

Let me tell you about the night I accidentally created the best version of meatloaf I’ve ever made. I was trying to meal prep for the week but didn’t have time to wait an hour for a traditional meatloaf to bake. So I said “screw it” and divided the mixture into individual portions. Game. Changer.
These mini Garlic Parmesan Chicken Meatloaves cook in less than half the time, they’re portion-controlled (which my waistline appreciated), and somehow they turned out even more flavorful than the big loaf version. The increased surface area means more of that gorgeous golden crust, and everyone gets their own perfect serving.
My family now refuses to go back to traditional meatloaf. And honestly? I don’t blame them. When something is this easy and tastes this good, why would you?
Why You’ll Love This Recipe
They cook ridiculously fast. Traditional meatloaf takes forever to bake through. These mini versions? Done in 20-25 minutes. That’s weeknight dinner territory, my friends. You can have comfort food on the table faster than ordering takeout.
Portion control without the math. Each meatloaf is one perfect serving. No guessing, no cutting wonky slices, no fighting over who got the bigger piece. Everyone gets their own personal meatloaf, and there’s something oddly satisfying about that.
Healthier than beef meatloaf. Ground chicken is leaner than beef but still gives you all that protein and satisfaction. You’re getting comfort food that actually aligns with your health goals. Plus, the garlic and Parmesan add so much flavor that you don’t miss the fattier meat at all.
Kid-approved and adult-delicious. My pickiest eater devours these. Something about having their “own” meatloaf makes kids excited to eat them. But the garlic-Parmesan combo keeps it interesting enough that adults aren’t bored.
Meal prep champion. Make a double batch on Sunday, and you’ve got protein sorted for the week. They reheat beautifully and taste just as good day three as they do fresh out of the oven.
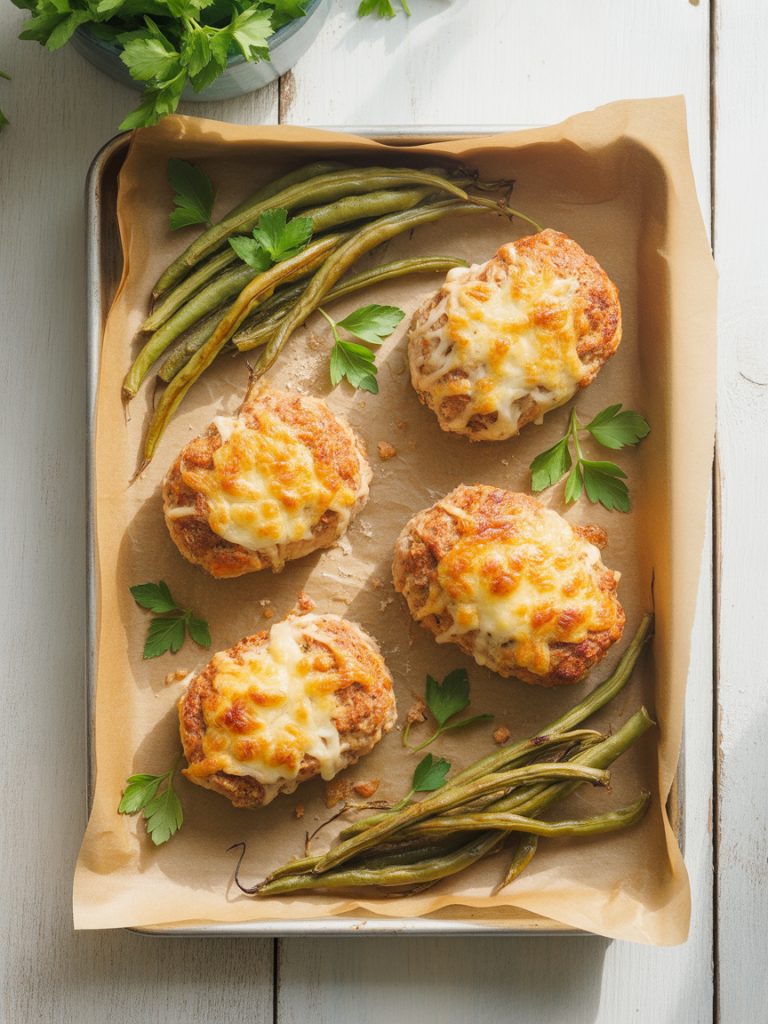
More crust = more flavor. Here’s the thing about individual meatloaves—you get way more of that delicious caramelized exterior. If you’re a crust person (and who isn’t?), this is your new favorite recipe.
Ingredients
For the Chicken Meatloaves:
- 1.5 lbs ground chicken (I prefer a mix of white and dark meat for moisture)
- Key note: Ground turkey works great too if that’s what you’ve got.
- 2/3 cup breadcrumbs (plain or Italian-style)
- Key note: Panko makes them lighter and fluffier. Use gluten-free breadcrumbs if needed, or swap for almond flour for low-carb.
- 1/2 cup grated Parmesan cheese, plus extra for topping
- Key note: Use the good stuff here—freshly grated Parmesan makes a real difference in flavor.
- 2 large eggs, lightly beaten
- 4 cloves garlic, minced (because we’re not playing around with garlic here)
- 1/4 cup fresh parsley, finely chopped
- Key note: Fresh is best, but 2 tablespoons dried parsley works in a pinch.
- 1 tablespoon Italian seasoning
- 1 teaspoon onion powder
- 1 teaspoon salt
- 1/2 teaspoon black pepper
- 1/4 cup milk (any kind—whole, 2%, even almond milk works)
- Key note: This keeps the meatloaves moist and tender. Don’t skip it!
For the Topping:
- 1/4 cup grated Parmesan cheese
- 2 tablespoons melted butter
- 2 cloves garlic, minced
- Fresh parsley for garnish
Optional Glaze (if you want it saucy):
- 1/2 cup marinara sauce
- Key note: Brush this on during the last 5 minutes of baking for a chicken parmesan vibe.
Step-by-Step Instructions
Step 1: Prep and Preheat
Preheat your oven to 400°F. Line a baking sheet with parchment paper or lightly grease it with cooking spray. Trust me, the parchment paper makes cleanup so much easier, and these babies won’t stick.
Step 2: Mix Your Meatloaf Base
In a large mixing bowl, combine your ground chicken, breadcrumbs, Parmesan cheese, eggs, minced garlic, chopped parsley, Italian seasoning, onion powder, salt, pepper, and milk.
Here’s the important part: mix everything together with your hands until just combined. Don’t overmix—you’re not kneading bread here. Overmixing makes the meatloaf tough and dense, and nobody wants that. Mix until everything is evenly distributed, then stop.
Step 3: Shape Those Loaves
Divide the mixture into 4 equal portions. Shape each portion into an oval or rectangular mini loaf, about 4-5 inches long and 2-3 inches wide. Think personal-sized, not massive.
Place them on your prepared baking sheet with a few inches between each one. They’ll shrink slightly as they cook, so don’t worry about them spreading too much.
Step 4: Prepare the Garlic Butter Topping
In a small bowl, mix together the melted butter and minced garlic. This is going to be your flavor bomb topping. Brush this garlic butter generously over the top of each meatloaf. Then sprinkle the extra Parmesan cheese on top.
This creates that gorgeous golden crust that makes these meatloaves irresistible. Don’t be shy with it.
Step 5: Bake to Golden Perfection
Pop the baking sheet into your preheated oven and bake for 20-25 minutes. You’re looking for an internal temperature of 165°F when you stick a meat thermometer in the thickest part of the meatloaf.
The tops should be golden brown and slightly crispy, and the cheese should be melted and bubbly. If you want them extra crispy on top, hit them with the broiler for the last 1-2 minutes—but watch them closely so they don’t burn.
Step 6: Optional Sauce Step
If you’re going for that chicken parmesan vibe, brush marinara sauce over each meatloaf during the last 5 minutes of baking, then sprinkle with a bit more mozzarella cheese. Let it melt and get bubbly. It’s not traditional meatloaf anymore, but who cares when it tastes this good?
Step 7: Rest and Serve
Let the meatloaves rest for about 5 minutes after pulling them from the oven. This lets the juices redistribute so they stay moist when you cut into them. Garnish with fresh parsley and serve hot.
Serving Suggestions
These Garlic Parmesan Chicken Meatloaves are versatile and pair well with just about any side you can think of:
Classic mashed potatoes are always a winner. The creamy potatoes soak up any juices from the meatloaf, and it’s pure comfort food heaven. Add some garlic to the mash to keep the theme going.
Roasted vegetables like Brussels sprouts, broccoli, or green beans balance the richness of the meatloaves perfectly. Toss them with olive oil, salt, and pepper, and roast them on a separate sheet alongside the meatloaves.
Pasta with marinara turns this into a deconstructed chicken parmesan situation. Cook your favorite pasta, top it with marinara, and serve the meatloaf on the side or sliced on top. Add extra Parmesan because why not?
A fresh Caesar salad with crunchy croutons and shaved Parmesan keeps things lighter but still satisfying. The crisp lettuce cuts through the richness of the meatloaf nicely.
Garlic bread on the side. I mean, if you’re already committed to the garlic theme, you might as well go all in, right? 🙂
Cauliflower mash if you’re keeping it low-carb. It’s lighter than regular mashed potatoes but still gives you that creamy, comforting side.
Storage Tips
Refrigerator: Store leftover meatloaves in an airtight container in the fridge for up to 4 days. They actually make fantastic meal prep—just grab one, reheat it, and pair it with whatever sides you’ve got.
Reheating: Warm them up in the microwave for 1-2 minutes, or reheat in a 350°F oven for about 10 minutes until heated through. The oven method keeps them from getting rubbery, which can happen in the microwave if you overdo it.
Freezing: These freeze beautifully! Let them cool completely, then wrap each meatloaf individually in plastic wrap and place them in a freezer-safe bag or container. They’ll keep for up to 3 months.
Thawing and Reheating from Frozen: Thaw overnight in the fridge, then reheat as directed above. Or, if you’re in a rush, you can reheat them straight from frozen in a 350°F oven for about 25-30 minutes, covered with foil to prevent them from drying out.
Meal Prep Tip: I like to make a double batch—eat some fresh for dinner, then freeze the rest individually. Future you will be incredibly grateful on those nights when cooking feels impossible. Just pop one in the oven, and dinner is basically done.
Final Thoughts
Here’s what I love most about these Garlic Parmesan Chicken Meatloaves—they prove that comfort food doesn’t have to be complicated or time-consuming. Sometimes the best recipes are the ones that you can throw together on a random Tuesday and still feel like you really cooked.
These little guys have become one of my most-requested recipes, and I get it. They’re fast, they’re tasty, they’re healthier than traditional meatloaf, and they make you feel like you’ve got your act together even when you absolutely don’t.
So whether you’re meal prepping for the week or just trying to get dinner on the table before everyone mutinies, give these a shot. I think you’re going to love them as much as my family does.
Now let’s get cooking!
— Kip
Garlic Parmesan Chicken Meatloaves (Mini Meatloaf Perfection!)
Description
These Garlic Parmesan Chicken Meatloaves are a lighter, faster take on traditional meatloaf. Made with lean ground chicken, loaded with garlic and Parmesan cheese, and baked to golden perfection in individual portions. They're moist, flavorful, and perfect for busy weeknights when you want comfort food without the wait.
Ingredients
Meatloaves:
Topping:
Optional:
Instructions
-
Preheat oven to 400°F. Line baking sheet with parchment paper.
-
In large bowl, combine ground chicken, breadcrumbs, Parmesan, eggs, garlic, parsley, Italian seasoning, onion powder, salt, pepper, and milk. Mix with hands until just combined—don't overmix.
-
Divide mixture into 4 equal portions. Shape each into an oval mini loaf (4-5 inches long). Place on prepared baking sheet.
-
Mix melted butter with minced garlic. Brush over each meatloaf. Sprinkle with extra Parmesan cheese.
-
Bake 20-25 minutes until internal temperature reaches 165°F and tops are golden brown.
-
Optional: Brush with marinara sauce during last 5 minutes of baking.
-
Let rest 5 minutes. Garnish with fresh parsley and serve.
Note
- Ground turkey works as substitute
- Use gluten-free breadcrumbs for GF version
- Panko makes lighter texture
- Don't overmix or meatloaves will be tough
- Individual portions cook faster than traditional loaf
- Can make one large loaf—bake 45-50 minutes at 375°F
- These freeze perfectly for meal prep
