

Every Easter, people spend hours on the main dish. The ham, the lamb, the sides — all of it gets so much attention. And then there’s the bread basket sitting there with some store-bought dinner rolls that nobody’s really excited about. Sound familiar?
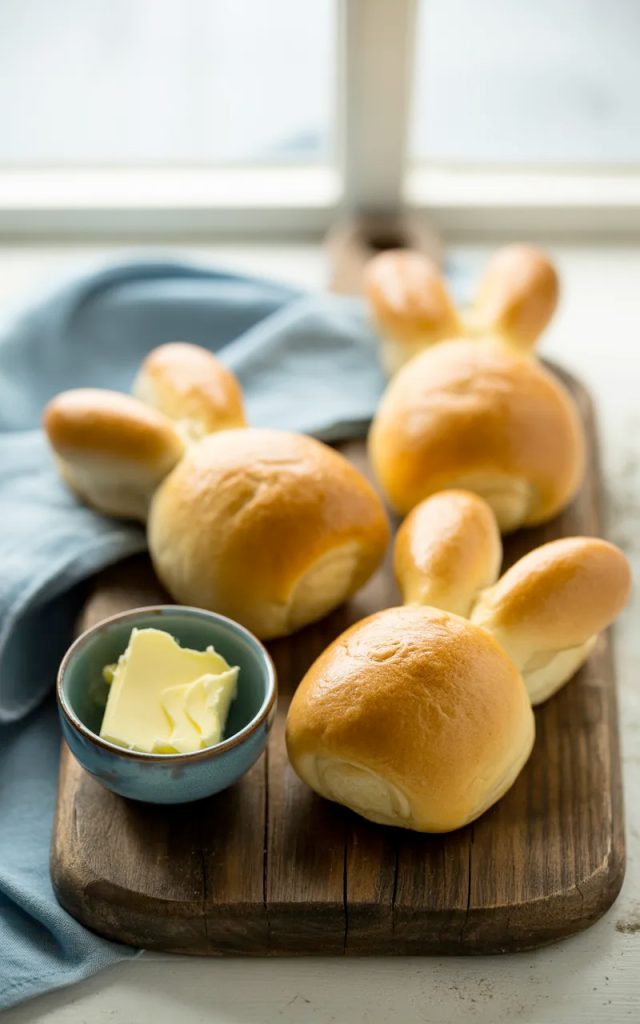
This year, that changes. These Easter Bunny Buns are soft, pillowy, golden, and shaped into the most ridiculously cute little bunnies you’ve ever put on a table. The kind of thing where guests walk in, see them, and immediately grab their phones before they even say hello. And the best part? The dough itself is a simple, beginner-friendly recipe that delivers an incredibly tender, fluffy roll every single time.
I’ll be straight with you — the shaping takes a little patience. But it’s not difficult, and I’m going to walk you through every step. Plus, this is genuinely one of the most fun baking projects you can do with kids. They go absolutely wild for it. So grab your apron, clear some counter space, and let’s make the most memorable Easter bread your family has ever had.
Why You’ll Love This Recipe
- They stop people in their tracks. Bunny-shaped bread on the Easter table is an instant conversation starter. Nobody expects it and everybody loves it. The wow factor here is seriously off the charts.
- The dough is incredibly forgiving. This is a simple enriched dough — eggs, butter, milk, yeast. It comes together easily, rises beautifully, and the shaping is way more intuitive than it looks.
- Soft and fluffy on the inside, golden on the outside. These are not your average dinner rolls. That buttery, pillowy crumb with a perfectly golden crust is what makes them disappear so fast.
- A perfect activity to do with kids. Shaping these bunnies is genuinely fun and kids can absolutely help with it. Rolling the dough, forming the ears, placing the little tail — they love every second of it.
- Works for breakfast or dinner. Serve them warm at Easter brunch with honey butter or alongside your main Easter dinner. They work beautifully either way.
- Make-ahead friendly. You can shape the buns the night before, refrigerate them overnight, and bake fresh in the morning. Minimal stress, maximum freshness.
Ingredients
For the Dough
- 3 1/2 cups all-purpose flour — spooned and leveled. You may need up to 1/4 cup more depending on your dough consistency, but add it gradually. Too much flour = dense rolls.
- 2 1/4 tsp active dry yeast (1 packet) — make sure your yeast is fresh. If it doesn’t foam up during proofing, it’s dead and your rolls won’t rise. Always check the expiration date before you start.
- 1/4 cup granulated sugar — feeds the yeast and adds just a touch of sweetness to the rolls.
- 1 tsp salt — essential for flavor. Don’t skip it.
- 3/4 cup whole milk, warmed — should feel warm to the touch but not hot. Around 110°F is ideal. Too hot and you’ll kill the yeast. Too cold and it won’t activate.
- 1/4 cup unsalted butter, melted — adds richness and that tender, soft crumb you want.
- 2 large eggs — room temperature. One goes into the dough, one is for the egg wash later.
- 1 tsp vanilla extract — a small addition that gives these rolls a subtle warmth that sets them apart from standard dinner rolls.
For the Egg Wash
- 1 large egg — beaten with a tablespoon of water. This is what gives the bunnies that beautiful golden color when they bake. Don’t skip it — the difference is night and day.
- 1 tbsp water
Step-by-Step Instructions
Step 1: Proof the Yeast
- Combine warm milk, sugar, and yeast in a large bowl or the bowl of your stand mixer. Stir gently and let it sit for 5 to 10 minutes. You’re looking for it to get foamy and fragrant — that means your yeast is alive and ready to work. If nothing happens after 10 minutes, start over with fresh yeast.
Step 2: Make the Dough
- Add the melted butter, one egg, and vanilla extract to the yeast mixture. Stir to combine.
- Add the flour and salt and mix until a shaggy dough forms. If you’re using a stand mixer, switch to the dough hook at this point. If you’re doing it by hand, get ready to put in a little work.
- Knead the dough for 8 to 10 minutes — either on a lightly floured surface by hand or in your stand mixer on medium speed. You’re looking for a smooth, elastic dough that springs back when you poke it. It should be slightly tacky but not sticky. If it’s sticking to your hands, add flour one tablespoon at a time.
Step 3: First Rise
- Shape the dough into a ball and place it in a lightly greased bowl. Cover with plastic wrap or a clean kitchen towel and let it rise in a warm spot for 1 hour, or until doubled in size. If your kitchen is cold, pop the bowl in your oven with just the oven light on — it creates the perfect warm environment.
Step 4: Shape the Bunny Buns
- Punch down the risen dough and transfer it to a lightly floured surface. Divide it into 12 equal pieces. A kitchen scale makes this easy — each piece should be around 65 to 70 grams.
- For each bunny, take one piece of dough and divide it into three parts — one larger piece for the body (about 60% of the dough) and two smaller pieces for the ears and tail.
- Roll the large piece into a smooth oval ball — this is the bunny body. Place it on your parchment-lined baking sheet.
- Roll two thin ropes from one of the smaller pieces — each about 5 inches long. These are the ears. Twist them together gently, then press one end of the twist onto the top of the body. Fan the two rope ends out slightly to form the ear shape.
- Roll the remaining small piece into a tiny smooth ball — this is the tail. Press it firmly onto the bottom of the body. Make sure it’s secured well so it doesn’t roll off during baking.
- Repeat for all 12 buns. Don’t worry if they’re not all identical — that’s part of the handmade charm. Nobody expects machine precision from homemade Easter bread.
Step 5: Second Rise
- Cover the shaped buns loosely with plastic wrap or a clean towel and let them rise again for 30 minutes. They’ll puff up and get noticeably fuller — that’s exactly what you want before they go into the oven.
Step 6: Egg Wash and Bake
- Preheat your oven to 375°F (190°C) while the buns are doing their second rise.
- Brush each bun gently with the egg wash — including the ears and tail. Use a light hand and don’t press down or you’ll deflate all that beautiful rise.
- Bake for 15 to 18 minutes until golden brown all over. Keep an eye on them from the 15-minute mark — ovens vary and these can go from golden to overdone fairly quickly.
- Remove from the oven and brush immediately with a little melted butter for extra shine and flavor while they’re still hot. Let them cool for at least 10 minutes before serving.
Serving Suggestions
These bunny buns are delicious totally on their own, but here are some ways to make them even more special on your Easter table:
- Serve warm with honey butter. Just whip softened butter with a drizzle of honey and a pinch of salt. It takes about 2 minutes and it is absolutely the move with these rolls.
- Add a side of strawberry or raspberry jam. The sweetness of the jam against the buttery bread is a combination that works every single time.
- Pair with your Easter brunch spread. These sit beautifully alongside eggs, quiche, fresh fruit, and mimosas. They pull double duty as a bread and a centerpiece.
- Serve alongside Easter dinner. Place them in a lined basket in the center of the table as your dinner roll. They complement ham, lamb, or any roasted protein perfectly.
- Let kids personalize theirs. Set out small bowls of honey, jam, and flavored butters and let everyone dress their own bunny. It keeps little hands busy and makes the meal more fun.
Storage Tips
- Room Temperature: Store cooled buns in an airtight container or zip-lock bag at room temperature for up to 2 days. They stay soft if sealed properly.
- Refrigerator: These keep well in the fridge for up to 5 days in an airtight container. Warm them in the microwave for 15 to 20 seconds or in a 300°F oven for 5 minutes before serving.
- Freezer: These freeze beautifully. Let them cool completely, then wrap individually in plastic wrap and place in a freezer bag. Freeze for up to 2 months. Thaw at room temperature or warm in the oven straight from frozen at 300°F for about 10 minutes.
- Make-Ahead Option: Shape the buns, place them on the baking sheet, cover tightly with plastic wrap, and refrigerate overnight after shaping. In the morning, take them out and let them come to room temperature and complete their second rise — about 45 minutes to 1 hour — then bake as directed. Fresh buns with almost no morning effort.
Go Make the Cutest Thing on Your Easter Table
Here’s the truth — nobody remembers the store-bought dinner rolls. But they will absolutely remember these. Soft, golden, shaped like little bunnies sitting right there in the bread basket. That’s the kind of detail that makes a holiday meal feel special and thoughtful.
And yeah, it takes a little more time than ripping open a can of crescent rolls. But the process is genuinely enjoyable, the results are stunning, and the look on people’s faces when they see them on the table? Worth every single minute.
Give these a try this Easter and let me know how the shaping goes in the comments below. And if you make them, please tag me on Pinterest or Instagram — I want to see your bunny buns. Happy baking.
— Kip
