

Every Easter I tell myself I am going to make something simple. And every Easter I end up staring at a kitchen full of ingredients wondering how I got here. Sound familiar? This year I decided to actually mean it when I said simple — and these banana pudding Easter truffles are the result of that commitment.
No oven. No complicated decorating skills. No candy thermometer or piping bags or anything that requires a YouTube tutorial to figure out. Just a creamy banana pudding filling made with ingredients you can grab at any grocery store, rolled into balls, dipped in white chocolate, and decorated with pastel sprinkles that make them look absolutely adorable. My kids helped decorate them and had the best time doing it. The truffles were half gone before they even made it to the Easter table.
What I love most about this recipe is that it hits that sweet spot between impressive and effortless. People see them on the table and immediately think you spent hours in the kitchen.
The truth — which you are absolutely not obligated to share — is that the whole thing took you less than 30 minutes of actual work. The rest was just waiting for them to chill in the fridge. That is the kind of Easter dessert I can get behind every single year.
Why you’ll love these banana pudding Easter truffles
- No oven required. This is a fully no-bake recipe from start to finish. No preheating, no baking, no timing anything in the oven. Just mixing, rolling, dipping, and chilling. It is the perfect Easter dessert for anyone who wants something festive without the heat or the stress.
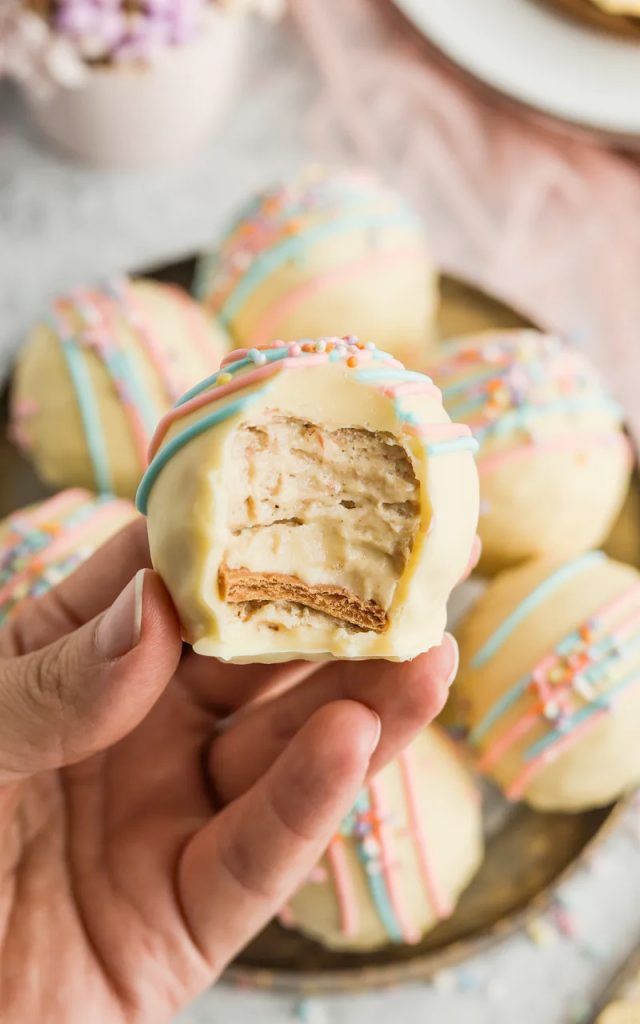
- They look absolutely stunning. The white chocolate coating paired with pastel pink and blue drizzles and colorful sprinkles makes these truffles look like they came from a professional candy shop. They are genuinely beautiful on an Easter table and require zero artistic skill to pull off.
- The banana pudding flavor is completely addictive. The filling combines the classic banana pudding flavor everyone loves — creamy, sweet, with that distinct vanilla wafer undertone — into a dense, fudgy truffle center that is incredibly satisfying. One is never enough. Brace yourself accordingly.
- Perfect for making with kids. Rolling the truffle balls and decorating with sprinkles is genuinely fun for children of all ages. This is one of those recipes that doubles as an Easter activity and comes out with a delicious result at the end. That is a rare and beautiful thing.
- Make-ahead friendly. These truffles can be made up to three days ahead and stored in the refrigerator, which means you can cross one thing off your Easter prep list early and not have to think about it again until it is time to serve them.
- Completely customizable for any occasion. The banana pudding filling works all year round. Swap the pastel Easter decorations for red and green sprinkles at Christmas, orange and black for Halloween, or red and pink for Valentine’s Day. One base recipe, endless seasonal versions.
Ingredients you’ll need
For the banana pudding filling:
- 8 oz cream cheese, softened to room temperature
- 1 box (3.4 oz) instant banana pudding mix, dry
- 1/4 cup powdered sugar
- 1 teaspoon vanilla extract
- 2 cups crushed vanilla wafers (about 50 wafers)
- 2–3 tablespoons whole milk (as needed for consistency)
For the white chocolate coating:
- 2 cups white chocolate chips or white melting wafers
- 1 tablespoon coconut oil or vegetable shortening
For decorating:
- Pastel pink candy melts or pink white chocolate for drizzling
- Pastel blue candy melts or blue white chocolate for drizzling
- Pastel sprinkles or Easter-themed sprinkle mix
- Mini cupcake liners for serving (optional but recommended)
Key ingredient notes:
Cream cheese, softened — The cream cheese is the binding agent for the filling and it needs to be genuinely at room temperature before you start. Cold cream cheese will leave lumps in your filling no matter how long you mix it. Take it out of the refrigerator at least 30–45 minutes before you begin. The cream cheese adds a slight tang that balances the sweetness of the banana pudding and keeps the filling from tasting one-dimensional.
Instant banana pudding mix, dry — Add this straight into the filling dry — do not prepare it according to the box instructions. The dry mix goes directly into the cream cheese mixture and gives the filling its signature banana pudding flavor and a slightly dense, fudgy texture. Make sure you grab the instant version and not the cook-and-serve kind. The flavor difference between banana pudding brands can be noticeable so use your preferred brand.
Crushed vanilla wafers — These are the texture backbone of the filling. They add bulk, a slight crunch in the fudgy filling, and that classic vanilla wafer flavor that is inseparable from banana pudding. Crush them in a zip-lock bag with a rolling pin or pulse them in a food processor until they are fine crumbs. A few slightly larger pieces in the mix are perfectly fine and actually add a nice textural contrast inside the truffle.
White chocolate chips vs white melting wafers — White melting wafers are easier to work with for dipping because they melt more smoothly and set with a glossier finish than regular white chocolate chips. If you use white chocolate chips, add the coconut oil or shortening to help them melt more smoothly and thin the consistency enough for even dipping. Either works well — melting wafers just make the process a little more forgiving, especially if this is your first time making dipped truffles.
Coconut oil in the coating — This is what gives the white chocolate coating a slightly thinner, more fluid consistency that makes dipping easier and results in a smooth, even coat rather than a thick clumpy one. Use refined coconut oil for a completely neutral flavor. One tablespoon is all you need.
Step-by-step instructions
Part 1: Make the banana pudding filling
Step 1: Beat the cream cheese
In a large mixing bowl, beat the softened cream cheese with a hand mixer or stand mixer on medium speed for about 1–2 minutes until it is completely smooth, light, and free of lumps. This step is what determines the texture of your filling — take the time to get it fully smooth before adding anything else.
Step 2: Add the pudding mix, powdered sugar, and vanilla
Add the dry instant banana pudding mix, powdered sugar, and vanilla extract to the beaten cream cheese. Mix on low speed until combined, then increase to medium and beat for another minute until the mixture is smooth, uniform, and slightly fluffy. The mixture will be thick and pale yellow at this point.
Step 3: Fold in the crushed vanilla wafers
Add the crushed vanilla wafers to the cream cheese mixture and fold them in with a rubber spatula until fully incorporated. The mixture will become quite thick and dense — this is exactly what you want for rolling into balls. If the mixture feels too stiff to roll into smooth balls, add milk one tablespoon at a time and mix until it reaches a consistency that holds its shape when pressed but is not crumbly.
Step 4: Chill the filling
Cover the bowl with plastic wrap and refrigerate the filling for at least 30 minutes. Chilling firms up the filling and makes it much easier to roll into smooth, uniform balls without it sticking to your hands or losing its shape.
Part 2: Roll the truffle balls
Step 5: Portion and roll
Once the filling has chilled, use a small cookie scoop or a tablespoon to portion the filling into even amounts. Roll each portion between your palms in a circular motion to form a smooth ball. Each truffle should be roughly 1 inch in diameter — about the size of a large marble. Place the rolled balls on a parchment-lined baking sheet as you go.
Step 6: Freeze the rolled balls
Once all the truffles are rolled, place the baking sheet in the freezer for 15–20 minutes. Freezing the balls before dipping is the step that makes the coating process significantly easier — cold, firm truffles hold their shape when dipped and the chocolate sets almost immediately when it hits the cold surface, giving you a clean, smooth coating.
Part 3: Coat and decorate
Step 7: Melt the white chocolate
Melt the white chocolate chips or melting wafers with the coconut oil in a microwave-safe bowl in 30-second intervals, stirring thoroughly between each one, until the chocolate is completely smooth and fluid. Do not overheat — white chocolate burns easily and seized white chocolate cannot be saved. Alternatively, use a double boiler on the stovetop for more controlled melting.
Step 8: Dip the truffles
Working quickly with one or two truffles at a time from the freezer, lower each ball into the melted white chocolate using a fork or a dipping tool. Turn it gently to coat all sides completely, then lift it out and let the excess chocolate drip back into the bowl. Place the coated truffle back on the parchment-lined sheet. The chocolate should begin setting almost immediately thanks to the cold truffle inside.
Step 9: Add the pastel drizzles
Melt the pastel pink and pastel blue candy melts separately in small microwave-safe bowls in 30-second intervals until smooth. Transfer each color to a small zip-lock bag and snip a tiny corner off the tip. Drizzle the pink and blue melts back and forth over the tops of the coated truffles in thin diagonal lines to create that signature Easter look.
Step 10: Add the sprinkles
While the drizzles are still wet, immediately scatter pastel sprinkles over the tops of the truffles. The sprinkles need to go on before the drizzle sets or they will not stick. Work quickly — the candy melt drizzle sets fast, especially over the cold truffle centers.
Step 11: Set completely
Let the decorated truffles sit at room temperature for 5–10 minutes or return them to the refrigerator for 10 minutes until the coating and drizzles are fully set and hardened. Place each finished truffle in a mini cupcake liner for a clean, bakery-style presentation.
Serving suggestions
These truffles are gorgeous on their own but here are a few ways to make them even more of a moment:
- Arranged on a tiered dessert stand. Stack them on a tiered stand in the center of your Easter table and they instantly become the focal point of the dessert spread. The pastel colors against a white serving piece look stunning and require zero extra effort.
- Packed in Easter gift boxes. Line a small gift box or Easter basket with tissue paper, arrange 6–8 truffles inside, and you have got one of the most charming homemade Easter gifts imaginable. Tie it with a ribbon and nobody will believe you made them yourself in under 30 minutes.
- As part of an Easter dessert platter. Arrange the truffles alongside Easter sugar cookies, mini chocolate eggs, and fresh strawberries on a large marble or white serving board. The pastel drizzles and sprinkles on the truffles tie the whole platter together visually.
- Served at an Easter egg hunt after-party. These are the perfect finger food dessert for a crowd of kids and adults after an Easter egg hunt. They are bite-sized, not messy once the coating has fully set, and universally loved by everyone from toddlers to grandparents.
- As a fun Easter activity with kids. Set up a decorating station with different colored drizzles and sprinkle mixes and let kids decorate their own truffles. It is one of those activities that is genuinely fun, produces something delicious, and keeps everyone busy for a solid chunk of time. That is a win on every level.
Storage tips
Refrigerator: Store the finished truffles in a single layer in an airtight container in the refrigerator for up to 5 days. If you need to stack them, place a sheet of parchment paper between layers to protect the decorations and prevent the truffles from sticking to each other. The white chocolate coating stays firm and the filling stays perfectly creamy when kept cold.
Room temperature: These truffles can sit at room temperature for up to 2 hours during serving without any issues. Beyond that, the cream cheese filling can start to soften in a warm environment, especially in a heated room. If you are serving them at an outdoor spring event, keep them in a cooler until right before serving.
Freezer: These truffles freeze beautifully. Place the fully decorated and set truffles in a single layer on a baking sheet and freeze for 1 hour, then transfer to a freezer-safe airtight container or zip-lock bag with parchment between layers. They keep for up to 2 months. Thaw in the refrigerator overnight before serving — do not thaw at room temperature as condensation can cause the white chocolate coating to develop a spotted or streaky appearance.
Make-ahead tip: You can make the filling and roll the truffle balls up to 3 days ahead and store them uncoated in the refrigerator. When you are ready to serve, dip and decorate fresh. This makes the whole process feel much more manageable if you are preparing for a large Easter gathering and want to spread the work across a couple of days.
Closing
These banana pudding Easter truffles are the kind of recipe that earns you a reputation. The reputation of someone who puts real thought and care into what they bring to the table — even when the truth is that you made them in your kitchen in under 30 minutes while half-watching something on TV. Your secret is safe here.
Whether you are making them for a big Easter gathering, packing them into gift boxes for people you care about, or just making a batch because banana pudding anything is always a good idea — I hope they bring as much joy to your table as they do to mine every single spring.
Make them, share them, and tag me on Pinterest and Instagram when you do. Seeing your pastel drizzled truffles genuinely makes my Easter. And if your kids eat half of them before they make it to the table, well — that just means you need to make a double batch next time.
Happy Easter and happy cooking — Kip
Banana pudding Easter truffles (the cutest no-bake treat of the season)
Description
These banana pudding Easter truffles are the no-bake dessert that is going to steal the show at your Easter table this year. A creamy, sweet banana pudding filling made with crushed vanilla wafers and cream cheese gets rolled into smooth balls, dipped in white chocolate, and decorated with pastel colored drizzles and sprinkles that make them look like they came straight from a bakery. No oven required, no complicated techniques, and they come together in under 30 minutes plus chilling time. Make them ahead, gift them in a pretty box, or pile them on a platter and watch every single one disappear.
Ingredients
For the banana pudding filling:
For the white chocolate coating:
For decorating:
Instructions
-
Beat softened cream cheese until completely smooth and lump-free, about 1–2 minutes.
-
Add dry banana pudding mix, powdered sugar, and vanilla extract. Beat until smooth and uniform.
-
Fold in crushed vanilla wafers until fully incorporated. Add milk one tablespoon at a time if the mixture feels too stiff.
-
Cover and refrigerate the filling for at least 30 minutes until firm.
-
Scoop and roll the chilled filling into 1-inch balls. Place on a parchment-lined baking sheet.
-
Freeze the rolled balls for 15–20 minutes until very firm.
-
Melt white chocolate chips and coconut oil together in 30-second microwave intervals until smooth.
-
Dip each frozen truffle ball into the melted white chocolate, coat completely, and place back on the parchment sheet.
-
Melt pastel pink and blue candy melts separately and transfer to small zip-lock bags with a tiny corner snipped off.
-
Drizzle pink and blue melts over the coated truffles in thin diagonal lines.
-
Immediately add pastel sprinkles while the drizzle is still wet.
-
Let set completely at room temperature or in the refrigerator for 10 minutes. Place in mini cupcake liners to serve.
