

If you have spent any time on food social media in the last few years you have almost certainly seen a sushi bake. And if you saw one and immediately thought that looks absolutely incredible but also wondered whether it was actually as good as it looks — the answer is yes. It is exactly as good as it looks and honestly might be better.
The sushi bake is a genius concept that takes the flavors and components of a spicy salmon roll — seasoned sushi rice, creamy spicy salmon, the briny pop of tobiko, the clean freshness of green onion — and assembles them into a warm baked casserole that serves a crowd without the painstaking roll-by-roll process of traditional sushi making. It is Japanese comfort food in its most approachable, shareable form and it has earned every bit of the attention it gets.
I made this for the first time at a dinner party when I wanted something impressive that did not require me to have professional sushi skills — which I very much do not have. The reaction around the table was immediate and enthusiastic. People were scooping it onto nori sheets, eating it straight from the dish, asking for the recipe before dessert had even been mentioned. It has since become one of my most requested recipes and once you make it once you will completely understand why.
Why you’ll love this recipe
- All the flavor of a spicy salmon roll without the rolling skill required. You get every element that makes a spicy salmon roll so good — the seasoned rice, the creamy spicy salmon, the toppings — assembled into a casserole that literally anyone can make.
- Perfect for feeding a crowd. This dish is designed to be shared and it scales beautifully. Double it for a larger gathering, make it in two pans, serve it family style and watch it disappear.
- That broiled top is genuinely spectacular. The spicy salmon mixture caramelizes and chars slightly under the broiler creating a golden, slightly crispy top that smells incredible and tastes even better.
- Ready in 45 minutes. Fast enough for a weeknight dinner and impressive enough for a dinner party. This recipe does not ask you to choose between speed and quality.
- Interactive and fun to eat. Serving this with nori sheets and letting people scoop their own portions makes dinner feel like an experience rather than just a meal. Everyone loves a build-your-own situation.
- Naturally dairy free and gluten free adaptable. The base recipe is dairy free and can easily be made gluten free with one simple swap making it accessible for a range of dietary needs.
Ingredients with key notes
For the sushi rice base
- 2 cups uncooked sushi rice — Short grain Japanese sushi rice is essential here — do not substitute with long grain or jasmine rice. The starchy, sticky quality of short grain sushi rice is what gives the base its characteristic texture and ability to hold together when scooped. Rinse the rice thoroughly under cold water until the water runs clear before cooking to remove excess starch.
- 2.5 cups water — For cooking the rice. The standard ratio for sushi rice is slightly less water than for regular rice to produce a firmer, stickier grain.
- 3 tbsp rice wine vinegar — The essential seasoning for sushi rice. Gives the cooked rice that characteristic slightly tangy, subtly sweet flavor that makes sushi rice taste like sushi rice and not just plain cooked rice.
- 1.5 tbsp granulated sugar — Dissolved with the vinegar and salt to make the sushi rice seasoning mixture.
- 1 tsp salt — Part of the sushi rice seasoning. Balances the vinegar and sugar perfectly.
- 2 tbsp Japanese mayonnaise (Kewpie) — Mixed into the cooked sushi rice before spreading in the baking dish. Adds a subtle richness and slight creaminess to the rice base that makes it more indulgent. Kewpie mayo has a richer, slightly sweeter flavor than regular American mayonnaise — look for it in the Asian aisle of most grocery stores.
- 1 tbsp sriracha — Mixed into the rice along with the mayo for a subtle heat running through the base layer.
For the spicy salmon topping
- 1.5 lbs fresh salmon fillets, skin removed — Fresh salmon gives the best flavor and texture for this dish. Remove the skin and cut into rough cubes before cooking. You can use raw salmon that cooks in the oven or lightly sear it first for more flavor — both methods work.
- 1/2 cup Japanese mayonnaise (Kewpie) — The creamy base of the salmon topping. Do not substitute with regular mayonnaise — Kewpie has a completely different flavor profile that is essential to the authentic taste of this dish.
- 2–3 tbsp sriracha — Controls the heat level of the salmon topping. Start with 2 tablespoons for medium heat and add more to taste. This is where the spicy in spicy salmon bake comes from so adjust confidently based on your preference.
- 1 tbsp soy sauce or tamari — Adds a savory umami depth to the salmon mixture. Use tamari for a gluten free version.
- 1 tsp sesame oil — Adds a distinctive nutty, toasty flavor that is characteristic of Japanese-inspired dishes. A little goes a very long way.
- 1 tsp garlic powder — Adds a subtle savory background note to the salmon mixture.
- 2 oz cream cheese, softened — Optional but highly recommended. Adds an extra layer of creaminess to the salmon topping that makes it richer and helps it caramelize more beautifully under the broiler.
For toppings and serving
- Tobiko or masago (fish roe) — The small bright orange or red fish eggs that go on top after broiling. They add a briny, slightly sweet flavor and a beautiful pop of color and texture. Find them at Asian grocery stores or the sushi section of well-stocked supermarkets. Optional but they make the dish look and taste significantly more authentic.
- 3 green onions, thinly sliced — Scattered over the finished dish for freshness and a mild onion flavor.
- 1 tbsp sesame seeds, toasted — Adds a nutty flavor and visual interest to the finished dish.
- Fresh cilantro or parsley, roughly chopped — Adds a fresh herby finish to balance the richness of the salmon topping.
- Roasted nori sheets, cut into squares — For scooping and serving. Cut full nori sheets into quarters or sixths. The nori adds the seaweed flavor that ties the whole dish to its sushi origins and is genuinely essential to the full experience.
- Soy sauce and extra sriracha for serving
Step-by-step instructions
Step 1 — Cook the sushi rice
Rinse the sushi rice under cold running water in a fine mesh strainer, swirling with your hand, until the water runs almost completely clear — about 2–3 minutes. This removes excess surface starch and is the most important step for properly cooked sushi rice. Cook the rinsed rice with 2.5 cups of water according to your preferred method — rice cooker gives the most consistent results but stovetop works perfectly well. Bring to a boil, reduce to the lowest possible heat, cover and cook for 18 minutes then remove from heat and let steam covered for another 10 minutes without lifting the lid.
Step 2 — Season the sushi rice
While the rice is still hot mix together the rice wine vinegar, granulated sugar and salt in a small bowl or microwave for 20 seconds until the sugar and salt are completely dissolved. Transfer the hot cooked rice to a large wide bowl and pour the seasoning mixture over it. Fold gently with a rice paddle or rubber spatula using cutting motions rather than stirring — you want to coat every grain without mashing the rice. Fan the rice as you fold to help it cool slightly and develop that glossy sushi rice sheen. Once the seasoning is incorporated fold in the Kewpie mayo and sriracha.
Step 3 — Prepare the salmon
Preheat your oven to 400°F (200°C). Remove the skin from the salmon fillets and cut into roughly 1-inch cubes. Season lightly with salt and pepper. For raw assembly — place the salmon pieces directly in the baking dish on top of the rice and the salmon will cook in the oven. For a more developed flavor — heat a skillet over medium-high heat with a little oil and sear the salmon pieces for about 2 minutes per side until golden on the outside but still slightly undercooked in the center. Break the lightly cooked salmon into large flakes. Either method produces excellent results.
Step 4 — Make the spicy salmon mixture
In a large bowl combine the flaked or raw cubed salmon with the Kewpie mayo, sriracha, soy sauce, sesame oil, garlic powder and softened cream cheese if using. Mix gently until everything is well combined and the salmon is evenly coated in the creamy spicy mixture. Taste and adjust — more sriracha for heat, more soy sauce for saltiness and depth, more mayo for creaminess. The mixture should taste bold and slightly over-seasoned on its own since it sits on top of the relatively neutral rice base.
Step 5 — Assemble the sushi bake
Grease a 9×13 inch baking dish with a thin layer of oil or cooking spray. Spread the seasoned sushi rice in an even, firmly packed layer across the entire base of the dish pressing it down gently with a spatula or the back of a spoon to compact it slightly. Spread the spicy salmon mixture in an even layer directly on top of the rice covering it completely all the way to the edges.
Step 6 — Bake and broil
Bake at 400°F for 15 minutes until the salmon mixture is cooked through and heated completely. Then switch the oven to broil on high and broil for 3–5 minutes until the top is caramelized, golden and slightly charred at the edges. Watch this step closely — broilers vary significantly and the difference between perfectly caramelized and burnt is about 60 seconds. The finished top should look deep golden with slightly dark caramelized edges and the salmon should be cooked through with no raw center remaining.
Step 7 — Add toppings and serve
Remove from the oven and let rest for 2 minutes. Scatter the tobiko or masago generously over the top followed by the sliced green onions, toasted sesame seeds and fresh cilantro or parsley. Drizzle with a little extra sriracha and Kewpie mayo in a zigzag pattern across the top if desired — this is what gives it that dramatic restaurant-quality presentation. Serve immediately directly from the baking dish with nori sheets cut into squares on the side for scooping.
Serving suggestions
- Scooped onto roasted nori sheets. The absolute classic way to eat this and the most authentic experience. The nori adds the seaweed flavor that ties everything together and makes each bite feel like a proper sushi roll in casserole form.
- In lettuce cups. Butter lettuce or little gem lettuce leaves work beautifully as a fresh, crisp alternative to nori. Great for people who do not love seaweed or as a lower carb option.
- With extra Kewpie mayo and sriracha on the side. Set out small dipping bowls of both so everyone can customize the heat and creaminess level to their preference. This is genuinely important for a crowd since heat tolerance varies wildly.
- With a simple cucumber salad. A cool, lightly dressed cucumber salad with rice vinegar and sesame oil on the side provides a fresh, light contrast to the rich spicy salmon bake and rounds out the meal beautifully.
- As a party appetizer. Cut smaller nori pieces and let people make their own bite-sized portions. Set out all the toppings in small bowls for a build-your-own sushi bake station that makes for a genuinely interactive and fun party food experience.
- With miso soup. A simple bowl of miso soup alongside this sushi bake completes the Japanese-inspired meal perfectly and the warm, savory broth is a lovely contrast to the bold spicy salmon.
Storage tips
In the refrigerator
Store leftover sushi bake in an airtight container in the refrigerator for up to 3 days. Store the toppings — tobiko, green onions, sesame seeds and fresh herbs — separately and add them fresh when serving leftovers. The rice firms up considerably when cold which is normal for sushi rice.
Reheating
Reheat portions in the oven at 350°F for about 10 minutes or in a skillet over medium heat with a tiny splash of water to prevent sticking. The microwave works but heat in short 45-second bursts to avoid drying the salmon out. An air fryer at 370°F for 4–5 minutes actually produces the best reheating result — it revives some of that caramelized top texture that makes the dish so good fresh. Add fresh toppings after reheating.
Freezing
The sushi bake can be frozen for up to 1 month though the texture of the sushi rice changes slightly after freezing — it becomes a little less cohesive and slightly grainy.
If you plan to freeze it undercook the rice very slightly in the original batch so it holds up better after thawing. Freeze without the toppings. Thaw overnight in the refrigerator and reheat in the oven at 350°F until hot throughout.
Rinse sushi rice until water runs clear. Cook with 2.5 cups water. Let steam covered 10 minutes after cooking. Dissolve vinegar, sugar and salt together. Fold into hot rice with cutting motions.
Fold in Kewpie mayo and sriracha. Preheat oven to 400°F. Remove salmon skin and cut into cubes. Season lightly. Mix salmon with Kewpie mayo, sriracha, soy sauce, sesame oil, garlic powder and cream cheese until well combined.
Press seasoned rice into an even layer in a greased 9×13 baking dish. Spread spicy salmon mixture evenly on top. Bake at 400°F for 15 minutes. Switch to broil on high for 3–5 minutes until top is caramelized and golden. Rest 2 minutes. Top with tobiko, green onions, sesame seeds and fresh herbs. Drizzle with extra mayo and sriracha. Serve with nori sheets.
A quick word before you go
This spicy salmon sushi bake is one of those recipes that I genuinely get excited to make because the reaction it gets is so consistently enthusiastic. There is something about the combination of warm seasoned rice, creamy spicy salmon and that caramelized broiled top that hits every single satisfaction note simultaneously — rich, spicy, savory, fresh, crunchy. It is a complete experience in every bite.
What I love most about it is how it takes something that feels exclusive and technically demanding — sushi — and makes it completely accessible without sacrificing any of the flavor or the fun. You do not need professional skills, specialty equipment or an hour of rolling practice. You need a baking dish, some good salmon and about 45 minutes. That is it.
Make this one for your next dinner party or family dinner and watch the reaction. Drop a comment below and let me know how it went or tag me on Pinterest — I always love seeing your sushi bakes. Happy cooking. 🙂
— Kip
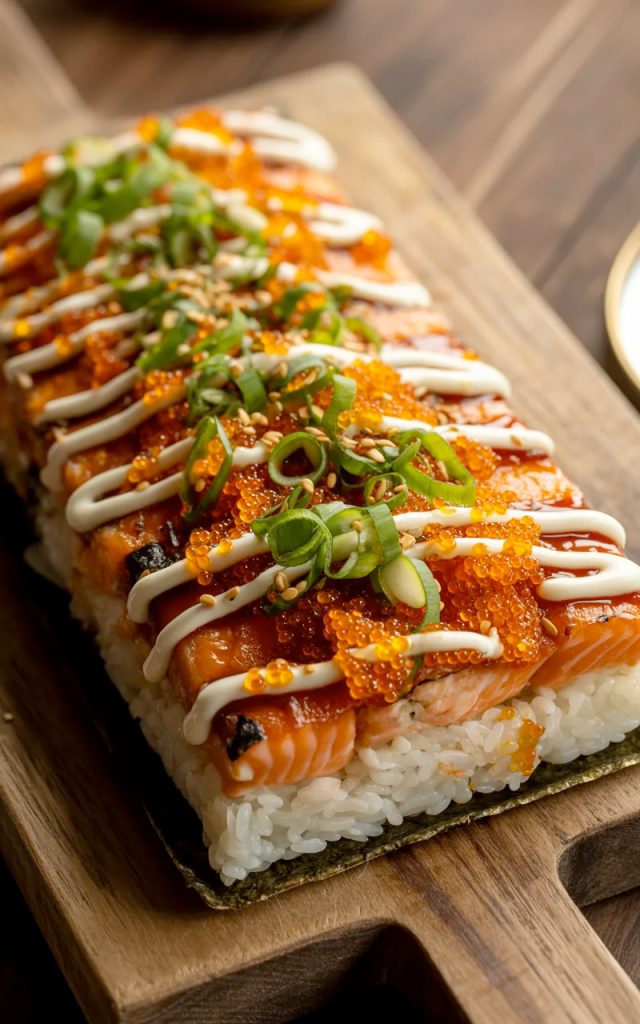
Spicy salmon sushi bake — bold, creamy and better than takeout
Description
This spicy salmon sushi bake is everything you love about a spicy salmon roll but made in a warm, shareable casserole format that feeds a crowd and comes together in about 45 minutes. A base of perfectly seasoned sushi rice is topped with a creamy, spicy salmon mixture made from fresh salmon, Japanese mayonnaise, sriracha and cream cheese, then broiled until caramelized and golden on top and finished with tobiko, sliced green onions, sesame seeds and fresh herbs. Every bite is rich, bold, slightly spicy and deeply satisfying in a way that makes it genuinely hard to stop eating. Serve it scooped onto sheets of roasted nori or lettuce leaves for a fun, interactive dinner that impresses absolutely everyone at the table.
