

Easter in my house has always been a big deal. Not just for the kids — honestly, more for me. There’s something about the season that makes me want to get creative in the kitchen, and a few years back I stumbled onto an idea that completely changed our Easter tradition.
I was scrolling through my feed, saw these stunning blue speckled eggs, and thought — I need to make those. What I didn’t expect was how simple the process actually is once you break it down.
The result? A tray of homemade chocolate eggs that had my whole family convinced I’d ordered them from some fancy artisan candy shop. I did not. I made them in my Kentucky kitchen on a Saturday afternoon. 🙂
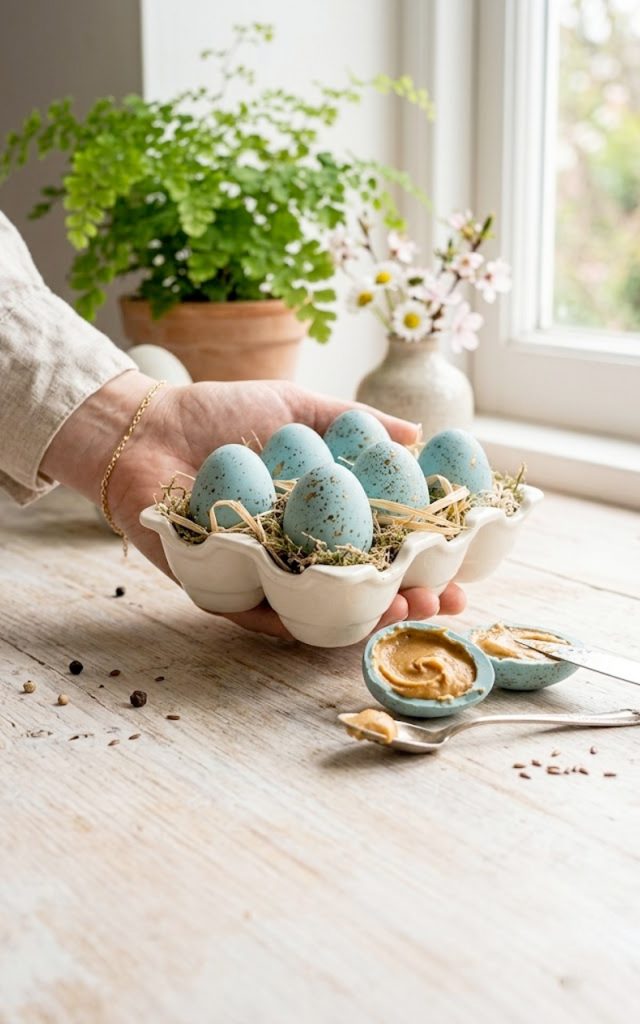
These speckled chocolate Easter eggs are filled with a thick, creamy peanut butter center, coated in a smooth robin’s egg blue chocolate shell, and finished with a hand-painted speckle effect that makes them look almost too pretty to eat. Almost. They disappear fast — FYI, make a double batch.
Why you’ll love this recipe
- They look incredibly impressive. That blue speckled shell is a genuine showstopper. Nobody will believe you made these at home.
- The filling is rich and satisfying. Creamy peanut butter mixed with powdered sugar and a touch of butter creates a filling that tastes like the inside of a Reese’s — but better.
- No baking required. This is a no-bake recipe from start to finish. Your oven gets the day off.
- Perfect for gifting. Nestle them in an egg carton and you have the most thoughtful homemade Easter gift anyone has ever received.
- Kid-friendly to make. The speckle step especially — kids absolutely love flicking the brush. Just maybe put down some newspaper first.
- Make-ahead friendly. You can make these days in advance and store them in the fridge. One less thing to stress about on Easter morning.
Ingredients and key notes
The chocolate shell
- 400g white chocolate, good quality — White chocolate is your base here because it takes on color beautifully. Cheap white chocolate can be waxy and difficult to work with. Use a brand you trust.
- Sky blue oil-based food coloring — This is important. You must use oil-based food coloring, not water-based. Water-based coloring will seize your melted chocolate and ruin the whole batch. Oil-based only.
- 1 tsp coconut oil — Helps thin the chocolate slightly for smoother coating and a glossier finish.
The peanut butter filling
- 1 cup creamy peanut butter — Use a standard commercial peanut butter like Jif or Skippy, not natural peanut butter. Natural peanut butter is too oily and the filling won’t hold its shape properly.
- 1 1/2 cups powdered sugar, sifted — This gives the filling its structure and sweetness. Sift it to avoid lumps.
- 3 tbsp unsalted butter, softened — Adds richness and helps bind everything together.
- 1/2 tsp vanilla extract — Just enough to round out the flavor.
- Pinch of salt — Balances the sweetness perfectly. Don’t skip it.
The speckle effect
- 1 tbsp cocoa powder — Your speckle color. It gives that authentic robin’s egg look.
- 1 tbsp vanilla extract or vodka — Mixed with the cocoa powder to create a paint-like consistency. Vodka evaporates faster and gives a cleaner speckle. Either works.
- A clean stiff-bristled brush — An old clean toothbrush or a small food-safe paintbrush works perfectly.
Step-by-step instructions
Step 1: Make the peanut butter filling
In a large mixing bowl, combine the softened butter, peanut butter, vanilla extract, and a pinch of salt. Mix until smooth and well combined. Add the sifted powdered sugar gradually, mixing as you go, until a thick dough forms. It should hold its shape when you press it together. If it feels too soft, add a little more powdered sugar. If it feels too dry and crumbly, add a teaspoon of peanut butter at a time until it comes together.
Step 2: Shape and freeze the filling
Scoop out portions of the peanut butter filling and roll them into egg shapes using your hands. Aim for about 2 tablespoons of filling per egg — roughly the size of a large grape. Place them on a parchment-lined baking sheet and freeze for at least 30 minutes. This step is critical. The filling needs to be very firm and cold before you dip it, otherwise it will fall apart in the melted chocolate.
Step 3: Melt and color the chocolate
While the filling is freezing, melt your white chocolate. You can do this in a double boiler over gently simmering water or in the microwave in 30-second bursts, stirring between each burst. Do not overheat it. Once melted and smooth, add the coconut oil and stir well. Then add your oil-based blue food coloring a little at a time, stirring after each addition, until you reach that soft robin’s egg blue color. Let the chocolate cool slightly — it should be fluid but not hot.
Step 4: Coat the eggs
Take your frozen peanut butter filling pieces out of the freezer. Working quickly, dip each one into the melted blue chocolate using a fork or a dipping tool. Let the excess chocolate drip off, then place it back on the parchment-lined tray. If you want a thicker shell, let the first coat set for a few minutes and then dip again. Work in small batches and keep the unused filling in the freezer while you work. Once all the eggs are coated, place the tray back in the fridge to set completely — about 20-30 minutes.
Step 5: Create the speckle effect
This is the fun part. In a small bowl, mix the cocoa powder and vanilla extract or vodka until you get a thin, paint-like consistency. Dip your stiff brush into the mixture, hold it over the tray of set chocolate eggs, and use your finger or another brush to flick the bristles. This sends tiny droplets of cocoa mixture splattering onto the eggs. Step back slightly for lighter, more spread-out speckles. Get closer for more concentrated ones. There’s no wrong way to do this — the more organic and random the speckles, the more realistic they look.
Step 6: Set and serve
Let the speckled eggs sit at room temperature for a few minutes to allow the speckle coating to dry fully. Then arrange them in an egg carton or on a serving tray. If you’re gifting them, a ceramic or paper egg carton makes the presentation absolutely stunning. Serve at room temperature for the best texture — the peanut butter filling softens slightly and becomes even creamier when it’s not fridge-cold.
Serving suggestions
These eggs are beautiful on their own, but here are a few ways to serve and present them that take things to the next level:
- Nestle them in an egg carton lined with shredded paper grass. This is the presentation move. It looks like they came straight from an artisan chocolatier.
- Arrange them on an Easter dessert board. Pair with mini chocolate bunnies, pastel M&Ms, shortbread cookies, and fresh strawberries for a stunning spread.
- Set one at each place setting as an Easter table favor. Wrap each egg individually in cellophane and tie with a ribbon. Simple, personal, and genuinely thoughtful.
- Serve alongside a hot drink. A mug of coffee or hot chocolate alongside one of these eggs is a genuinely great combination. The peanut butter and chocolate flavor against a bitter espresso? Unreal.
- Package them as homemade Easter gifts. A dozen in a pretty box with a handwritten tag is one of the most charming gifts you can give. People will talk about it for years.
Storage tips
Refrigerator: Store in an airtight container in the fridge for up to 2 weeks. Layer them between sheets of parchment paper so the speckles don’t rub off against each other.
Freezer: These freeze beautifully for up to 3 months. Place them on a tray to freeze solid first, then transfer to a freezer-safe bag or container. Thaw in the fridge overnight before serving.
Room temperature: If your kitchen isn’t too warm, these can sit out at room temperature for up to 2 days. Any warmer than that and the chocolate shell may start to soften.
Avoid humidity: Chocolate and humidity are not friends. Store these away from anything steamy and keep them covered to protect the speckle finish.
Let’s wrap it up
If you’ve been looking for a homemade Easter treat that genuinely impresses people without requiring professional candy-making skills, this is it. These speckled chocolate Easter eggs hit that sweet spot between beautiful and approachable — and that’s exactly what cooking should be.
Whether you’re making a batch for your kids, gifting them to someone special, or just treating yourself because Easter candy deserves to be homemade at least once — I hope this recipe brings some joy into your kitchen.
Give them a try and let me know how yours turn out. Tag me on Pinterest — I genuinely love seeing your versions. And if your speckles go rogue and end up all over your counter? That just means you had fun making them. Worth it every time.
With gratitude, Kip.
Speckled Chocolate Easter Eggs with Peanut Butter Filling — The Homemade Treat That Looks Too Good to Eat
Description
These no-bake homemade Easter eggs feature a thick, creamy peanut butter filling wrapped in a smooth robin's egg blue white chocolate shell, finished with a hand-painted cocoa speckle effect. They look like they came from a high-end candy shop and taste even better than they look.
Ingredients
For the peanut butter filling:
For the chocolate shell:
For the speckle effect:
Instructions
-
Combine softened butter, peanut butter, vanilla extract, and salt in a bowl. Mix until smooth. Gradually add sifted powdered sugar and mix until a thick dough forms.
-
Scoop and shape the filling into egg shapes, about 2 tablespoons each. Place on a parchment-lined tray and freeze for 30 minutes.
-
Melt white chocolate using a double boiler or microwave in 30-second bursts. Add coconut oil and stir. Add oil-based blue food coloring gradually until you reach robin's egg blue. Let cool slightly.
-
Dip frozen filling pieces into the blue chocolate using a fork. Let excess drip off and place on a parchment-lined tray. Repeat for a second coat if desired. Refrigerate for 20-30 minutes to set.
-
Mix cocoa powder and vanilla extract or vodka in a small bowl to a thin paint consistency. Dip a stiff brush into the mixture and flick bristles over the set eggs to create speckles.
-
Allow speckles to dry fully. Arrange in an egg carton or on a serving tray and serve at room temperature.
