

Some treats manage to feel indulgent and wholesome at the same time, and those are the ones worth holding onto. These frozen peanut butter Greek yogurt bites are exactly that kind of treat.
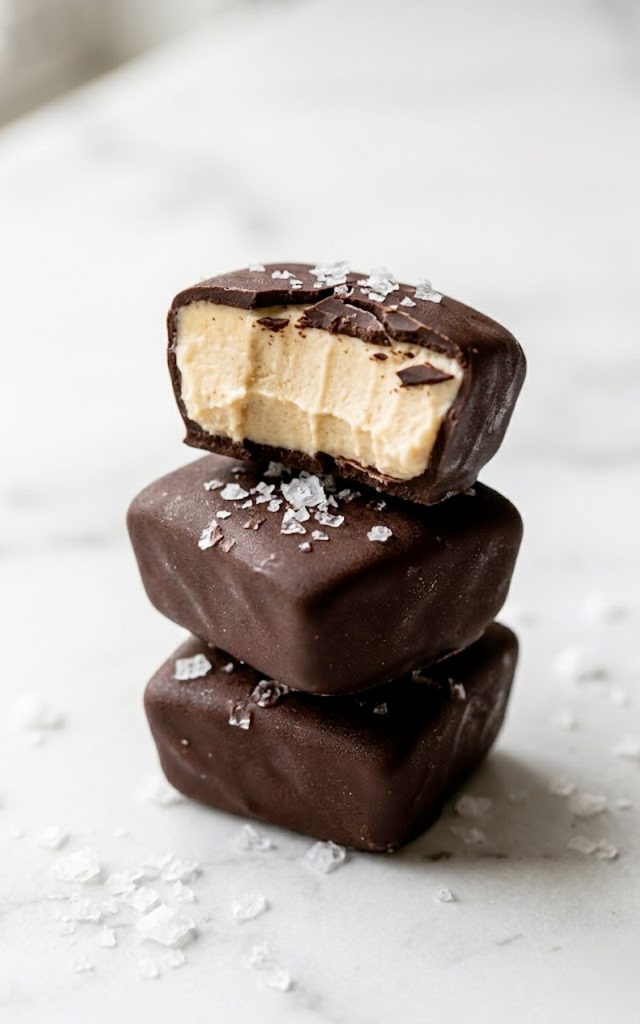
A creamy, peanut buttery center wrapped in a firm dark chocolate shell with a little flake of sea salt on top — they taste like something you would find at a fancy chocolate shop, and they are made with four ingredients in your own kitchen.
I started making these on hot Kentucky afternoons when I wanted something cold and satisfying that would not derail the way I was trying to eat. Ice cream felt like too much. Fruit felt like too little. These hit that perfect middle ground — rich enough to feel like a real treat, clean enough to feel good about eating two or three in a sitting.
The best part is that you make them ahead, stash them in the freezer, and they are ready whenever you need them. Late night sweet craving, post workout snack, something to put in front of the kids after school — these bites handle all of it without any fuss. Once you make a batch, you will wonder how you ever lived without them in your freezer.
Why you’ll love this recipe
- These bites require zero baking and zero cooking. You mix, shape, freeze, dip, and freeze again — and the result is a treat that looks and tastes far more impressive than the effort involved.
- They are packed with protein from the Greek yogurt and peanut butter, which means they actually satisfy a sweet craving rather than just feeding it and leaving you wanting more.
- Kids absolutely love them. They look like fancy chocolate truffles, they taste like a peanut butter cup, and they are genuinely good for them — which is a parenting win on every level.
- They are naturally gluten free and egg free, making them a treat that works for most dietary needs without any complicated substitutions.
- Made with just four main ingredients — Greek yogurt, peanut butter, honey, and dark chocolate — they are one of the simplest and most satisfying things you can make at home.
- They live in the freezer and are ready to grab at any moment, making them the most convenient healthy treat you will ever have on hand.
Ingredients with key notes
For the filling:
- 1 cup plain full fat Greek yogurt — full fat Greek yogurt gives the filling a rich, creamy texture that holds up beautifully once frozen. Low fat versions work but the texture will be slightly icier and less creamy. Make sure you are using plain unsweetened Greek yogurt — flavored varieties will throw off the balance of sweetness
- 1/2 cup natural creamy peanut butter — use a natural peanut butter with no added sugar or hydrogenated oils for the cleanest flavor. The peanut butter should be smooth and slightly runny for easy mixing. Almond butter is a great substitute if needed
- 2 tablespoons honey or maple syrup — this sweetens the filling just enough without making it overly sugary. Maple syrup keeps it fully vegan if that is important to you. Taste the mixture before freezing and adjust the sweetness to your preference
- 1 teaspoon vanilla extract — this small addition rounds out the flavor of the filling and adds warmth that pairs beautifully with the peanut butter
For the chocolate coating:
- 1 and 1/2 cups dark chocolate chips or chopped dark chocolate — use good quality dark chocolate with at least 60 percent cacao for the best flavor and a firm snap once frozen. Semi sweet chocolate works too if you prefer a milder chocolate flavor. Dairy free chocolate chips keep this recipe fully dairy free
- 1 tablespoon coconut oil — this is the secret to a smooth, glossy chocolate coating that sets firmly and does not crack too aggressively when you bite into it. Do not skip this — it makes a significant difference to the texture of the shell
For finishing:
- Flaky sea salt — a small pinch on top of each bite after dipping elevates the whole thing. The contrast between the sweet chocolate and the flaky salt is what makes these feel truly special. Maldon sea salt flakes are ideal here
Step-by-step instructions
Step 1: Line your pan and prep your workspace
Line a small baking sheet or flat tray with parchment paper. Make sure it fits in your freezer before you start — you do not want to discover it does not fit when your hands are full of yogurt mixture. Set aside.
Step 2: Make the filling
In a medium mixing bowl, combine the Greek yogurt, peanut butter, honey or maple syrup, and vanilla extract. Stir everything together until completely smooth and well combined. Taste the mixture and adjust the sweetness if needed — it should taste pleasantly sweet with a strong peanut butter flavor. Keep in mind the dark chocolate coating will add richness and slight bitterness, so the filling can afford to lean a little sweeter.
Step 3: Shape the bites
Using a small cookie scoop or a tablespoon, scoop the yogurt mixture onto the prepared parchment lined tray. Shape each mound into a neat round dome with your hands or the back of a spoon. They do not need to be perfect — they will look beautiful once coated in chocolate. Aim for roughly one tablespoon per bite for a good snack sized portion.
Step 4: First freeze
Place the tray in the freezer and freeze for at least 2 hours, or until the yogurt bites are completely solid. This step is critical — if the bites are not fully frozen before dipping, they will fall apart in the warm chocolate. Do not rush this step. You can leave them overnight if you prefer.
Step 5: Melt the chocolate
When the bites are fully frozen, melt the dark chocolate chips and coconut oil together. You can do this in a microwave safe bowl in 30 second intervals, stirring between each interval until completely smooth and glossy. Alternatively, melt them in a heatproof bowl set over a pot of barely simmering water, stirring constantly. Let the chocolate cool for a minute or two before dipping — chocolate that is too hot will melt the frozen bites too quickly.
Step 6: Dip the bites
Working quickly one at a time, remove the frozen bites from the freezer and dip each one into the melted chocolate using a fork or a dipping tool. Let the excess chocolate drip off and place each coated bite back onto the parchment lined tray. Sprinkle a small pinch of flaky sea salt on top immediately before the chocolate sets. Work in small batches if needed, returning the uncoated bites to the freezer while you work so they stay firm.
Step 7: Second freeze
Once all the bites are coated and salted, return the tray to the freezer for at least 30 minutes until the chocolate shell is completely set and firm.
Step 8: Serve
Serve straight from the freezer. These are best enjoyed cold — the chocolate shell snaps satisfyingly and the filling is perfectly creamy and cool. Let them sit at room temperature for 2 to 3 minutes before eating if you prefer a slightly softer center.
Serving suggestions
These frozen bites are a complete treat on their own and need absolutely nothing else alongside them. Pull them straight from the freezer, let them sit for a moment, and enjoy. That is honestly the best way to eat them.
For a more composed dessert, serve three or four on a small plate with a few fresh berries on the side — the tartness of raspberries or strawberries is a beautiful contrast to the rich chocolate and peanut butter. A light dusting of extra flaky salt over the plate makes the whole thing feel very intentional and restaurant worthy.
For kids, these make an incredible after school treat that you can feel completely good about serving. Put a couple in a small bowl and watch them disappear. They also work really well as a birthday party treat — make a big batch, arrange them on a platter, and they look impressive without any real effort on your part.
For a post workout snack, two or three bites give you a solid hit of protein and healthy fats that help with recovery while also satisfying that post exercise sweet craving that is so hard to ignore. Keep a bag of them in the freezer specifically for this purpose and you will always have something good waiting for you after a workout.
Storage tips
Freezer: These bites are a freezer only situation — that is where they live and where they are at their absolute best. Once the chocolate is fully set, transfer the bites from the tray into a freezer safe zip lock bag or airtight container. Store flat if possible to prevent them from sticking together. They will keep in the freezer for up to 2 months, though they rarely last that long.
Preventing sticking: If you are storing multiple layers, place a sheet of parchment paper between each layer to prevent the bites from sticking to each other.
Serving from frozen: These are designed to be eaten straight from the freezer. Unlike many frozen treats, you do not need to thaw them — the filling stays beautifully creamy even when fully frozen and the chocolate shell gives a satisfying snap. If you prefer a slightly softer center, let them sit at room temperature for 2 to 3 minutes before eating.
Refrigerator: Do not store these in the fridge. The chocolate coating will become soft and sticky and the filling will lose its firm frozen texture. The freezer is the only place for these.
Make ahead: These are one of the best make ahead treats you can have in your freezer. Make a double batch on the weekend and you will have a healthy frozen treat ready to go for the entire month.
A little something before you go
There is something deeply satisfying about having a treat in your freezer that you made yourself, that you know exactly what went into, and that genuinely tastes like an indulgence even though it is anything but. These frozen peanut butter Greek yogurt bites are that treat for me.
They remind me that taking care of yourself does not have to mean depriving yourself. It just means being a little intentional about what you reach for when the craving hits. And when what you reach for tastes this good, that feels less like discipline and more like a gift you gave yourself.
That is the heart of Recipes by Kip. Food that heals, food that satisfies, food that makes you feel good in every sense of the word.
Make a batch this weekend. Tuck them in your freezer. And the next time a craving hits, you will be ready.
With gratitude, Kip
Frozen peanut butter Greek yogurt bites (the perfect family friendly treat)
Description
These frozen peanut butter Greek yogurt bites are the kind of treat that makes you feel like you are getting away with something. A creamy, naturally sweetened peanut butter and Greek yogurt filling wrapped in a firm dark chocolate shell with a sprinkle of flaky sea salt on top. No baking, no cooking, just four simple ingredients and a little patience while they freeze. High in protein, gluten free, kid approved, and freezer friendly — these are the treat you will always want to have on hand.
Ingredients
For the filling:
For the chocolate coating:
For finishing:
Instructions
-
Line a small baking sheet with parchment paper and ensure it fits in your freezer.
-
Mix Greek yogurt, peanut butter, honey or maple syrup, and vanilla extract together in a bowl until completely smooth. Taste and adjust sweetness if needed.
-
Scoop tablespoon sized mounds onto the parchment lined tray and shape into neat domes.
-
Freeze for at least 2 hours until completely solid.
-
Melt dark chocolate chips and coconut oil together in 30 second microwave intervals, stirring between each, until smooth and glossy. Allow to cool slightly.
-
Working quickly, dip each frozen bite into the melted chocolate using a fork. Let excess drip off and return to the parchment tray. Sprinkle with flaky sea salt immediately.
-
Return to the freezer for at least 30 minutes until the chocolate shell is fully set.
-
Serve straight from the freezer. Store in a freezer safe airtight container for up to 2 months.
Note
- Do not skip the first freeze — the bites must be completely solid before dipping or they will fall apart in the warm chocolate.
- Work in small batches when dipping, keeping uncoated bites in the freezer until needed.
- Use dairy free chocolate chips to keep this fully dairy free.
- Almond butter can replace peanut butter for a different flavor profile.
