

Every household has that one vegetable that sits on the plate getting quietly ignored while everyone focuses on everything else. For a long time in my house, green beans were that vegetable. Steamed, bland, slightly sad — they showed up out of obligation and left largely uneaten. I am not proud of how long I let that situation continue before I finally did something about it.
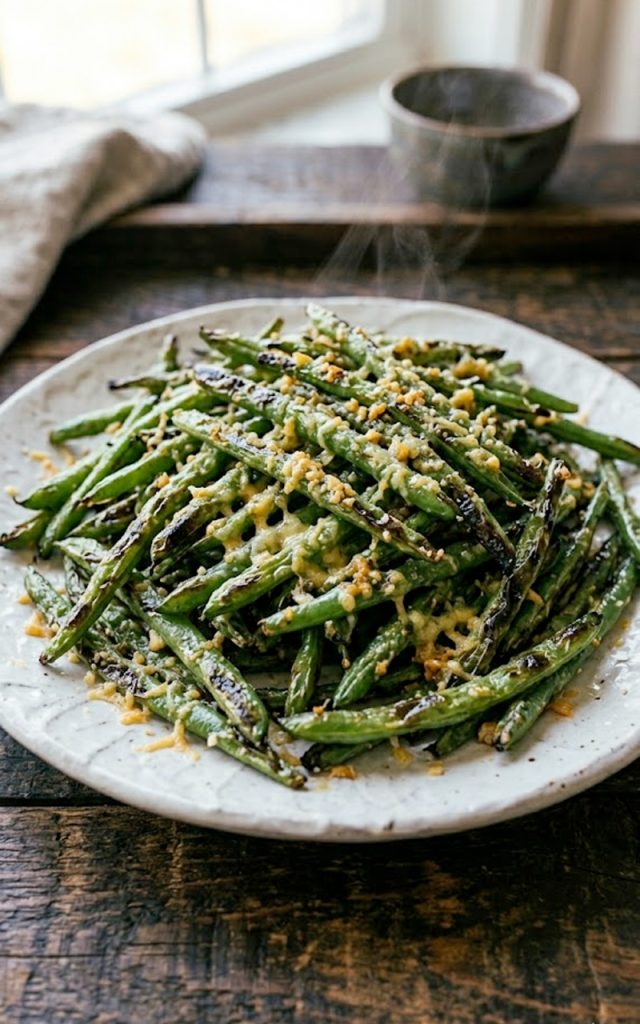
The something I did was this recipe. Garlic sauteed in butter and olive oil until golden, green beans cooked at high heat until they blister and crisp at the edges, and then a generous shower of freshly grated parmesan that melts into every crevice and creates a salty, nutty crust that makes these beans genuinely addictive. The first time I made them my family ate the entire batch before anything else on the table was touched. The green bean ignoring era was officially over.
What makes this recipe work is the combination of high heat and good fat. You are not steaming these beans into submission — you are getting actual color and texture on them in a hot pan, which changes everything about how they taste.
Add garlic that has been coaxed to a perfect golden brown and a proper amount of parmesan and you have a side dish that people will request by name. Let’s get into it.
Why you’ll love this recipe
- It converts vegetable skeptics — these are not sad steamed green beans. They are crispy, garlicky, cheesy, and genuinely delicious. Even people who claim not to like green beans tend to eat these without complaint.
- 20 minutes from start to finish — this is one of the fastest side dishes you can make that still feels like you put real effort into it. High heat, quick cook, done.
- That garlic parmesan combination is unbeatable — golden toasted garlic and salty parmesan on crispy green beans is one of those flavor combinations that just works every single time without exception.
- Works alongside almost any main course — roasted chicken, grilled steak, pasta, baked fish. These green beans go next to everything without clashing with any of it.
- Simple ingredients, no special equipment — you need a pan, some basic pantry staples, and fresh green beans. That is genuinely the whole list.
- Looks impressive on the plate — vibrant green beans with golden garlic bits and white parmesan scattered throughout look restaurant-worthy without requiring any real plating skill. They just look good naturally.
Ingredients with key notes
- 1 lb fresh green beans, trimmed — Fresh green beans are essential here. Frozen green beans contain too much moisture and will steam rather than crisp in the pan, giving you a completely different and less satisfying result. Look for beans that are bright green, firm, and snap cleanly when bent — those are the ones at peak freshness. Trim the stem ends but leave the tail ends on for a cleaner look.
- 3 tbsp unsalted butter — Butter is what gives you that rich, nutty flavor base and helps the garlic toast properly. Using unsalted butter gives you control over the final salt level of the dish. If you only have salted butter, reduce the added salt accordingly.
- 1 tbsp olive oil — Combined with the butter, the olive oil raises the smoke point of the fat and prevents the butter from burning at the high heat required to get a proper crisp on the beans. This combination is one of the most useful techniques in everyday cooking.
- 5 cloves garlic, thinly sliced — Thinly sliced rather than minced. Sliced garlic toasts into delicate golden chips in the fat that distribute evenly throughout the dish and add texture as well as flavor. Minced garlic burns much more easily at high heat and turns bitter. Thin, even slices are the move here.
- 1/3 cup freshly grated parmesan — Freshly grated from a block, not the pre-shredded or the powdered green can variety. Freshly grated parmesan melts into the warm beans and creates a light coating rather than sitting on top as dry powder. The flavor difference is also significant — block parmesan is nuttier, saltier, and more complex than any pre-processed version.
- 1/2 tsp red pepper flakes — Optional but strongly recommended. A small amount of heat in the background makes the garlic and parmesan flavors pop more than they would without it. Start with 1/4 tsp if you are sensitive to heat.
- Salt and black pepper to taste — Season at every stage of cooking. Season the beans lightly before they go in the pan, taste as they cook, and adjust again right before serving. Layering seasoning throughout builds a more developed flavor than seasoning only at the end.
- 1 tsp lemon zest — Optional but a genuinely excellent addition. A little lemon zest stirred in right at the end of cooking adds a bright citrus note that cuts through the richness of the butter and parmesan and makes the whole dish taste fresher and more vibrant. Try it at least once before deciding whether to include it.
- Fresh lemon juice — A small squeeze over the finished beans right before serving. Same principle as the zest — brightness and acid balance the richness. About half a lemon is all you need.
Step-by-step instructions
Step 1: Prep the green beans
Wash the green beans thoroughly and dry them completely with a clean kitchen towel or paper towels. This step matters more than it sounds. Wet beans in a hot pan will steam instead of sear, and you will lose the blistered edges that make this recipe what it is. Once dry, trim the stem ends off each bean. You can do this quickly by lining them up in small bundles and cutting across the ends with one clean knife stroke rather than trimming each bean individually.
Step 2: Slice the garlic
Peel and thinly slice all five garlic cloves as evenly as possible. Aim for slices about the thickness of a coin — thin enough to become crispy and golden in the pan without burning before the beans are done. Consistency in the thickness of your slices matters here because uneven pieces will cook at different rates and the thinner ones will burn while the thicker ones are still raw. Take a moment to get this right.
Step 3: Heat the pan
Place a large skillet or wide pan over medium-high heat and let it get properly hot before anything goes in. A properly preheated pan is what creates the sear and blister on the green beans. Add the butter and olive oil together. Let the butter melt completely and begin to foam. Once the foam subsides slightly and the butter smells nutty, the pan is ready.
Step 4: Cook the green beans
Add the dried green beans to the hot pan in a single layer. Do not overcrowd the pan — if your pan is not large enough to fit all the beans in one layer, cook them in two batches. Overcrowding causes steaming instead of searing and you will not get the crispy blistered edges that define this dish. Cook the beans without stirring for 2-3 minutes to allow the first side to blister and develop color. Then toss or stir and cook for another 3-4 minutes, continuing to toss occasionally, until the beans are bright green, tender-crisp, and blistered in spots. Season with salt and black pepper during this stage.
Step 5: Add the garlic and red pepper flakes
Reduce the heat slightly to medium. Push the green beans to the edges of the pan to create a small clear space in the center. Add the remaining butter if the pan looks dry, then add the sliced garlic and red pepper flakes to the center of the pan. Let the garlic cook undisturbed for about 60 seconds until it starts to turn golden at the edges. Watch it carefully — the difference between perfectly golden garlic and burnt garlic is about 30 seconds and burnt garlic will make the whole dish taste bitter. Once the garlic is golden, toss it together with the green beans to distribute evenly throughout.
Step 6: Add the parmesan
Remove the pan from heat. Immediately scatter the freshly grated parmesan over the hot green beans. The residual heat from the pan will melt the parmesan slightly and help it cling to the beans. Toss gently to distribute the cheese throughout. If you are using lemon zest, add it at this point as well and toss once more.
Step 7: Finish and serve
Transfer the green beans to a serving plate or bowl. Squeeze a small amount of fresh lemon juice over the top right before serving. Add a final crack of black pepper and an extra pinch of parmesan if you want an even more generous finish. Serve immediately — these beans are at their absolute best hot and fresh from the pan when the garlic is still fragrant and the parmesan has just melted.
Serving suggestions
These green beans are one of the most versatile side dishes you can have in your weeknight arsenal:
- Alongside roasted chicken — A simple roasted chicken with these crispy garlic parmesan green beans on the side is a complete, satisfying dinner that feels far more effortful than it actually is. The green beans complement the savory chicken without competing with any of its flavors.
- With a grilled steak — These beans are substantial enough to stand up to a bold grilled ribeye or sirloin. The garlic butter base makes them a natural companion to any cut of beef.
- Next to baked or grilled salmon — The lemon and parmesan notes in the green beans pair beautifully with the richness of salmon. Add the lemon zest option if serving with fish — it ties the two components of the plate together perfectly.
- As part of a holiday spread — These beans are impressive enough for Thanksgiving or Christmas dinner but easy enough that they will not stress you out on a day that already has enough going on. They can be prepped in advance and cooked in under 20 minutes while other things rest.
- With pasta dishes — Serve alongside a simple pasta like cacio e pepe or a creamy mushroom pasta for a complete Italian-inspired dinner. The green beans add color, texture, and nutrition to what is otherwise a carb-forward plate.
- As a low-carb main with eggs — Double the batch and serve with a couple of fried eggs on top for a genuinely satisfying low-carb meal that takes about 25 minutes total. The garlic and parmesan make the beans substantial enough to anchor an entire plate.
Storage tips
Refrigerator: Store leftover green beans in an airtight container in the refrigerator for up to 3 days. The beans will soften as they sit and lose their crispiness but the flavor remains excellent. They reheat well and make a great addition to grain bowls or pasta the next day.
Reheating: Reheat in a dry skillet over medium-high heat for 2-3 minutes, tossing occasionally. This method revives some of the texture that was lost in the refrigerator far better than a microwave does. If reheating in the microwave, do it in 30-second intervals and accept that the texture will be softer than fresh. Add a small extra pinch of parmesan after reheating to freshen the flavor.
Freezer: These green beans do not freeze well. The texture of both the beans and the parmesan degrades significantly after freezing and thawing, leaving you with something that is quite far from the crispy, vibrant original. Make this recipe fresh and enjoy it the same day for the best result.
Make-ahead tip: You can trim and dry the green beans and slice the garlic up to 24 hours in advance and store them separately in the refrigerator. Grate the parmesan ahead of time as well and keep it covered. When you are ready to cook, the whole process takes only 15 minutes. This makes the recipe very manageable even on busy evenings or during a large holiday meal where kitchen timing is everything.
Keeping them crispy for serving: If you are making these for a gathering and need to hold them for a short time before serving, spread them out on a baking sheet in a single layer rather than covering them in a pot. Covering them traps steam which softens the beans quickly. An oven set to 200F will keep them warm for up to 20 minutes without destroying the texture.
Let’s wrap this up
Green beans do not have to be boring. They never did — we just got stuck in the habit of treating them like an afterthought, something to boil and put on the plate out of obligation rather than genuine desire. This recipe is the correction to all of that.
Crispy edges, golden garlic, nutty parmesan, a little heat from the pepper flakes, and a bright finish from the lemon — these green beans are a complete experience in a side dish. They take 20 minutes, cost almost nothing to make, and consistently end up being the thing people comment on at the table.
Make them tonight alongside whatever you already have planned for dinner. I am confident they are going to earn a permanent spot on your weekly rotation, and I am equally confident that the days of ignored green beans in your house are officially numbered.
With gratitude, Kip
Crispy garlic parmesan green beans that make vegetables the best thing on the table
Description
These crispy garlic parmesan green beans are cooked in a combination of butter and olive oil over high heat until blistered and tender-crisp, tossed with golden toasted garlic, and finished with freshly grated parmesan that melts into every crevice. Ready in 20 minutes with simple pantry ingredients, this is the side dish that makes everyone actually excited about vegetables.
Ingredients
Instructions
-
Wash and thoroughly dry the green beans. Trim the stem ends. Thinly slice all garlic cloves to an even coin thickness.
-
Heat a large skillet over medium-high heat. Add butter and olive oil together. Once the butter foams and subsides, the pan is ready.
-
Add dried green beans in a single layer. Cook without stirring for 2-3 minutes until blistered on the first side. Toss and cook another 3-4 minutes until bright green, tender-crisp, and blistered in spots. Season with salt and pepper.
-
Reduce heat to medium. Push beans to the edges. Add sliced garlic and red pepper flakes to the center. Cook undisturbed for 60 seconds until golden. Toss with the beans immediately.
-
Remove pan from heat. Scatter freshly grated parmesan over the hot beans. Add lemon zest if using. Toss gently to distribute.
-
Transfer to a serving plate. Squeeze fresh lemon juice over the top. Finish with cracked black pepper and extra parmesan. Serve immediately.
