

You know that specific craving — the one for honey chicken from your favorite Chinese takeout spot. Crispy little pieces of chicken, coated in that deep, sticky, almost lacquered honey sauce that’s sweet but not too sweet, rich but not heavy. You order it, it’s great, and then two days later you want it again.
I spent a long time trying to figure out how to get that exact result at home. Not a close approximation — the real thing. Crispy exterior, glossy sauce, that slight caramelized edge where the honey has done its thing in the pan.
After more than a few trial runs and one very sticky stovetop, I cracked it. And it turns out it’s not complicated at all — it just comes down to a few key details that most recipes skip over.
This perfect honey chicken comes together in 25 minutes, uses ingredients you either already have or can grab at any grocery store, and produces results that will genuinely make you question why you ever called for delivery in the first place. IMO, this one belongs in your permanent weeknight rotation.
Why you’ll love this recipe
- Genuinely crispy chicken. The light coating on the chicken creates a thin, crispy exterior that holds up even after the sauce goes on. This is not soggy honey chicken. This is the real deal.
- That sauce is everything. Deep, sticky, rich honey sauce with just enough soy and garlic to keep it from being one-dimensional. It caramelizes in the pan and coats every piece of chicken perfectly.
- 25 minutes from start to finish. Faster than ordering delivery, cheaper than a restaurant, and you control every ingredient that goes into it.
- Simple pantry ingredients. Honey, soy sauce, garlic, cornstarch, chicken. Nothing obscure, nothing that requires a special trip to a specialty store.
- Crowd pleaser without exception. Kids love the sweetness. Adults love the depth. This is one of those rare recipes that genuinely works for everyone at the table.
- Better than takeout. Not just as good — better. Because it’s fresh, you made it yourself, and there’s something deeply satisfying about pulling off a restaurant-quality dish in your own kitchen on a Tuesday night.
Ingredients with key notes
The protein
- 1.5 pounds boneless skinless chicken breast, cut into 1-inch chunks — Chicken breast works best here because it cooks quickly and stays tender inside while the coating gets crispy outside. Cut the pieces as evenly as possible so everything cooks at the same rate. Pat them dry before coating — this is a non-negotiable step for getting a proper crispy exterior.
The coating
- ½ cup cornstarch — This is the secret to the crispy exterior. Cornstarch creates a lighter, crispier coating than flour and holds up better once the sauce goes on. Do not substitute with flour — the texture will not be the same.
- ½ teaspoon salt
- ½ teaspoon black pepper
- ½ teaspoon garlic powder — Just enough to season the coating without overpowering the sauce.
- 2 eggs, beaten — The egg wash helps the cornstarch adhere to the chicken and creates that thin, crispy shell when it hits the hot oil.
- 3-4 tablespoons neutral oil — For pan frying. Vegetable oil, canola oil, or avocado oil all work. You want enough to coat the bottom of the pan generously — this is pan frying, not deep frying.
The honey sauce
- ½ cup honey — The star of the show. Use good quality real honey. The flavor of the sauce is almost entirely built on the honey, so this is not the place to use the cheapest option on the shelf.
- 3 tablespoons soy sauce — Adds the salty, savory depth that balances the sweetness of the honey. Low-sodium soy sauce works if you prefer.
- 3 cloves garlic, minced — Fresh garlic gives the sauce a punchy, aromatic backbone. Do not use garlic powder in the sauce — fresh only.
- 1 tablespoon rice vinegar — Cuts through the sweetness and adds a brightness that keeps the sauce feeling balanced rather than cloying.
- 1 tablespoon ketchup — This might surprise you, but it adds a subtle tanginess and a richness to the sauce that rounds everything out. Trust the process.
- 1 teaspoon cornstarch mixed with 2 tablespoons cold water — Thickens the sauce so it clings to the chicken instead of pooling at the bottom of the pan.
- ½ teaspoon red pepper flakes — Optional, but recommended. A small amount of heat against all that sweetness makes the whole sauce more interesting.
Garnishes
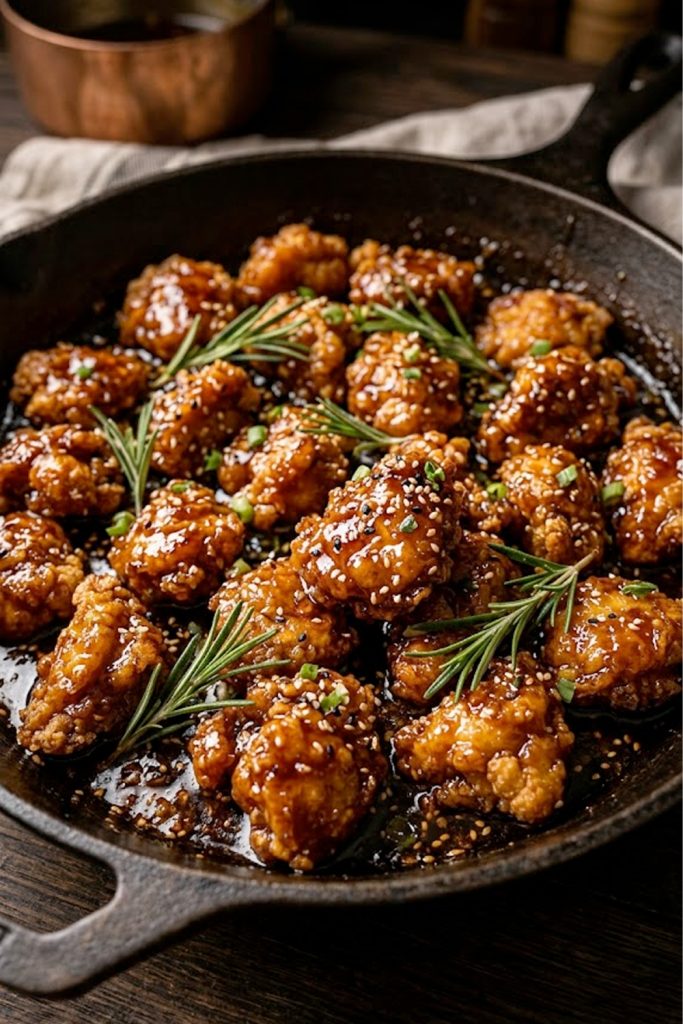
- Fresh rosemary sprigs — As seen in the original pin. Unexpected but genuinely lovely against the richness of the honey sauce.
- Sesame seeds — Optional, adds a subtle crunch and a visual finish.
- Sliced green onions — For freshness and color contrast.
Step-by-step instructions
Step 1: Prep and coat the chicken
Start by cutting your chicken breast into even 1-inch chunks and patting every piece completely dry with paper towels. This step matters more than it sounds — any surface moisture will prevent the cornstarch from adhering properly and will steam the chicken instead of frying it. In a shallow bowl, mix together the cornstarch, salt, black pepper, and garlic powder. In a separate bowl, beat the eggs. Dip each piece of chicken into the egg wash first, let the excess drip off, then toss in the cornstarch mixture until fully coated. Shake off any excess coating and set the pieces aside on a plate.
Step 2: Pan fry the chicken
Heat 3-4 tablespoons of neutral oil in a large skillet or wok over medium-high heat. You want the oil hot before the chicken goes in — test it by dropping a tiny pinch of cornstarch into the pan. If it sizzles immediately, you’re ready. Add the chicken pieces in a single layer without crowding the pan. Work in two batches if needed — crowding drops the oil temperature and you’ll end up with steamed, soft chicken instead of crispy pieces. Fry for 3-4 minutes per side until deeply golden and cooked through. Remove from the pan and set aside on a plate lined with paper towels.
Step 3: Make the honey sauce
Carefully wipe out the skillet with a paper towel — you want to remove the excess oil but keep a thin film in the pan. Reduce the heat to medium. Add the minced garlic and cook for 30-45 seconds, stirring constantly, until fragrant. Watch it closely — garlic goes from golden to burnt very fast and burnt garlic will ruin the sauce. Add the honey, soy sauce, rice vinegar, ketchup, and red pepper flakes. Stir everything together and bring to a gentle simmer. Let it bubble for 1-2 minutes.
Step 4: Thicken the sauce
Stir in the cornstarch slurry — 1 teaspoon cornstarch mixed with 2 tablespoons cold water — and keep stirring as the sauce thickens. You’ll see it shift from a thin liquid to a glossy, clingy sauce within about 60 seconds. This is what you want. If it thickens too quickly or gets too thick, add a small splash of water and stir to loosen.
Step 5: Combine and caramelize
Add the fried chicken pieces back into the pan and toss to coat every piece in the sauce. Turn the heat up slightly to medium-high and let everything cook together for 1-2 minutes, stirring occasionally. This is where the magic happens — the sauce starts to caramelize around the chicken, deepening in color and intensifying in flavor. You’ll see the sauce go from glossy to almost lacquered. That deep mahogany color on the chicken is exactly what you’re going for. Keep an eye on it during this step because honey caramelizes quickly.
Step 6: Garnish and serve
Remove from the heat and transfer to a serving plate or serve straight from the pan. Tuck a few sprigs of fresh rosemary between the chicken pieces, scatter sesame seeds and sliced green onions over the top, and serve immediately. This dish is at its absolute best the moment it comes off the stove.
Serving suggestions
- Serve over steamed jasmine rice — The classic pairing. The rice soaks up any extra honey sauce from the pan and turns this into a complete, satisfying meal.
- Pair with stir-fried vegetables — Broccoli, snap peas, or bok choy stir-fried with a little garlic and soy sauce alongside this chicken makes for a balanced, colorful plate.
- Serve with egg fried rice — If you want to go full takeout experience at home, a simple egg fried rice on the side is the move. The flavors complement each other perfectly.
- Add to a noodle bowl — Pile the honey chicken over cooked lo mein or rice noodles with some sliced cucumbers and a drizzle of sesame oil for a bowl that eats like a full restaurant meal.
- Serve as an appetizer — Keep the pieces bite-sized and serve on a platter with toothpicks as a party appetizer. Put out a small bowl of extra sauce for dipping and watch them disappear.
- Wrap it up — Slide the honey chicken into warm flour tortillas or lettuce cups with some shredded cabbage and a drizzle of sriracha mayo for a completely different meal using the same recipe.
Storage tips
Refrigerator: Store leftover honey chicken in an airtight container in the fridge for up to 3 days. Keep in mind that the crispy coating will soften as it sits — this is normal and unavoidable once the sauce is on. The flavor stays excellent.
Reheating for best results: Skip the microwave if you want to bring back any of the texture. Reheat in a skillet over medium heat for 3-4 minutes, or in the air fryer at 350°F for 3-4 minutes. Both methods help firm up the coating and re-caramelize the sauce slightly.
Freezer: The cooked honey chicken freezes reasonably well. Let it cool completely and freeze in a single layer before transferring to a freezer bag. Store for up to 6 weeks. Reheat from frozen in the air fryer at 375°F for 6-8 minutes.
Make ahead tip: If you want to prep ahead, coat the chicken in the cornstarch and egg mixture and keep it in the fridge on a plate for up to 2 hours before frying. Make the sauce ahead and store it separately. When ready to eat, fry the chicken fresh and toss with the reheated sauce. This is the best way to get a fresh result with minimal effort at dinnertime.
One last thing
There is a reason this kind of recipe has been a takeout staple for decades — honey chicken is just genuinely one of the best flavor combinations out there. Sweet, savory, sticky, rich. It hits every note.
Making it at home means you get all of that, plus you know exactly what’s in it, it costs a fraction of the price, and honestly — it tastes better. Fresh off the stove, caramelized and glossy, with that crispy coating still doing its thing under all that sauce. That’s a hard thing to beat.
Try it once and let me know what you think. Drop a comment below, share it with someone who loves a good honey chicken, or tag me on Pinterest. This community grows one good recipe at a time, and I’m glad you’re part of it. 🙂
With gratitude, Kip
Perfect honey chicken – the crispy, sticky pan-fried recipe that beats takeout every time
Description
This perfect honey chicken delivers everything you love about Chinese takeout honey chicken — crispy golden pieces of chicken coated in a deep, sticky, caramelized honey sauce — made entirely at home in 25 minutes with simple pantry ingredients. It is richer, fresher, and more satisfying than anything that comes in a delivery bag, and once you make it, delivery stops making sense.
Ingredients
For the chicken and coating:
For the honey sauce:
For garnish:
Instructions
-
Pat chicken dry and cut into even 1-inch chunks. Mix cornstarch, salt, pepper, and garlic powder in a shallow bowl. Beat eggs in a separate bowl. Dip each piece in egg wash then coat in cornstarch mixture. Shake off excess.
-
Heat oil in a large skillet over medium-high heat. Fry chicken in a single layer in batches for 3-4 minutes per side until golden and cooked through. Remove and drain on paper towels.
-
Wipe excess oil from the pan. Cook minced garlic over medium heat for 30-45 seconds until fragrant.
-
Add honey, soy sauce, rice vinegar, ketchup, and red pepper flakes. Stir and simmer for 1-2 minutes.
-
Stir in cornstarch slurry and cook for 60 seconds until sauce is thick and glossy.
-
Return chicken to the pan, toss to coat, and cook over medium-high heat for 1-2 minutes until sauce caramelizes around the chicken.
-
Garnish with fresh rosemary, sesame seeds, and green onions. Serve immediately.
