

Let me be honest with you — the first time I made shepherd’s pie on a keto diet, I was skeptical. Like, really skeptical. How do you take one of the most comforting dishes on the planet and make it low carb without completely ruining it? Turns out, you swap the mashed potatoes for cauliflower mash, and somehow — somehow — it works even better than the original.
This recipe has become a staple in my kitchen, especially on those weeknights when I want something hearty and satisfying but don’t want to spend two hours cooking or feel guilty afterward.
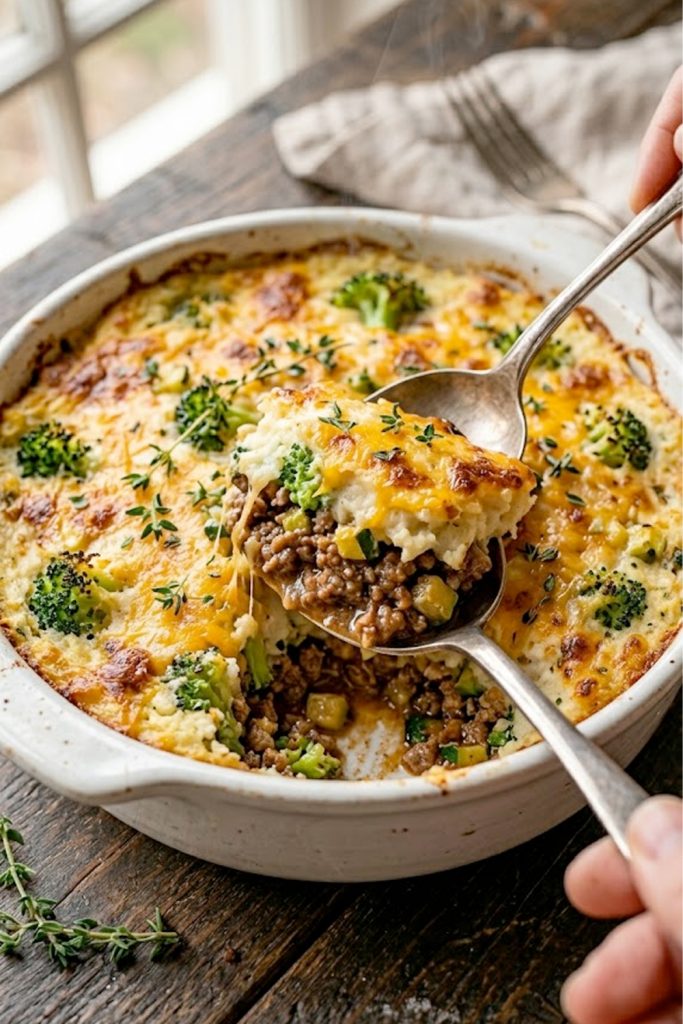
It’s got a rich, savory meat filling loaded with vegetables, topped with the creamiest cauliflower mash you’ve ever tasted. The whole thing gets baked until golden and bubbly on top. Comfort food at its finest, minus the carb crash.
Whether you’re strictly keto, just eating low carb, or simply trying to sneak more vegetables into your life — this one’s for you. Let’s get into it.
Why you’ll love this recipe
- It’s genuinely comforting. This dish hits every comfort food note — warm, savory, creamy, and filling. You won’t miss the potatoes. Seriously.
- It’s keto and low carb without tasting like it. The cauliflower mash is so creamy and flavorful, most people can’t even tell the difference.
- It’s a one-dish dinner. Everything cooks in one baking dish, which means less cleanup and more time doing literally anything else.
- It’s ready in under an hour. 50 minutes from start to finish. On a weeknight, that’s a win.
- It’s meal prep friendly. This recipe stores and reheats beautifully, making it perfect for batch cooking.
- It’s family approved. Even picky eaters tend to go back for seconds. The golden, cheesy top has a way of winning people over.
Ingredients with key notes
For the meat filling
- 1.5 lbs ground beef — Go for 80/20 for the best flavor. Leaner beef works too but the filling won’t be as rich.
- 1 medium onion, diced — Yellow onion works great here.
- 3 garlic cloves, minced — Fresh garlic makes a real difference. Don’t skip it.
- 1 cup zucchini, diced — This adds bulk and nutrition without adding carbs.
- 1 cup bell pepper, diced — Use any color you like. I personally love yellow for sweetness.
- 2 tablespoons tomato paste — Adds depth and richness to the filling.
- 1 cup beef broth — Low sodium is fine. This keeps the filling moist and flavorful.
- 1 teaspoon Worcestershire sauce — Trust me on this one. It’s the secret weapon.
- 1 teaspoon garlic powder
- 1 teaspoon onion powder
- Salt and black pepper to taste
- 1 tablespoon olive oil — For sauteing the filling.
For the cauliflower mash topping
- 1 large head cauliflower, cut into florets — About 6 cups of florets. Fresh works best but frozen cauliflower works in a pinch.
- 3 tablespoons butter — Unsalted. This makes the mash rich and creamy.
- 3 oz cream cheese — The real MVP of this mash. It makes it incredibly smooth.
- 1/4 cup parmesan cheese, grated — Adds flavor and helps the top get golden in the oven.
- Salt and pepper to taste
- Optional: shredded mozzarella for the top — If you want an extra golden, cheesy crust, sprinkle some on before baking.
Step-by-step instructions
Step 1: Make the meat filling
Heat a large oven-safe skillet or pan over medium-high heat and add the olive oil. Add your diced onion and cook for about 3 minutes until it softens up. Toss in the garlic and cook for another minute — your kitchen is going to smell incredible right about now.
Add the ground beef and break it apart as it cooks. You want it fully browned with no pink remaining, which takes about 6-8 minutes. Drain any excess fat if needed, but leave a little for flavor.
Stir in the bell pepper and zucchini and cook for 3 minutes. Add the tomato paste, Worcestershire sauce, garlic powder, onion powder, salt, and pepper. Pour in the beef broth and let everything simmer together for about 5 minutes until the liquid reduces slightly and the filling thickens up. Remove from heat and set aside.
Step 2: Prep the cauliflower mash
While the filling simmers, bring a large pot of salted water to a boil. Add your cauliflower florets and cook for about 8-10 minutes until they’re very tender — you want them soft enough to mash easily.
Drain the cauliflower really well. This part matters more than you think. Any excess water in the cauliflower will make your mash watery, and nobody wants that. Let it sit in the colander for a couple of minutes and even pat it dry with a paper towel if needed.
Transfer the cauliflower to a food processor or blender. Add the butter, cream cheese, parmesan, salt, and pepper. Blend until completely smooth and creamy. Taste it and adjust seasoning as needed. FYI — if it tastes good at this stage, it’s going to taste even better after baking.
Step 3: Assemble and bake
Preheat your oven to 400°F (200°C). Transfer your meat filling into a 9×13 inch baking dish if it isn’t already in one. Spread it out into an even layer across the bottom.
Spoon the cauliflower mash over the top of the meat filling and spread it out evenly using a spatula or the back of a spoon. If you’re adding shredded mozzarella, sprinkle it on top now.
Bake uncovered for 20-25 minutes until the top is golden and the edges are bubbling. If you want a deeper golden color on top, switch to broil for the last 2-3 minutes — just keep an eye on it so it doesn’t burn. Let it cool for 5 minutes before serving.
Serving suggestions
- Serve it straight from the baking dish with a simple side salad dressed in olive oil and lemon. The freshness of the salad balances the richness of the pie perfectly.
- A side of roasted broccoli or green beans works really well alongside this dish and keeps everything keto friendly.
- If you’re serving this at a dinner gathering, portion it out into individual ramekins before baking for a more elegant presentation. People love their own little personal pie — IMO it just hits different.
- A dollop of sour cream on top right before serving adds a nice tangy contrast to the savory filling.
Storage tips
Refrigerator: Store leftovers in an airtight container or cover the baking dish tightly with plastic wrap. It keeps well in the fridge for up to 4 days. The flavors actually deepen overnight, so day-two leftovers are arguably even better.
Freezer: This recipe freezes beautifully. Let it cool completely, then portion it into freezer-safe containers. It keeps in the freezer for up to 3 months. Perfect for those nights when cooking is absolutely not happening.
Reheating: Reheat individual portions in the microwave for 2-3 minutes. If reheating the whole dish, cover it with foil and warm it in the oven at 350°F for about 20 minutes. Remove the foil for the last 5 minutes to re-crisp the top.
Wrapping it up
This keto shepherd’s pie is the kind of recipe that proves you don’t have to sacrifice comfort to eat well. The cauliflower mash is creamy, the filling is rich and deeply savory, and the whole thing comes together in under an hour. It’s the dish I turn to when I need something that feels indulgent but keeps me on track.
Give it a try this week and let me know how it goes in the comments below. And if you end up putting your own spin on it — different veggies, extra cheese, ground lamb — I’d love to hear about it. That’s what cooking is all about.
Until next time, let’s keep it delicious. — Kip
Keto Shepherd’s Pie with Cauliflower Mash (Low Carb & Incredibly Comforting)
Description
A hearty keto shepherd's pie made with a savory seasoned ground beef and vegetable filling, topped with ultra-creamy cauliflower mash and baked to golden perfection. All the comfort, none of the guilt.
Ingredients
Meat filling:
Cauliflower mash:
Instructions
-
Heat olive oil in a large pan over medium-high heat. Saute onion for 3 minutes, add garlic and cook 1 minute more.
-
Add ground beef and cook until browned, about 6-8 minutes. Drain excess fat.
-
Add bell pepper and zucchini, cook 3 minutes. Stir in tomato paste, Worcestershire sauce, seasonings, and beef broth. Simmer 5 minutes.
-
Boil cauliflower florets until very tender, about 8-10 minutes. Drain well and pat dry.
-
Blend cauliflower with butter, cream cheese, parmesan, salt, and pepper until smooth.
-
Preheat oven to 400°F. Spread meat filling in a 9x13 baking dish. Top with cauliflower mash.
-
Bake 20-25 minutes until golden. Broil 2-3 minutes for extra color if desired. Rest 5 minutes before serving.
