

Look — I have seen a lot of viral food trends come and go. Cloud bread. Cauliflower everything. Banana oat cookies that taste exactly like what you imagine banana oat cookies would taste like. So when cottage cheese wraps started showing up everywhere I was, to put it mildly, unconvinced.
A wrap made from blended cottage cheese and eggs? Baked in the oven? That holds together and tastes good? Sure. Right. Absolutely.
Then I made them. And I genuinely could not believe how well they worked. The texture is slightly chewy, slightly crispy at the edges, and flexible enough to fold without cracking. They taste mild and creamy — almost like a very thin omelette meets a flatbread — and they hold up to fillings without falling apart. FYI, I have made them at least a dozen times since that first batch and I have zero regrets. This one is the real deal.
Why you’ll love this recipe
- Just two main ingredients for the wrap itself. Cottage cheese and eggs. That is genuinely it. Everything else is filling and seasoning — completely up to you.
- Seriously high in protein. Between the cottage cheese, eggs, and whatever protein filling you choose, this wrap delivers a protein punch that keeps you full for hours. No mid-afternoon energy crash.
- Completely gluten free. No flour anywhere in this recipe. Great for anyone with gluten sensitivities or anyone just trying to cut back on processed carbs.
- Flexible enough to actually fold. Unlike some low carb wrap alternatives that crack and fall apart the moment you touch them, these hold together properly. You can fold them, wrap them, and eat them like a real sandwich.
- Endlessly customizable. The wrap itself is a blank canvas. BLT style, tuna salad, grilled chicken, hummus and roasted vegetables — it works with pretty much anything you want to put in it.
- Meal prep friendly. Bake a batch of wraps at the start of the week and store them in the fridge. Lunch is sorted for days with almost zero daily effort.
Ingredients and key notes
For the cottage cheese wrap:
- 1 cup full fat cottage cheese — This is the base of your wrap. Full fat gives you the best texture — it bakes into a more cohesive, flexible sheet than low fat versions which tend to be wetter and more fragile. Do not skip draining any excess liquid from the cottage cheese before blending — a drier base means a better wrap.
- 2 large eggs — The binding agent that holds the whole thing together. Use room temperature eggs for a smoother blend.
- 1/4 teaspoon garlic powder — Adds a subtle savory flavor to the wrap base without overpowering it.
- 1/4 teaspoon onion powder — Works alongside the garlic powder to give the wrap a mild depth of flavor.
- Salt and black pepper to taste — Season the base mixture well — a bland wrap means a bland bite even with good fillings.
- Fresh chives or herbs, finely chopped — Optional but adds a lovely freshness and a little color to the wrap itself.
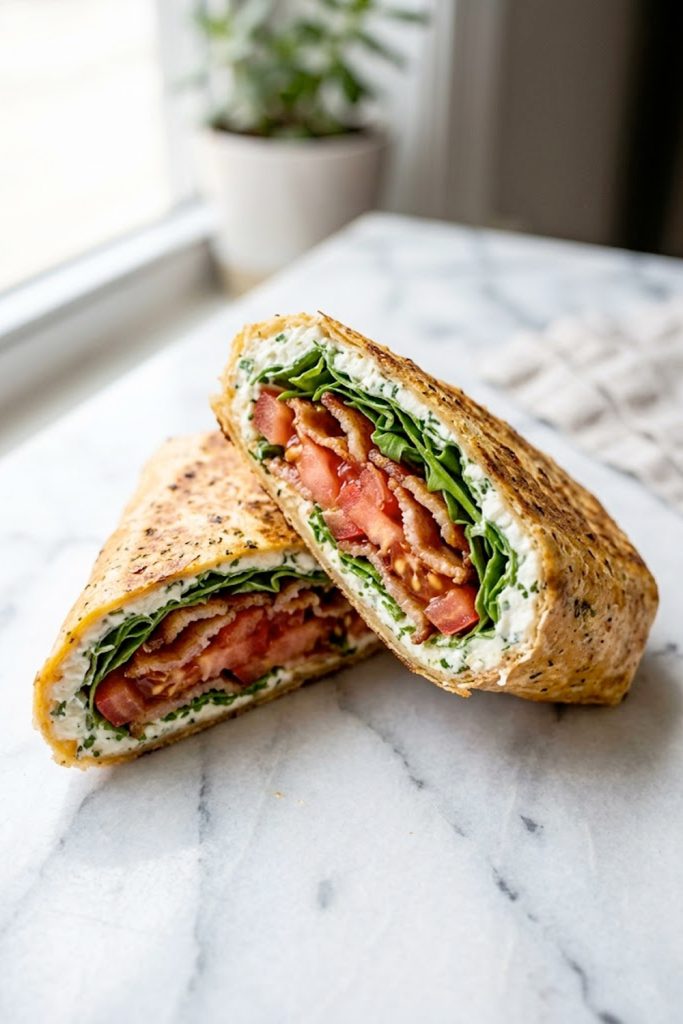
For the BLT filling shown in the pin:
- 4 strips crispy bacon — Cook until properly crispy so it holds up inside the wrap without going soggy. Streaky bacon works best here.
- 2 medium tomatoes, sliced — Use ripe, firm tomatoes and slice them not too thick so they sit flat inside the wrap.
- 1 cup fresh lettuce or arugula — Arugula adds a peppery bite that pairs beautifully with the creamy cottage cheese wrap. Romaine or butter lettuce work great too.
- 2 tablespoons cream cheese or cottage cheese spread — Spread inside the wrap before adding the filling to add a creamy layer that ties everything together.
- Salt and black pepper to taste
Step-by-step instructions
Step 1: Preheat your oven
Preheat your oven to 350 degrees F (175 degrees C). Line a large baking sheet with parchment paper and lightly spray it with cooking spray. This step is non-negotiable — the wrap will stick to an unlined pan and you will not get it off in one piece.
Step 2: Blend the wrap mixture
Add the cottage cheese and eggs to a blender or food processor. Blend on high for about 30 to 45 seconds until the mixture is completely smooth with no visible curds remaining. Add the garlic powder, onion powder, salt, pepper, and any chopped herbs. Blend for another 10 seconds to combine. The mixture should look like a smooth, slightly thick pancake batter.
Step 3: Pour and spread
Pour the blended mixture onto the center of your prepared baking sheet. Using a spatula or the back of a spoon, spread it out into a thin, even rectangle or oval shape — roughly 10 by 12 inches. The thinner and more even you spread it, the better the texture and the more flexible the final wrap will be. Aim for an even thickness throughout so it bakes uniformly.
Step 4: Bake
Place the baking sheet in the preheated oven and bake for 25 to 30 minutes. The wrap is ready when the edges are golden brown and slightly pulled away from the parchment paper, the surface looks dry and set rather than wet or glossy, and the center feels firm when you gently press it. Do not rush this step — an underbaked wrap will tear when you try to fold it.
Step 5: Cool before peeling
This is the step most people rush and then regret. Let the wrap cool on the baking sheet for at least 5 to 8 minutes before attempting to peel it off the parchment paper. Once it has cooled slightly, peel it away from the parchment gently and carefully — it should come off cleanly in one piece. If it tears at the edges, give it another minute or two to cool.
Step 6: Cook the bacon
While the wrap is cooling, cook your bacon strips in a skillet over medium-high heat until properly crispy. Drain on paper towels. Crispy bacon is important here — limp bacon releases moisture inside the wrap and makes everything soggy.
Step 7: Assemble the wrap
Place the cooled wrap on a clean surface. Spread the cream cheese or cottage cheese spread across one half of the wrap. Layer the crispy bacon strips, fresh tomato slices, and arugula or lettuce on top of the spread. Season with a little salt and black pepper. Fold the wrap in half over the filling. Press gently to hold it together.
Step 8: Optional — toast for a crispy finish
For an extra layer of texture, place the folded wrap in a dry skillet or sandwich press over medium heat for 1 to 2 minutes per side until golden grill marks appear on the outside. This step is optional but it takes the wrap to a completely different level — crispy on the outside, creamy and fresh on the inside.
Step 9: Slice and serve
Cut the wrap in half diagonally and serve immediately. The cross section reveals all those beautiful layers inside and trust me — it looks as good as it tastes.
Serving suggestions
- Serve with a small side salad of mixed greens and a light lemon vinaigrette for a complete and balanced lunch.
- A handful of cherry tomatoes and sliced cucumber on the side keeps things fresh and light without adding many calories.
- These wraps pair really well with a bowl of soup on the side — tomato soup especially complements the BLT style filling beautifully.
- For a heartier meal, add sliced avocado inside the wrap alongside the bacon and tomato — it adds a creamy richness that works incredibly well.
- If you are meal prepping, store the baked wraps and fillings separately and assemble just before eating so the wraps stay crispy and the greens stay fresh.
Storage tips
Baked wraps — refrigerator: Store baked, unfilled cottage cheese wraps stacked between sheets of parchment paper in an airtight container or zip-lock bag in the fridge for up to 4 days. They stay flexible and peel apart easily when stored this way.
Baked wraps — freezer: These wraps freeze really well. Stack them with parchment paper between each one, wrap the stack tightly in foil, and freeze for up to 2 months. Thaw at room temperature for about 15 minutes before filling and eating or warming in a skillet.
Assembled wraps: Once filled, these are best eaten immediately. The moisture from the tomato and greens will start to soften the wrap if it sits for too long. If you need to take one to go, wrap it tightly in foil and eat within a few hours.
Reheating: Warm unfilled wraps in a dry skillet over medium heat for about 1 minute per side or pop them in a toaster oven for 3 to 4 minutes until warmed through and slightly crispy again.
Let’s wrap this up
I know — cottage cheese wrap sounds like diet food. It sounds like the kind of thing you eat while staring sadly at someone else’s sandwich. But I promise you, that is not what this is.
This is a genuinely good wrap that happens to be high in protein and low in carbs. It holds together, it tastes great, and it makes lunch feel like something worth looking forward to rather than something you just get through. Give it a try this week and let me know what you filled yours with.
Drop a comment below, share it on Pinterest, or tag me in your version — I love seeing the creative fillings people come up with. Happy cooking — Kip.
Cottage cheese wraps – the high protein low carb lunch you’ll make on repeat
Description
These cottage cheese wraps are made from just cottage cheese and eggs, blended smooth and baked into a golden, flexible wrap that holds together beautifully. High in protein, low in carbs, and completely gluten free — fill them with crispy bacon, fresh tomato, and greens for a lunch that feels indulgent but is anything but.
Ingredients
For the wrap:
For the BLT filling:
Instructions
-
Preheat oven to 350 degrees F (175 degrees C). Line a large baking sheet with parchment paper and lightly grease.
-
Blend cottage cheese and eggs until completely smooth. Add garlic powder, onion powder, salt, pepper, and herbs. Blend to combine.
-
Pour mixture onto prepared baking sheet and spread into a thin even rectangle approximately 10 by 12 inches.
-
Bake for 25 to 30 minutes until edges are golden, surface is dry and set, and center feels firm.
-
Cool for 5 to 8 minutes then carefully peel away from parchment paper.
-
Cook bacon until crispy and drain on paper towels.
-
Spread cream cheese across one half of the wrap. Layer bacon, tomato slices, and arugula on top. Season with salt and pepper.
-
Fold the wrap over the filling and press gently.
-
Optional: toast in a dry skillet or sandwich press for 1 to 2 minutes per side until golden.
-
Slice diagonally and serve immediately.
