
You know those bananas. The ones that started out bright yellow and full of potential, and now they're sitting on your counter looking like they've given up on life. Dark, spotty, soft — completely ignored by everyone in the house. Sound familiar?
Here's the thing though — those sad, overripe bananas are actually at their absolute peak for baking. The riper the banana, the sweeter and more intense the flavor. And when you bake them into these bars and pour a warm brown butter glaze over the top, something genuinely magical happens.
I made these on a whim one afternoon with three bananas that were about 48 hours away from the trash. What came out of the oven was so good that I had to text my sister the recipe immediately. That brown butter glaze alone is worth making this for. Trust me on that one.
For the banana bread brownie base:
For the brown butter glaze:
Key notes:
Step 1: Preheat and prep your pan
Preheat your oven to 375 degrees F (190 degrees C). Grease a 9x13 inch baking pan well with butter or non-stick spray, then line it with parchment paper leaving some overhang on the sides. That overhang will help you lift the bars out cleanly later. Set the pan aside.
Step 2: Mash your bananas
Peel your overripe bananas and mash them in a bowl with a fork until mostly smooth. A few small lumps are completely fine — they actually add nice texture to the finished bar. You should have about 1 and 1/2 cups of mashed banana. Set aside.
Step 3: Mix your wet ingredients
In a large mixing bowl, beat the softened butter with the granulated sugar and brown sugar until light and fluffy, about 2-3 minutes. Add the eggs one at a time, beating after each addition. Mix in the mashed bananas, sour cream, and vanilla extract until everything is well combined. The batter will look a little loose at this point — that is completely normal.
Step 4: Add the dry ingredients
Add the flour, baking soda, and salt to the wet ingredients. Fold gently with a rubber spatula until just combined. Stop as soon as you no longer see streaks of flour. Overmixing will make your bars dense and tough instead of soft and tender.
Step 5: Fold in the walnuts and bake
If you are using walnuts, fold them in now. Pour the batter into your prepared pan and spread it into an even layer with your spatula. Bake for 25-30 minutes, until the top is lightly golden and a toothpick inserted into the center comes out clean or with just a few moist crumbs. Start checking at the 25-minute mark.
Step 6: Make the brown butter glaze
While the bars are cooling, make your glaze. Place the butter in a small light-colored saucepan over medium heat. Melt it completely, then continue cooking, swirling the pan occasionally. After about 3-4 minutes you will start to see golden brown bits forming at the bottom and it will smell deeply nutty. The moment that happens, pull the pan off the heat immediately and pour the brown butter into a mixing bowl. Whisk in the sifted powdered sugar and vanilla extract. Add milk one tablespoon at a time, whisking until you reach a smooth, pourable consistency.
Step 7: Glaze and slice
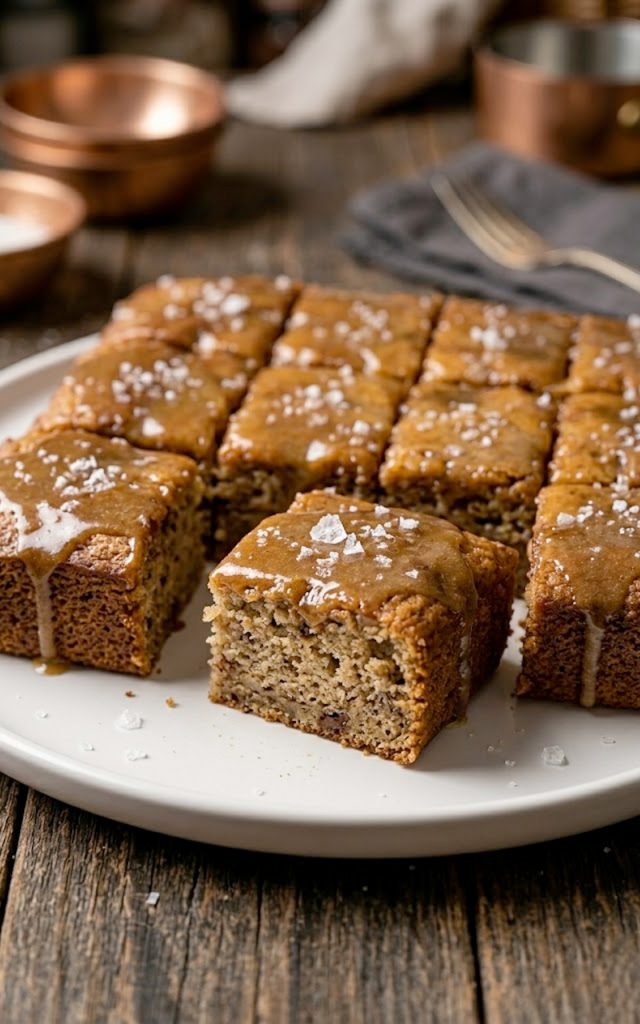
Pour the warm brown butter glaze over the bars while they are still slightly warm. Use a spatula to spread it evenly all the way to the edges. If you are using coarse sea salt, sprinkle it over the glaze now while it is still wet. Let the glaze set for about 15-20 minutes before lifting the bars out of the pan using the parchment overhang and slicing into squares.
Room temperature: Store the bars in an airtight container at room temperature for up to 3 days. Place parchment paper between layers if stacking to keep the glaze from sticking.
Refrigerator: These bars keep well in the fridge for up to 5 days. The glaze will firm up slightly when chilled, which actually makes them easier to handle and eat. Let them come to room temperature for about 10 minutes before serving if you prefer them softer.
Freezer: These freeze incredibly well. Slice the bars first, then wrap each one individually in plastic wrap and place them in a zip-lock freezer bag. Freeze for up to 3 months. Thaw at room temperature or microwave for 20-30 seconds straight from frozen.
Pro tip: If you want to make these ahead for an event, bake the bars a day in advance and pour the glaze on the morning of. The bars stay perfectly moist overnight and the fresh glaze makes them look and taste like they just came out of the oven.
Every time I make these banana bread brownies I am reminded of why I started cooking in the first place — to take something simple, something that was almost wasted, and turn it into something that genuinely brings people together. Three overripe bananas and a handful of pantry staples, and suddenly you have something that people are reaching for seconds and thirds of.
That brown butter glaze is the kind of thing that makes people ask you for the recipe before they have even finished eating. And honestly? That never gets old.
If you make these, I want to hear about it. Drop a comment below, leave a review, or tag me on Pinterest. This community is everything to me and every single person who tries one of these recipes and shares it back is the reason I keep showing up in this kitchen.
With gratitude, Kip.
These banana bread brownies are what happens when two comfort food classics collide in the best possible way. The base is everything you love about banana bread — soft, moist, full of ripe banana flavor — but baked flat into bars and finished with a rich, nutty brown butter glaze that takes the whole thing to another level entirely. If you have overripe bananas sitting on your counter right now, this is exactly what they were waiting for.