
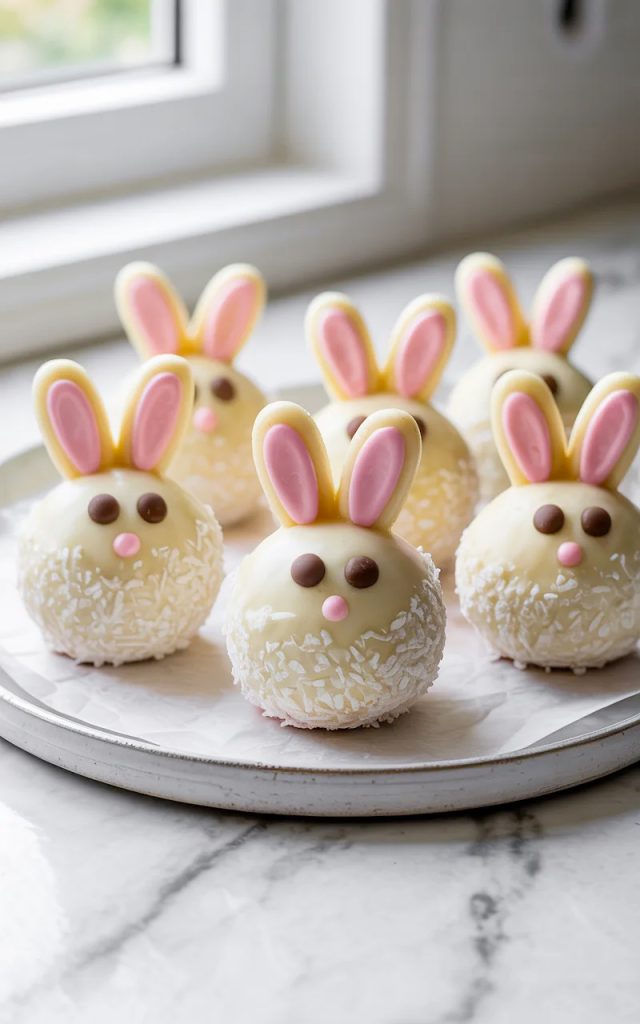

There are cute Easter treats and then there are these. Little white chocolate and coconut covered Oreo truffle bunnies sitting on a plate looking up at you with their tiny chocolate chip eyes and pink candy ears.
The moment you put these out at an Easter gathering the room stops. People grab their phones before they grab a treat. Kids lose their minds completely. Adults are not much more composed.
And here is the thing that makes it even better — these are no-bake, three-ingredient Oreo balls at their core. Crushed Oreos, cream cheese, white chocolate. That is the foundation. The bunny transformation happens in the decorating step and it is easier than it looks.
Pink candy melts cut into ear shapes, two mini chocolate chips for eyes, a roll in shredded coconut for that fluffy bunny fur effect. The whole process is fun, the results are absolutely adorable, and the taste is that rich, fudgy Oreo truffle filling that people cannot stop eating.
I make these every Easter without fail and they consistently get more reaction than anything else on the dessert table — including things that took three times as long. If you are looking for the Easter treat that earns you legend status in your household, this is it. Let me walk you through exactly how to make them.
Why You’ll Love This Recipe
- Absolutely zero baking required. The oven stays off for this one entirely. If you can crush cookies, melt chocolate, and roll a ball between your palms you can make these. They are genuinely accessible for any skill level.
- The reaction they get is completely out of proportion to the effort. These look like they took hours and professional decorating skill. They take about an hour including chill time and the decorating is straightforward once you know the technique.
- That Oreo truffle filling is deeply satisfying. Rich, fudgy, and intensely chocolatey with just enough cream cheese tang to keep it from being one-dimensional. The white chocolate shell and coconut coating add texture and sweetness that makes every bite completely balanced.
- Kids absolutely love every single step. Rolling the balls, dipping in chocolate, rolling in coconut, pressing on the ears and eyes — this is a full family activity that ends with everyone eating something delicious and feeling proud of what they made.
- Make-ahead friendly. These need to chill before serving which means making them a day ahead is not just allowed — it is encouraged. One less thing to think about on Easter morning.
- They work as gifts, party treats, and table centerpieces. A plate of these bunny Oreo balls is a complete Easter presentation on its own. They are also easy to pack into boxes as gifts and ship without damage.
Ingredients
For the Oreo Balls
- 36 Oreo cookies, one standard package — use the classic original Oreos, filling and all. The filling is part of the binding so do not scrape it out. Crush the entire cookie — cream filling included — into fine crumbs. A food processor gives you the most uniform crumb in about 30 seconds. A zip-lock bag and rolling pin work perfectly well too — just make sure you get the crumbs as fine as possible. Large chunks make shaping difficult and give you a rougher textured truffle.
- 8 oz cream cheese, fully softened — room temperature is non-negotiable here. Cold cream cheese will not blend smoothly into the Oreo crumbs and you will end up with a lumpy, unevenly textured filling that is difficult to roll into smooth balls. Give it a full hour on the counter before you start.
For the Coating
- 16 oz white chocolate melting wafers — melting wafers are strongly preferred over white chocolate chips for this recipe. They melt more smoothly, coat more cleanly, and set up with a better shine. If you use white chocolate chips, add a teaspoon of coconut oil to help them melt more evenly. Do not overheat white chocolate — it seizes fast. Always melt in 30-second microwave intervals, stirring between each.
- 1 1/2 cups sweetened shredded coconut — this is what gives the bunnies their fluffy white fur look. Sweetened shredded coconut has the right texture and moisture level to cling to the white chocolate coating beautifully. Fine desiccated coconut is too powdery and will not give you that fluffy fur effect. You can lightly toast some of the coconut for a more textured look if you prefer.
- 1/2 cup pink shredded coconut (optional) — for a sweet detail, toss some of the shredded coconut with a tiny drop of pink food coloring for a pink-tinged coconut topping that adds an extra Easter flair. Completely optional but really adorable on some of the bunnies.
For the Bunny Decorations
- Pink candy melts — these get melted and either piped or spooned into small ear shapes on parchment paper to set. You will make two ears per bunny so plan for 48 ear shapes for a batch of 24 bunnies. They can be made ahead and stored at room temperature.
- Mini chocolate chips — two per bunny for the eyes. Mini chips work better than regular sized chips because they are proportional to the size of the truffle. Press them in point-side down for a flat, secure eye that looks just right.
- Pink candy melts or pink food coloring — a tiny dot of melted pink candy melt applied with a toothpick makes the little nose on each bunny. This is a tiny detail that makes a big difference in how finished and adorable the final result looks.
Step-by-Step Instructions
Step 1: Make the Bunny Ears First
- Melt the pink candy melts according to package directions in a microwave-safe bowl — 30-second intervals, stirring between each. Transfer the melted pink candy to a small zip-lock bag and snip a very small corner off the tip.
- Pipe small ear shapes onto a parchment paper lined baking sheet — two elongated teardrop or oval shapes side by side slightly connected at the base, like two bunny ears. Make them about 3/4 inch tall. You need two ears per bunny so pipe at least 48 to 50 ear pairs and a few extras for any that break.
- Let the ears set completely at room temperature or in the refrigerator for about 15 minutes until fully hardened. Handle them gently — they are delicate. Set aside until ready to decorate.
Step 2: Make the Oreo Filling
- Crush the Oreos into fine crumbs in a food processor — about 30 seconds of processing until completely uniform with no large chunks. If using a bag and rolling pin, really work it until the crumbs are as fine as possible.
- Add the softened cream cheese to the food processor and pulse until the mixture comes together into a smooth, uniform dark dough that holds its shape when pressed. If mixing by hand, combine in a large bowl with a hand mixer until fully incorporated.
Step 3: Shape and Chill
- Scoop the Oreo mixture using a tablespoon or small cookie scoop — about 1 to 1.5 tablespoons per ball. Roll each portion between your palms into a smooth, uniform ball. Work quickly — the warmth of your hands softens the mixture fast.
- Place each ball on a parchment paper lined baking sheet as you go. You should get approximately 24 balls from one batch.
- Refrigerate for at least 30 minutes until firm and cold all the way through. Cold balls dip cleanly and hold their shape in the warm chocolate. Do not rush this step.
Step 4: Coat in White Chocolate
- Melt the white chocolate melting wafers in 30-second microwave intervals, stirring between each, until completely smooth. Do not overheat — white chocolate seizes quickly. Stop microwaving when it is mostly melted and stir until the residual heat finishes the job.
- Working one at a time, drop a chilled Oreo ball into the melted white chocolate. Use a fork to roll it around until completely coated, then lift it out and tap the fork gently against the side of the bowl to let the excess drip off.
- Place the coated ball back on the parchment-lined baking sheet. Work quickly — the white chocolate sets fast on the cold Oreo balls.
Step 5: Roll in Coconut
- While the white chocolate coating is still wet, immediately roll each coated ball in the shredded coconut. You can either roll it directly in a bowl of coconut or use your fingers to press the coconut gently all around the surface. Make sure the entire ball is covered for the full fluffy bunny fur effect.
- Place the coconut-coated ball back on the parchment-lined baking sheet. If you are using pink coconut for some of the bunnies, roll those separately in the pink coconut immediately after coating.
- Let all the coated balls set for about 10 minutes until the chocolate is fully firm before adding the decorations.
Step 6: Add the Bunny Details
- Add the eyes first. Press two mini chocolate chips point-side down into the upper half of each coconut-covered ball, placed close together to look like bunny eyes. Press them in firmly so they stay put.
- Add the nose. Dip a toothpick into a small amount of melted pink candy melt and dab a tiny dot below and between the eyes for the nose. It is a small detail but it makes these look completely finished and incredibly cute.
- Insert the ears. Gently press the base of each pre-made pink candy melt ear pair into the top of the ball. Press firmly but carefully so the ears stand upright without snapping. If an ear breaks, use a small dab of melted white chocolate as glue to piece it back together.
- Refrigerate the finished bunnies for 15 minutes to set everything completely before arranging on a plate or storing.
Serving Suggestions
These Bunny Oreo Balls are a complete presentation on their own but here are some ideas for serving them beautifully:
- Arrange them on a white cake stand or tiered dessert stand. The contrast of the white coconut-covered bunnies against a white stand with their pink ears and chocolate eyes is an incredibly clean and beautiful presentation that looks completely professional.
- Nestle them in a bed of Easter grass on a platter. Green Easter grass underneath the bunnies makes them look like they are sitting in a little meadow. It is an incredibly charming presentation that guests always love.
- Include them on your Easter dessert board alongside the Cadbury Egg Cookies, Italian Easter Cookies, and Easter Bunny Chow for a spread that genuinely looks catered.
- Gift them in a small box lined with tissue paper. These make a genuinely beautiful Easter gift. A white box with a few bunnies inside tied with a ribbon is the kind of homemade gift people remember.
- Set up a decorating station for kids. Make the Oreo balls and coat them in white chocolate and coconut, then let kids press on the ears, eyes, and noses themselves. It is one of the most fun Easter activities you can do with little ones and they are incredibly proud of the bunnies they make.
- Place one next to each place setting as an edible Easter favor at the dinner table. It doubles as a decoration and a treat and guests absolutely love finding a little bunny at their seat.
Storage Tips
- Refrigerator: Store the finished bunny Oreo balls in a single layer in an airtight container in the refrigerator for up to 1 week. If you need to stack them, place a sheet of parchment between layers and be gentle with the ears — they are the most fragile part.
- Room Temperature: These can sit out at room temperature for up to 2 hours while serving. After that the cream cheese filling needs to go back in the refrigerator.
- Freezer: These freeze well. Place in a single layer on a baking sheet and freeze until solid — about 1 hour — then transfer to a freezer-safe airtight container. Freeze for up to 6 weeks. Thaw in the refrigerator overnight. Note that the coconut can absorb a little moisture during thawing — this does not affect the flavor but may slightly change the look.
- Make the Ears Ahead: The pink candy melt ears can be made up to a week ahead and stored at room temperature between sheets of parchment paper in an airtight container. This makes the final assembly much faster on the day you need them.
- Make-Ahead Option: The Oreo balls can be made, coated in white chocolate and coconut, and stored in the refrigerator up to 2 days before the decorating step. Add the ears, eyes, and noses on the day you plan to serve them for the freshest and most intact presentation.
The Cutest Thing You Will Put on Your Easter Table This Year
There is something genuinely joyful about a dessert that looks like a little animal. These bunny Oreo balls sit there on the plate with their pink ears and little chocolate chip eyes looking completely innocent while being absolutely loaded with rich Oreo truffle filling. They make people smile before they even take a bite. And then they take a bite and the smiling gets even bigger.
Whether you make these with kids as an Easter activity, bring them to a gathering as a showstopper dessert, or pack them into boxes as the most charming homemade Easter gift anyone has ever received — these bunnies deliver every single time.
Make a batch this Easter and show me what you create. Drop a comment below with how the decorating went — especially if a bunny lost an ear or two along the way, because that happens to the best of us and they are still delicious. Tag me on Pinterest or Instagram so I can see your adorable bunnies. Happy no-baking.
— Kip
Bunny Oreo Balls (The Cutest No-Bake Easter Treat You Will Ever Make)
Description
Crushed Oreos and cream cheese rolled into smooth balls, dipped in white chocolate, rolled in shredded coconut, and finished with pink candy bunny ears and chocolate chip eyes. The most adorable Easter treat you will put on your table this year and one of the easiest things you will ever make.
Ingredients
For the Oreo Balls:
For the Coating:
For the Bunny Decorations:
Instructions
-
Melt pink candy melts and pipe bunny ear pairs onto parchment paper. Let set completely.
-
Crush Oreos into fine crumbs. Add softened cream cheese and mix until a smooth uniform dough forms.
-
Scoop and roll into 24 smooth balls. Place on parchment-lined baking sheet and refrigerate 30 minutes.
-
Melt white chocolate in 30-second intervals until smooth. Dip each chilled ball, let excess drip off, and place on parchment.
-
Immediately roll each coated ball in shredded coconut until fully covered. Let set 10 minutes.
-
Press two mini chocolate chips point-side down for eyes. Add a tiny pink candy melt nose dot with a toothpick.
-
Gently press pink candy melt ear pairs into the top of each ball.
-
Refrigerate 15 minutes to set completely before serving.
