
I have a weakness for caramel. Always have. There is something about that deep, buttery, slightly bitter sweetness that makes everything it touches immediately better. Caramel on ice cream, caramel in coffee, caramel drizzled over literally anything — I am here for all of it. So when I started experimenting with ways to get caramel into a cookie bar, I knew I was either going to create something incredible or eat a lot of mediocre attempts along the way.
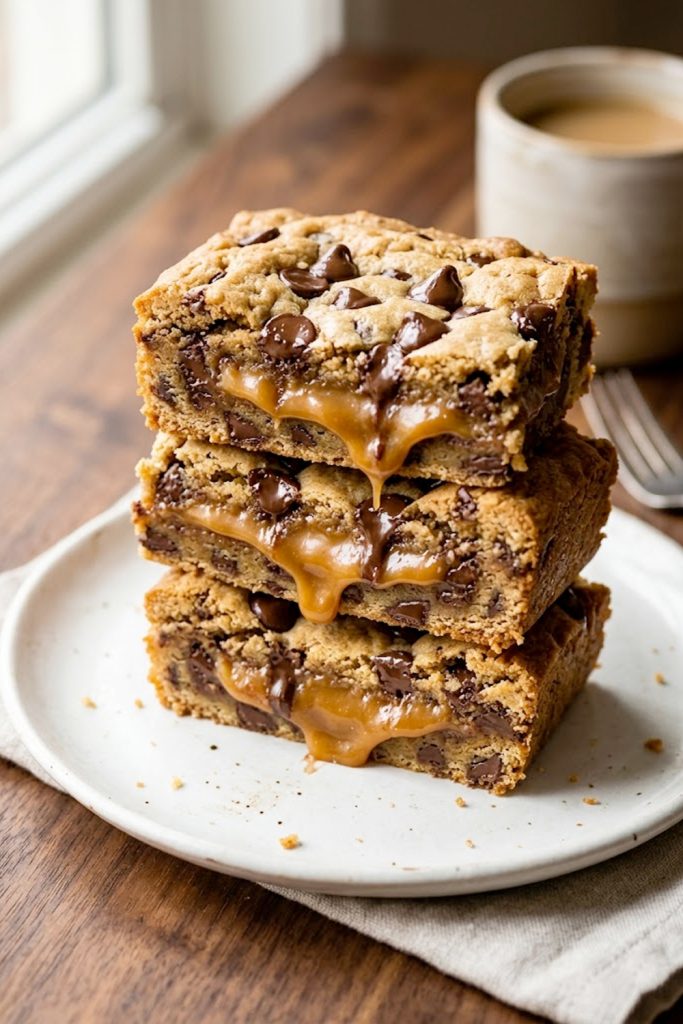
Turns out it did not take many attempts at all. These caramel cookie bars are layered in the most satisfying way — a soft, chewy cookie base pressed into the pan, a thick layer of warm gooey caramel poured right on top, another layer of cookie dough crumbled over that, and then chocolate chips pressed into the surface before the whole thing goes into the oven. What comes out is something that looks almost too good to cut into and tastes even better than it looks.
The caramel pools between the cookie layers and sets into this sticky, gooey ribbon that you hit with every single bite. Combined with the melted chocolate chips and that soft buttery cookie dough — this bar is the kind of dessert people talk about. Fair warning: make a full batch because these disappear faster than you will expect.
For the cookie dough:
Note: Melted butter is essential for the chewy texture in both cookie layers. Softened or creamed butter will give you a cakier, lighter result that does not hold the caramel layer as well. Stick with melted.
Note: Room temperature eggs blend into the melted butter more smoothly than cold eggs. Cold eggs can cause the butter to solidify slightly and create an uneven dough texture. Pull them out of the fridge 20 minutes before you start.
Note: The dough will be thick and slightly sticky — that is exactly right. It should not be pourable but it should be soft enough to press into the pan and crumble over the top without cracking.
For the caramel layer:
Note: Use a thick caramel sauce rather than a thin caramel syrup. Thin caramel will soak straight into the cookie dough and disappear during baking — you want something thick enough to stay as a visible layer. Werther's soft caramels melted with a splash of cream is an excellent option if you want a foolproof caramel layer.
Note: If using store-bought caramel sauce, warm it gently in a small saucepan with the heavy cream and salt, stirring until smooth. This loosens it just enough to pour easily without making it too thin.
Note: The salt in the caramel layer is not optional in my kitchen. That touch of salt against the sweetness of the caramel and chocolate is what takes these bars from good to genuinely unforgettable. Salted caramel is always the answer.
Note: If you want to make the caramel layer from scratch, melt 11 oz of soft caramel candies with 3 tablespoons of heavy cream in a saucepan over low heat, stirring constantly until completely smooth. Season with salt. This gives you a thick, stable caramel that bakes beautifully.
Step 1: Preheat and prep the pan
Preheat your oven to 350°F / 175°C. Line a 9x13 inch baking pan with parchment paper, leaving overhang on all four sides if possible. This overhang is how you lift the entire slab cleanly out of the pan for cutting — do not skip it. Lightly grease the parchment. Set aside.
Step 2: Make the caramel layer
If using store-bought caramel sauce, combine it in a small saucepan with heavy cream and salt over low heat. Stir gently until smooth and pourable — about 2 minutes. If using soft caramel candies, unwrap them and melt with heavy cream over low heat, stirring constantly until completely smooth. Season with salt. Set aside to cool slightly while you make the cookie dough.
Step 3: Make the cookie dough
Whisk the flour, baking soda, and salt together in a medium bowl. In a large mixing bowl, whisk the melted butter with both sugars until smooth and glossy — about 90 seconds. Add the eggs one at a time, whisking well after each. Add the vanilla extract and whisk until the mixture is thick and slightly pale. Add the flour mixture all at once and fold with a rubber spatula until just combined. Fold in one cup of the chocolate chips. The dough will be thick and soft.
Step 4: Press the bottom layer
Divide the dough roughly in half. Take the first half and press it evenly into the bottom of the prepared baking pan. Use your hands or the back of a lightly greased spatula to get it into an even layer all the way to the corners and edges. The layer will be thin — that is correct. This is your base.
Step 5: Add the caramel layer
Pour the warm caramel mixture evenly over the pressed cookie dough base. Use a spatula to spread it all the way to the edges, covering the entire surface. Work relatively quickly — if the caramel cools too much it becomes harder to spread. Leave a very thin border around the edges if you want to minimize caramel from bubbling up and sticking to the pan sides during baking.
Step 6: Add the top cookie layer
Take the remaining half of the cookie dough and crumble it in chunks evenly over the caramel layer. You do not need to cover every single spot — the dough will spread slightly during baking and the caramel peeking through the top layer looks intentional and beautiful. Scatter the remaining half cup of chocolate chips over the top and press them lightly into the dough chunks.
Step 7: Bake
Bake at 350°F / 175°C for 25–28 minutes until the top is golden brown and the edges are set and pulling slightly from the sides of the pan. The center will look slightly underdone — that is exactly right. The bars continue cooking from residual heat after you remove them from the oven and the caramel needs time to set properly. Do not overbake chasing a fully set center or you will end up with dry bars and hardened caramel.
Step 8: Cool completely before cutting
This is the hard part. Let the bars cool in the pan on a wire rack for at least 30 minutes before attempting to cut them. The caramel layer needs this time to firm up enough to cut cleanly. If you cut them too early the caramel runs everywhere and while that is delicious it makes for very messy bars. For the cleanest cuts, refrigerate for 20 minutes after the initial cooling period. Lift out using the parchment overhang, transfer to a cutting board, and cut with a sharp knife — wiping the blade between cuts.
Room temperature: Store bars in an airtight container at room temperature for up to 4 days. Place parchment paper between layers to prevent the caramel from sticking bars together. In warmer climates the caramel can get quite soft at room temperature — refrigerating is a better option if your kitchen runs warm.
Refrigerator: Store in an airtight container in the fridge for up to a week. The caramel firms up considerably when chilled which makes the bars easier to handle and gives them a different but excellent texture. Let them sit at room temperature for 10 minutes before eating for the best experience.
Freezer: These freeze exceptionally well for up to 3 months. Wrap individual bars tightly in plastic wrap and store in a freezer-safe bag or container. Thaw at room temperature for about 90 minutes or in the fridge overnight. The caramel layer survives freezing and thawing beautifully — no texture loss whatsoever.
Make-ahead tip: You can make the cookie dough and caramel layer a day ahead and refrigerate them separately. Bring both to room temperature before assembling and baking. Alternatively, bake the fully assembled bars, cool completely, and refrigerate overnight before cutting — the caramel sets perfectly overnight and gives you incredibly clean cuts the next day.
I have made a lot of bars in this kitchen. Brownies, blondies, lemon bars, cookie bars of all kinds. But these caramel cookie bars occupy a very specific category that I call dangerous — the ones where you cut yourself a modest slice and somehow end up going back three more times before you realize what happened.
The caramel does that. It always does. There is something about that gooey sweet ribbon running through the middle of a soft chewy cookie that bypasses every sensible thought and speaks directly to the part of your brain that just wants to be happy.
Make these for someone you love. Make them for a gathering. Make them for yourself on a quiet afternoon and do not apologize for a single bar. That is what good food is for.
Until next time — keep it simple, keep it delicious.
With love, Kip.
These caramel cookie bars bring together a buttery soft cookie dough base, a generous layer of thick gooey caramel, and a crumbled cookie top studded with chocolate chips that melts into everything as it bakes. Each bar delivers a ribbon of sticky caramel running through the middle, surrounded by soft chewy cookie on all sides and pockets of melted dark chocolate throughout. Rich, indulgent, and genuinely one of the best bar desserts you will ever make.