

You know that moment when you’re staring at a pound of ground beef trying to figure out what to do with it for the hundredth time? Yeah, I’ve been there more times than I can count.
One evening I decided to skip the bun entirely and wrap everything inside flaky pastry dough instead. The result was so good that my family asked for it again the very next week. That doesn’t happen often around here.
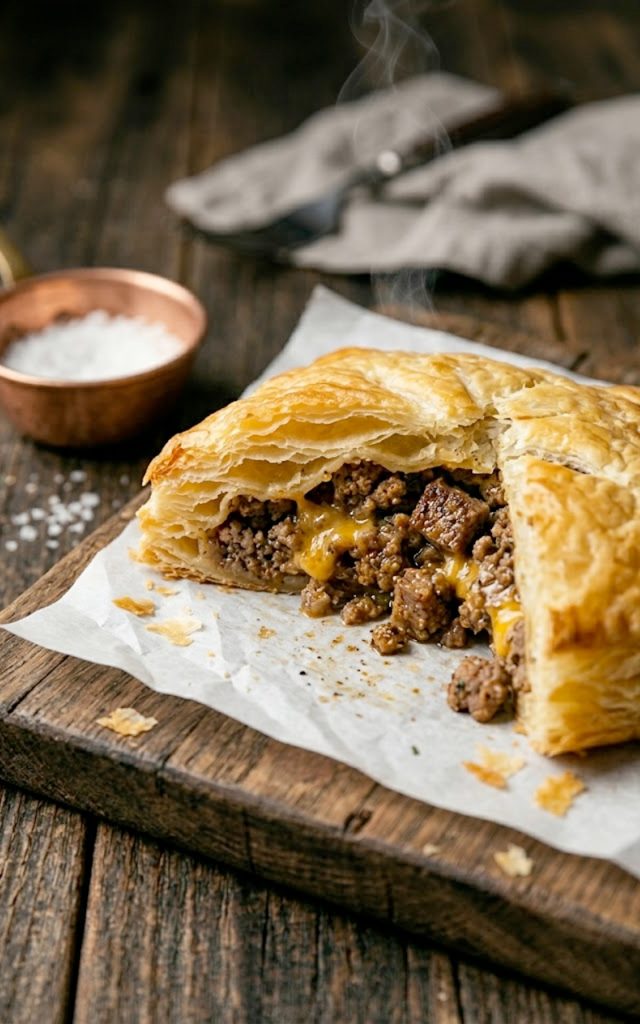
Think of everything you love about a cheeseburger — the seasoned beef, the melted cheddar, the savory flavor — and then imagine all of that tucked inside a golden, flaky pastry pocket that you can hold in one hand. That’s exactly what this is. It’s comfort food that makes sense on a Tuesday night and impressive enough to serve when you have people over.
The best part? The whole thing comes together in under 30 minutes with ingredients that are either already in your kitchen or cost next to nothing at the grocery store. Let’s make something good tonight.
Why you’ll love this recipe
- Every single thing you love about a cheeseburger is here — just wrapped in flaky golden pastry and infinitely more fun to eat
- Kids go absolutely wild for these and that alone makes them worth keeping in your regular rotation
- They are genuinely great for meal prep — make a batch, freeze them, and you have dinner ready to go on the nights when cooking is the last thing you want to do
- From start to finish you are looking at under 30 minutes which makes this one of the fastest comfort food dinners you can put on the table
- Ground beef and puff pastry or crescent dough are two of the most affordable ingredients at any grocery store — this is a budget dinner that does not taste like one
- The filling is completely customizable so everyone at the table can have exactly what they want inside theirs
Ingredients with key notes
Here is everything you need to make these cheeseburger pockets, with a few notes to help you nail them on the first try.
- 1 lb ground beef — 80/20 ground beef is the sweet spot here. Enough fat to keep the filling juicy and flavorful without making it greasy. Leaner beef tends to dry out inside the pastry
- 1 small onion, finely diced — This cooks down into the beef and adds a subtle sweetness and depth to the filling. Dice it small so it distributes evenly
- 2 cloves garlic, minced — Fresh garlic makes the filling taste like it came from a restaurant. Do not skip it
- 1 tbsp Worcestershire sauce — This is the secret weapon. It adds a deep savory umami flavor to the beef that takes it from good to great
- 1 tsp mustard — Yellow or Dijon both work. It adds that classic cheeseburger tang
- 1 tsp ketchup — Just a touch rounds out the flavor and ties everything together
- Salt and black pepper to taste
- 1 package puff pastry or crescent roll dough — Puff pastry gives you those beautiful flaky layers you see in the pin. Crescent roll dough is slightly softer and more bread-like. Both are delicious — it comes down to personal preference. Thaw puff pastry in the fridge overnight if using frozen
- 6 slices American or cheddar cheese — American cheese melts beautifully and gives that classic cheeseburger flavor. Sharp cheddar adds more depth. Use whichever you prefer or do a mix of both
- 1 egg, beaten — This is your egg wash. It gives the pockets that beautiful golden shiny finish when they come out of the oven
- Optional: sesame seeds for topping — A small detail that makes these look like proper cheeseburger-inspired bites
Step-by-step instructions
Step 1: Preheat your oven
Preheat your oven to 400 degrees Fahrenheit and line a baking sheet with parchment paper. Getting the oven fully preheated before the pockets go in is important — you want that immediate high heat to puff and crisp the pastry properly.
Step 2: Cook the beef filling
Heat a large skillet over medium-high heat. Add the ground beef and diced onion and cook, breaking the beef up with a spoon, for about 6-8 minutes until the beef is browned and the onion is soft. Add the minced garlic and cook for another 30 seconds. Drain any excess fat from the pan — this is important because too much grease will make your pastry soggy from the inside.
Step 3: Season the filling
Stir in the Worcestershire sauce, mustard, ketchup, salt, and black pepper. Mix everything together and let it cook for another minute so the flavors come together. Give it a taste at this point and adjust the seasoning if needed. The filling should be bold and well seasoned because the pastry will mellow it out slightly. Set aside and let it cool for a few minutes before assembling.
Step 4: Prepare the dough
If using puff pastry, unfold the sheets on a lightly floured surface and cut each sheet into rectangles — roughly 4×5 inches works well. If using crescent roll dough, unroll and separate into rectangles, pressing the perforated seams together firmly. You want a solid piece of dough with no gaps for the filling to leak through.
Step 5: Assemble the pockets
Lay a piece of cheese on one half of each dough rectangle, leaving about a half inch border around the edges. Spoon a generous amount of the beef filling on top of the cheese. Don’t overfill — as tempting as it is, too much filling makes them hard to seal and the dough can tear. Fold the dough over the filling to create a pocket and press the edges together firmly with your fingers or a fork to seal. Crimping with a fork gives them that classic pocket look and ensures a good seal.
Step 6: Egg wash and bake
Transfer the sealed pockets to your prepared baking sheet. Brush the tops generously with the beaten egg wash — get the edges too. Sprinkle with sesame seeds if you are using them. Bake at 400 degrees for 18-20 minutes until the pockets are deep golden brown and puffed up beautifully. Every oven is a little different so start checking at the 18-minute mark.
Step 7: Rest and serve
Let the pockets rest on the baking sheet for about 5 minutes before serving. The filling will be extremely hot straight out of the oven and the resting time lets everything settle so you don’t burn your mouth on the first bite. Not that I’m speaking from experience or anything. :/
Serving suggestions
These cheeseburger pockets are a complete meal on their own but here are a few ways to make the whole experience even better:
- Set up a dipping sauce situation alongside them — ketchup, mustard, burger sauce, or a simple garlic aioli all work incredibly well
- Serve with a side of crispy oven fries or sweet potato fries to lean fully into the cheeseburger experience
- A simple coleslaw on the side cuts through the richness of the pastry and beef beautifully
- For a lighter pairing, a green salad with a tangy vinaigrette balances everything out without competing with the main event
- Cut them in half diagonally before serving so people can see that gorgeous filling inside — presentation matters and this one delivers
Storage tips
These store and reheat really well which makes them perfect for meal prep and packed lunches.
- Fridge: Store cooled pockets in an airtight container for up to 4 days. They reheat beautifully and taste almost as good as fresh
- Freezer: These are excellent freezer meals. Let them cool completely, wrap each pocket individually in plastic wrap, and store in a freezer bag for up to 2 months. You can bake them from frozen or thaw overnight in the fridge
- Reheating: The oven and air fryer are your best friends here. Reheat in the oven at 350 degrees for about 10 minutes or in the air fryer at 375 degrees for 5-6 minutes. Both methods bring back that crispy flaky exterior that the microwave absolutely cannot replicate. Use the microwave only if you have no other option and accept that the pastry will be soft
Let’s wrap this up
Cheeseburger pockets are one of those recipes that sound simple until you actually make them and realize they are even better than you expected. The flaky pastry, the juicy seasoned beef, the melted cheese — it all comes together in a way that feels genuinely special for something that took you less than 30 minutes to pull off.
Make a double batch, freeze half, and future you will be very grateful. That’s the kind of cooking I’m here for — food that works hard so you don’t have to.
Try them this week and let me know what you think. Leave a comment below, share this with someone who needs a weeknight dinner win, and as always — keep it simple, keep it delicious.
With gratitude, Kip
Cheeseburger pockets — The handheld dinner your whole family will go crazy for
Description
These cheeseburger pockets are made with seasoned ground beef, melted cheddar cheese, and classic burger flavors all wrapped inside golden flaky pastry dough and baked until perfectly crisp. They come together in under 30 minutes, work brilliantly as a freezer meal, and are the kind of fun, satisfying dinner that the whole family gets genuinely excited about.
Ingredients
Instructions
-
Preheat oven to 400 degrees Fahrenheit and line a baking sheet with parchment paper
-
Cook ground beef and diced onion in a skillet over medium-high heat for 6-8 minutes until browned. Add garlic and cook for 30 seconds. Drain excess fat
-
Stir in Worcestershire sauce, mustard, ketchup, salt, and pepper. Cook for 1 minute. Set aside to cool slightly
-
Cut puff pastry into rectangles roughly 4x5 inches. If using crescent dough, press seams together to form solid rectangles
-
Place a cheese slice on one half of each rectangle. Spoon beef filling on top. Fold dough over and seal edges firmly with a fork
-
Brush tops with egg wash and sprinkle with sesame seeds if using. Bake for 18-20 minutes until deep golden brown
-
Rest for 5 minutes before serving
