
Let me tell you something about cookie bars that took me an embarrassingly long time to figure out. They are not just a lazy version of cookies. They are genuinely, objectively better in almost every way. Thicker, chewier, more gooey in the center, and you only have to deal with one pan. One. Pan. I do not know why it took me so long to fully commit to this format but here we are.
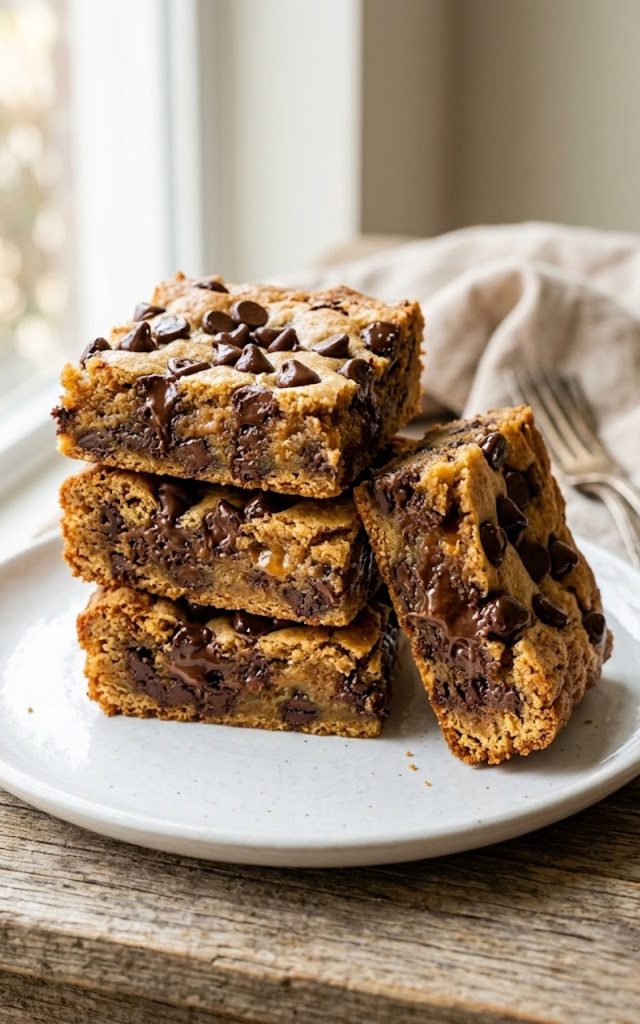
These chewy chocolate chip cookie bars have everything you love about a classic chocolate chip cookie — the buttery, brown sugar richness, the crispy edges, the soft and gooey center — but in a format that is somehow even more satisfying. You press the dough into a pan, scatter a ridiculous amount of chocolate chips over the top, bake it, and slice it. No scooping, no rotating pans, no watching a dozen individual cookies like a hawk. The pan does all the work.
I started making these when I needed a large batch dessert for a family gathering and did not have the patience to babysit individual cookie batches for an hour. They disappeared completely in about twelve minutes flat. Now they are my go-to whenever I need something crowd-pleasing, fast, and genuinely delicious. Which, honestly, is most of the time.
For the cookie bars:
Key notes:
Step 1: Preheat your oven and prepare the pan
Preheat your oven to 350 degrees F. Line a 9x13 inch baking pan with parchment paper, leaving some overhang on the sides. Spray lightly with cooking spray. The parchment overhang is your best friend here — it means you can lift the entire slab out of the pan cleanly once the bars have cooled, which makes slicing so much easier and neater.
Step 2: Whisk the dry ingredients
In a medium bowl, whisk together the flour, baking soda, and salt until evenly combined. Set this aside. Getting the dry ingredients evenly mixed before they go into the dough means no random pockets of baking soda or salt in the finished bars.
Step 3: Mix the butter and sugars
In a large mixing bowl, whisk together the melted butter, packed brown sugar, and granulated sugar until the mixture is smooth and fully combined. It should look thick and slightly glossy. This takes about 60 seconds of vigorous whisking and it is worth doing properly.
Step 4: Add the eggs and vanilla
Add the two whole eggs, the extra egg yolk, and the vanilla extract to the butter and sugar mixture. Whisk everything together until fully combined and the mixture looks smooth and slightly lighter in color, about 1 minute. The extra yolk will make the mixture look noticeably richer and more golden.
Step 5: Add the dry ingredients
Pour the flour mixture into the wet ingredients and use a rubber spatula to fold everything together until just combined. Stop as soon as you no longer see streaks of flour. The dough will be thick and slightly sticky — that is exactly right. Overmixing develops gluten and makes the bars tough so keep it gentle and minimal.
Step 6: Fold in the chocolate chips
Reserve about half a cup of chocolate chips and set them aside. Fold the remaining chocolate chips into the dough with the rubber spatula until evenly distributed throughout. Try to distribute them as evenly as possible so every bar gets a good amount of chocolate in every bite.
Step 7: Press the dough into the pan
Transfer the dough into your prepared pan and use lightly greased hands or a spatula to press it out into an even layer all the way to the edges. The dough is sticky so greased hands work best here. Take your time getting it as even as possible — an uneven layer means some parts will be overcooked while others are underdone.
Step 8: Add the chocolate chips on top
Scatter the reserved chocolate chips evenly over the entire surface of the dough and press them down very gently so they are partially embedded. This is what creates that beautiful, professional looking chocolate chip topped surface on the finished bars.
Step 9: Bake
Bake for 25 to 28 minutes until the edges are golden brown and the center looks just set — slightly glossy is fine and even preferable. Do not wait for the center to look fully matte and done before pulling the pan. Remember that the bars continue to cook from residual heat even after the pan comes out of the oven.
Step 10: Cool and slice
Let the bars cool in the pan on a wire rack for at least 30 minutes before attempting to slice them. I know that is hard to hear but it is important — cutting into warm bars gives you a gooey mess instead of clean slices. Once cooled, use the parchment overhang to lift the slab out of the pan onto a cutting board and slice into bars with a sharp knife.
These chocolate chip cookie bars are excellent on their own but here are some ways to take them a little further:
Room temperature: Store in an airtight container at room temperature for up to 4 days. Place a slice of white bread in the container to keep the bars soft — the bread releases just enough moisture to maintain that chewy texture without making anything soggy. Replace the bread slice every couple of days.
Refrigerator: Store in an airtight container in the refrigerator for up to a week. The bars firm up significantly when cold so let them sit at room temperature for 10 to 15 minutes before eating or warm them in the microwave for 10 to 15 seconds to bring back that fresh, gooey texture.
Freezer — cut bars: Wrap individual bars tightly in plastic wrap and place in a freezer safe bag or container. Freeze for up to 3 months. Thaw at room temperature for about 30 minutes or warm gently in the microwave. The texture holds up remarkably well after freezing.
Freezer — uncut slab: You can also freeze the entire uncut slab wrapped tightly in plastic wrap and then foil. Thaw overnight in the refrigerator and slice the next day. This is a great option if you want to make these ahead of time for a gathering.
Cookie bars do not get enough credit. They are everything a cookie should be — just bigger, chewier, more gooey, and significantly less work to make. One bowl, one pan, and about 40 minutes of your time is all it takes to have something on your counter that disappears faster than you expect every single time.
Make these for your next gathering, your kids after school, or just because it is the weekend and your kitchen should smell like butter and chocolate. They are the kind of recipe that requires no special occasion and no real excuse. Just a pan, some chocolate chips, and an appetite.
Give them a try and let me know what you think. And if you manage to make it 30 full minutes without cutting into them while they cool — respect. That is a level of patience I genuinely admire.
With gratitude, Kip
These chewy chocolate chip cookie bars take everything you love about a classic chocolate chip cookie and deliver it in the most satisfying, low effort format possible. Buttery, brown sugar dough packed with melty chocolate chips, baked in a single pan until the edges are golden and the center is perfectly gooey. One pan, simple ingredients, under 40 minutes, and a result that makes everyone reach for a second bar before the first one is even gone.