

I’m going to be honest—I avoided making enchiladas for years because I thought they’d be complicated. Rolling tortillas? Making sauce? It sounded like too much work for a Tuesday night. Then one day I actually tried it, and I felt ridiculous for waiting so long.
Enchiladas are stupid easy. You shred some chicken, mix it with cheese, roll it in tortillas, dump sauce on top, and bake. That’s it. The hardest part is waiting for them to come out of the oven because your kitchen smells so good. My family requests these constantly now, and I’m always happy to make them because they’re actually less work than most dinners.
The key is not overthinking it. These aren’t complicated restaurant-style enchiladas with fifteen steps. These are straightforward, delicious, cheesy enchiladas that come together fast and taste incredible. Sometimes the best recipes are the simple ones.
Why You’ll Love This Recipe
They’re easier than you think. Seriously, if you can shred chicken and roll a tortilla, you can make these. There’s no complicated technique, no special equipment, just straightforward assembly and baking. Even beginners can nail these on the first try.
The cheese situation is next-level. We’re talking cheese mixed into the filling, cheese on top, and cheese that gets all melty and gooey as it bakes. If you’re a cheese person, these enchiladas will speak to your soul.
Perfect for using up leftovers. Got leftover rotisserie chicken? Leftover grilled chicken? Yesterday’s taco meat? Throw it in enchiladas. This recipe is incredibly forgiving and makes the most of what you already have on hand.
They freeze beautifully. Make a double batch, freeze one for later, and you’ve got a complete dinner ready to go whenever you need it. Future you will be so grateful for enchiladas in the freezer on a chaotic night.
Everyone loves them. Kids, picky eaters, food snobs—everyone requests seconds. There’s something about that combination of tender chicken, melted cheese, and tangy enchilada sauce that’s universally appealing.
Great for feeding a crowd. Making dinner for eight people? Just double the recipe and use two pans. Enchiladas scale effortlessly, making them perfect for potlucks, family gatherings, or meal prep.
Ingredients
For the Chicken Filling:
- 3 cups cooked, shredded chicken (about 1.5 lbs or one rotisserie chicken)
- Key note: Rotisserie chicken is the ultimate shortcut here.
- 4 oz cream cheese, softened
- Key note: This makes the filling extra creamy and keeps it from being dry.
- 1 cup sour cream
- 1 can (4 oz) diced green chiles
- Key note: Adds flavor without being spicy. Use jalapeños if you want more heat.
- 2 cups shredded Mexican cheese blend, divided
- Key note: Use half in the filling, half on top.
- 1 teaspoon cumin
- 1 teaspoon garlic powder
- 1/2 teaspoon chili powder
- Salt and black pepper to taste
For Assembly:
- 12 flour tortillas (8-inch size)
- Key note: Flour tortillas are easier to roll than corn, but both work.
- 2 cups red enchilada sauce (store-bought or homemade)
- Key note: Use green sauce if you prefer—both are delicious.
- Cooking spray or oil for the baking dish
For Topping and Garnish:
- 1 cup shredded Mexican cheese blend
- Fresh cilantro, chopped
- Sour cream
- Diced tomatoes
- Sliced jalapeños (optional)
- Lime wedges
Step-by-Step Instructions
Step 1: Prep Your Filling
Preheat your oven to 350°F. Lightly grease a 9×13-inch baking dish with cooking spray or oil.
In a large bowl, combine the shredded chicken, softened cream cheese, sour cream, diced green chiles, 1 cup of the shredded cheese, cumin, garlic powder, chili powder, salt, and pepper. Mix everything together until well combined and creamy.
The cream cheese should be soft enough to mix easily. If it’s too cold, microwave it for 15-20 seconds to soften it up.
Step 2: Warm the Tortillas
This step is optional but makes rolling easier. Wrap your tortillas in a damp paper towel and microwave for 30-60 seconds until warm and pliable. Warm tortillas roll without cracking, while cold ones tend to tear.
You can also warm them individually in a dry skillet for 10 seconds per side if you prefer.
Step 3: Assemble the Enchiladas
Pour about 1/2 cup of enchilada sauce in the bottom of your prepared baking dish and spread it around. This prevents the enchiladas from sticking and adds flavor.
Take one tortilla and spoon about 1/3 cup of the chicken filling down the center. Roll the tortilla tightly around the filling and place it seam-side down in the baking dish. Repeat with the remaining tortillas and filling, arranging them snugly in the pan.
You should be able to fit all 12 enchiladas in the dish, packed close together. Don’t worry if they’re tight—that’s actually good. It helps them hold their shape.
Step 4: Add Sauce and Cheese
Pour the remaining enchilada sauce evenly over all the enchiladas, making sure each one gets coated. Use a spoon or brush to spread the sauce if needed—you want good coverage.
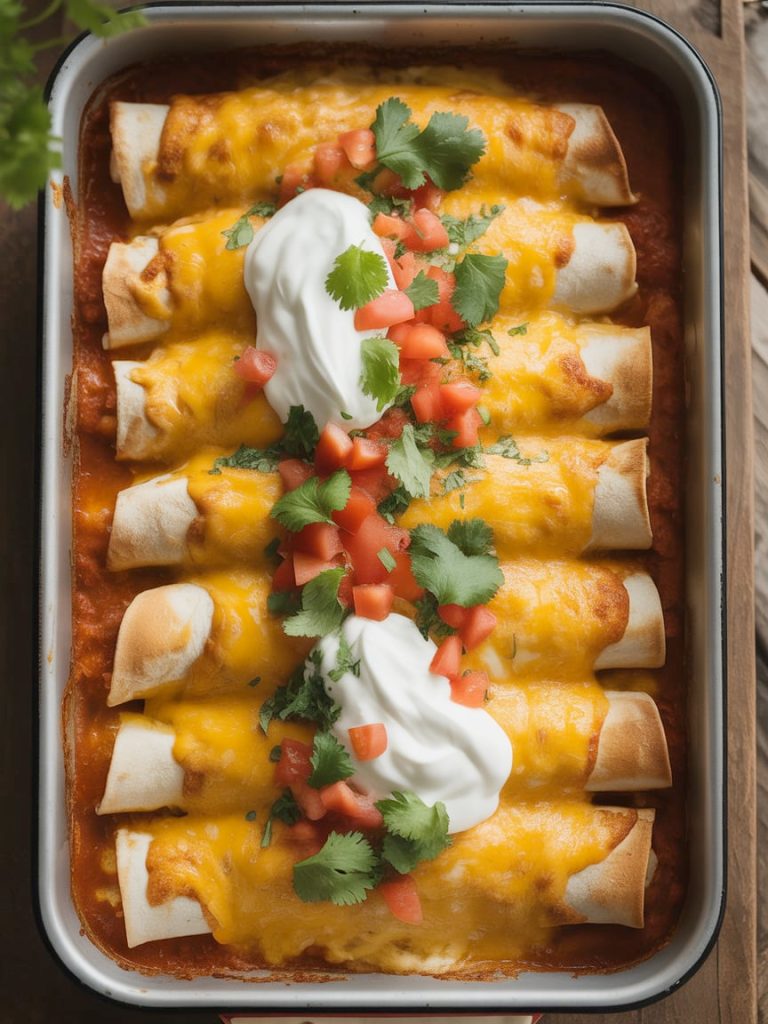
Sprinkle the remaining 1 cup of shredded cheese over the top, covering all the enchiladas. The more cheese, the better, honestly.
Step 5: Bake
Cover the baking dish with aluminum foil and bake for 20 minutes. This initial covered bake ensures everything heats through without the cheese getting too brown.
Remove the foil and bake for an additional 5-10 minutes, until the cheese is melted, bubbly, and starting to turn golden brown in spots. The edges should be slightly crispy.
Step 6: Rest and Serve
Let the enchiladas rest for 5 minutes after pulling them from the oven. This gives the filling time to set up so they don’t fall apart when you serve them.
Garnish with fresh cilantro, dollops of sour cream, diced tomatoes, jalapeños, and lime wedges. Serve hot and watch them disappear.
Serving Suggestions
These Chicken Enchiladas are pretty much a complete meal, but here are some great sides:
Mexican rice is the classic pairing. The fluffy, tomato-flavored rice soaks up any extra enchilada sauce and completes the meal perfectly. It’s what I serve every single time.
Refried beans or black beans on the side add protein and make the meal more filling. Warm them up with a bit of cumin and garlic for extra flavor.
A simple side salad with lime-cilantro dressing keeps things fresh and light. The crisp lettuce balances the richness of the cheesy enchiladas.
Chips and salsa or guacamole while you’re waiting for the enchiladas to bake. It’s the appetizer that bridges the gap between “I’m starving” and “dinner’s ready.”
Cilantro-lime rice if you want to upgrade from plain Mexican rice. The bright lime flavor pairs beautifully with the rich enchiladas.
Elote (Mexican street corn) on the side takes this meal to the next level. The sweet, creamy corn complements the savory enchiladas perfectly. 🙂
Storage Tips
Refrigerator: Store leftover enchiladas in an airtight container or covered with foil in the fridge for up to 4 days. They reheat beautifully and some people say they’re even better the next day when the flavors have had time to meld.
Reheating: Warm individual portions in the microwave for 2-3 minutes, or reheat in a 350°F oven for 15-20 minutes until heated through. Cover with foil if reheating in the oven to prevent them from drying out.
Freezing: These freeze incredibly well! You can freeze them before or after baking. For best results, assemble the enchiladas in a freezer-safe baking dish, cover tightly with plastic wrap and then foil, and freeze for up to 3 months.
Baking from Frozen: If baking frozen enchiladas, keep them covered and bake at 350°F for 60-75 minutes until heated through, then uncover and bake 10 more minutes to brown the cheese. Or thaw overnight in the fridge first, then bake as directed (you may need to add 10 extra minutes).
Meal Prep Tip: I often make two pans—one for dinner tonight, one for the freezer. It’s barely any extra work, and having enchiladas ready to go in the freezer is a lifesaver on busy weeks.
Final Thoughts
Here’s what I love about these Chicken Enchiladas—they prove that homemade Mexican food doesn’t have to be complicated or time-consuming. You don’t need special skills or hard-to-find ingredients. Just some chicken, cheese, tortillas, and sauce, and you’re making something that tastes way better than takeout.
The beauty of enchiladas is their versatility. Use up leftovers, adjust the spice level, swap the sauce, add vegetables—they adapt to whatever you need. They’re the kind of recipe that becomes a regular rotation staple because they’re easy, delicious, and everyone loves them.
So grab those tortillas, shred that chicken, and let’s make some enchiladas. Your kitchen is about to smell incredible, and your family is about to be very happy with you.
Let’s roll!
— Kip
Chicken Enchiladas (The Best You’ll Ever Make!)
Description
These Chicken Enchiladas are everything you want in Mexican comfort food—tender shredded chicken mixed with cheese, rolled in soft tortillas, covered in rich enchilada sauce, and baked until the cheese is melted and bubbly. They're easy enough for weeknights but impressive enough for company. Once you make these from scratch, you'll never go back to the restaurant version.
Ingredients
Filling:
Assembly:
Garnish:
Instructions
-
Preheat oven to 350°F. Grease 9x13-inch baking dish.
-
Mix shredded chicken, cream cheese, sour cream, green chiles, 1 cup cheese, cumin, garlic powder, chili powder, salt, and pepper until combined.
-
Warm tortillas in microwave for 30-60 seconds to make them pliable.
-
Pour 1/2 cup enchilada sauce in bottom of baking dish.
-
Fill each tortilla with 1/3 cup chicken mixture. Roll tightly and place seam-side down in dish. Repeat with all tortillas.
-
Pour remaining sauce over enchiladas. Sprinkle with remaining 1 cup cheese.
-
Cover with foil and bake 20 minutes. Uncover and bake 5-10 minutes more until cheese is melted and bubbly.
-
Let rest 5 minutes. Garnish with cilantro, sour cream, tomatoes, jalapeños, and lime. Serve hot.
Note
- Rotisserie chicken is the easiest shortcut
- Can use corn tortillas instead of flour
- Green enchilada sauce works great too
- Cream cheese keeps filling moist and creamy
- Can assemble ahead and refrigerate up to 24 hours before baking
- Freezes beautifully for up to 3 months
- Add jalapeños to filling for extra heat
- Double the recipe easily for meal prep
