
Every Easter table needs a dessert that makes people genuinely react when it gets set down. Not just a polite smile and a nod — a real reaction. The kind where someone says out loud that it is too pretty to eat and then immediately cuts themselves a large slice anyway. This Easter bunny poke cake is exactly that dessert and the best part is that it is significantly easier to make than it looks.
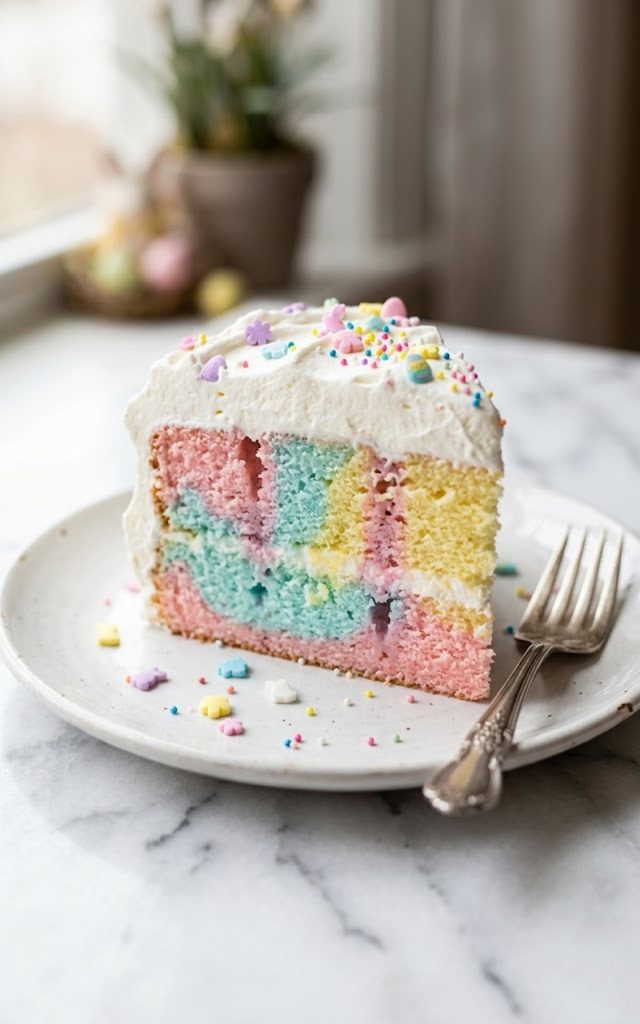
The magic of a poke cake is in the reveal. From the outside it looks like a simple white cake topped with whipped cream and colorful sprinkles — charming but not particularly dramatic.
Then someone cuts into it and the pastel layers of pink, blue, and yellow inside the cake are exposed and the table goes quiet for a second before everyone reaches for a piece. I have made this cake three years in a row now and that moment never gets old. It is one of my favorite things about this recipe.
The flavor is just as good as the look. The gelatin soaks into the cake and keeps every single bite incredibly moist and lightly flavored with a sweetness that is not too heavy.
The whipped cream topping is light and airy and balances everything out perfectly. This is a cake that works for kids and adults equally and disappears from the table faster than almost anything else you could serve at Easter. Fair warning — make more than you think you need.
For the cake:
For the gelatin soak:
For the topping:
Step 1 — Bake the cake
Prepare the cake batter according to the box instructions. Once the batter is fully mixed divide it evenly into three separate bowls. Add a few drops of pink gel food coloring to the first bowl, blue to the second, and yellow to the third. Stir each one until the color is fully and evenly incorporated. Grease a 9x13 inch baking dish well with butter or cooking spray. Drop alternating spoonfuls of each colored batter into the prepared dish, then use a toothpick or skewer to gently swirl them together slightly. You want distinct color areas not a fully blended batter. Bake at 350F according to the box instructions — usually 28 to 32 minutes — until a toothpick inserted in the center comes out clean.
Step 2 — Poke the holes
Allow the cake to cool for about 15 minutes after removing from the oven. While it is still warm but no longer hot use the handle of a wooden spoon or a large skewer to poke holes all over the surface of the cake, spacing them about 1 inch apart. You want the holes to go about three quarters of the way through the cake — deep enough for the gelatin to soak in fully but not all the way through the bottom. More holes means more gelatin soaks in which means a more flavorful and moist cake. Do not be shy here.
Step 3 — Prepare the gelatin
In three separate bowls prepare each gelatin flavor one at a time. For each flavor dissolve one packet of gelatin in one cup of boiling water, stirring for at least two minutes until completely dissolved with no granules remaining. Then stir in one cup of cold water to bring the temperature down. You should have three separate bowls of liquid gelatin in pink, blue, and yellow. Work with one color at a time and move quickly so the gelatin does not begin to set before you pour it.
Step 4 — Pour the gelatin into the cake
This is the step that creates the magic. Pour each gelatin flavor slowly and evenly over a different section of the cake, trying to direct each color toward the area of the cake where that color of batter was baked. The pink gelatin over the pink section, blue over the blue section, and yellow over the yellow section. The gelatin will sink into the holes and spread through the cake creating those beautiful layered colors you see when the cake is cut. Some mixing at the edges is completely fine and actually looks beautiful.
Step 5 — Chill the cake
Cover the baking dish loosely with plastic wrap and refrigerate for a minimum of 2 hours or overnight. The chilling time allows the gelatin to fully set inside the cake, the colors to stabilize, and the flavors to develop. Do not rush this step — a properly chilled poke cake has a completely different and superior texture to one that has not been given enough time. Overnight chilling actually gives you the best result of all.
Step 6 — Make the whipped cream topping
Just before serving remove the cake from the refrigerator. In a large cold mixing bowl add the heavy whipping cream, powdered sugar, and vanilla extract. Using a hand mixer or stand mixer beat on medium high speed until stiff peaks form — about 3 to 4 minutes. Do not overbeat or the cream will become grainy. Spread the whipped cream generously and evenly over the entire surface of the chilled cake using a spatula, creating soft peaks and swirls across the top for a beautiful finish.
Step 7 — Decorate and serve
Scatter the Easter themed sprinkles generously across the whipped cream topping. Be generous — this is a festive celebration cake and more sprinkles is always the right call. Slice and serve immediately, making sure each slice goes all the way to the bottom of the dish so every portion gets a full cross section of the pastel layers. Watch the reaction when people see the inside of their slice. That moment is worth every single minute of the process.
This Easter bunny poke cake is a celebration dessert that works beautifully in several contexts:
Refrigerator: This cake must be stored in the refrigerator because of the gelatin and whipped cream topping. Cover the baking dish tightly with plastic wrap or transfer individual slices to airtight containers. The cake keeps well in the refrigerator for up to 4 days. The texture actually improves slightly over the first 24 hours as the gelatin continues to set and the flavors meld together.
Make ahead: This is one of the best cakes to make ahead. Bake the cake and add the gelatin up to two days in advance, keeping it covered in the refrigerator. Add the whipped cream topping and sprinkles within a few hours of serving for the freshest presentation. The whipped cream holds up reasonably well overnight but looks and tastes best when freshly applied.
Freezer: The cake base without the whipped cream topping can be frozen for up to 2 months. Wrap the baking dish tightly in two layers of plastic wrap and then foil. Thaw overnight in the refrigerator and add the whipped cream and sprinkles just before serving.
Serving from cold: Always serve this cake cold directly from the refrigerator. The gelatin needs to be set for the cake to hold its structure and the colors to appear at their most vivid. A warm poke cake loses its structure and the gelatin becomes runny.
This Easter bunny poke cake is one of those recipes that becomes a family tradition. The first year you make it people ask for the recipe. The second year they start asking in advance if you are making it again. By the third year it is just understood that this cake is part of Easter and that is exactly the kind of recipe worth having.
Make it the night before, let it chill, add the whipped cream and sprinkles in the morning, and watch what happens when you bring it to the table. Leave a comment below and tell me how your pastel layers turned out, share your photos on Pinterest, or tag me so I can see your beautiful Easter creation. Happy Easter from my kitchen to yours.
With love from my kitchen, Kip
This Easter bunny poke cake is the kind of dessert that makes people stop mid-conversation and reach for their phones to take a photo before they even take a bite. A soft white cake soaked with pastel colored gelatin that creates stunning pink, blue, and yellow layers when sliced, topped with a generous cloud of whipped cream and festive Easter sprinkles. It looks incredibly impressive, it tastes light and delicious, and it is genuinely one of the easiest celebration cakes you will ever make. Kip's version keeps the process fun, approachable, and completely festive because Easter deserves a dessert as cheerful as the holiday itself.