

Every Easter, there is always that one person who shows up with something that makes everyone stop and stare. The thing that looks like it came from a fancy bakery. The thing that makes people ask how long it took to make. This year, that person is going to be you. And your secret is that it took you less than an hour and you did not even turn on the oven.
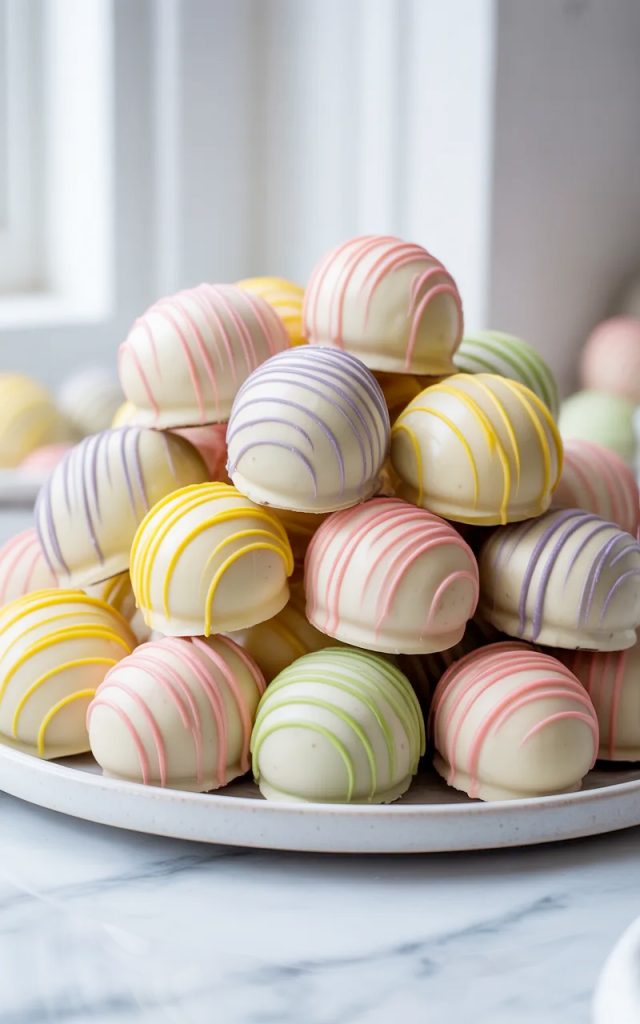
These Easter Egg Oreo Balls are everything. Creamy Oreo and cream cheese filling shaped into little eggs, dipped in smooth white chocolate, and decorated with pastel drizzles in pink, purple, yellow, and green. They look like something from a professional candy shop and taste even better than they look. The filling is rich and fudgy with that deep Oreo flavor and the white chocolate shell gives you that satisfying snap when you bite in.
I make these every single Easter and they disappear faster than anything else on the dessert table. Kids go absolutely wild for them and honestly adults are not much better. The best part is that you can get kids involved in the decorating step — the drizzling is fun, low-pressure, and even the messy ones look good. So clear off some counter space, grab a pack of Oreos, and let’s make the most fun Easter treat of the season.
Why You’ll Love This Recipe
- Zero baking required. No oven, no pans, no worrying about timing or temperature. If you can crush cookies and melt chocolate you can absolutely make these. It is genuinely one of the easiest dessert recipes out there.
- They look stunning with minimal effort. The egg shape and pastel drizzles do all the work. People will genuinely think you spent hours on these and you do not have to correct them.
- That Oreo cream cheese filling is addictive. Rich, fudgy, deeply chocolatey with just enough cream cheese to give it a slight tang. It is the kind of filling you will be sneaking spoonfuls of while you work.
- Completely customizable. Use any pastel colors you like, switch up the drizzle combinations, add sprinkles, use different Oreo flavors. The base recipe is a blank canvas and it works beautifully every time.
- Perfect for making with kids. The shaping is fun, the dipping is satisfying, and the drizzling step is practically made for little hands. This is a full family activity that ends with everyone eating something delicious.
- Make-ahead friendly. These actually need to chill before serving so making them the day before is not just allowed — it is encouraged. One less thing to stress about on Easter morning.
Ingredients
For the Oreo Balls
- 36 Oreo cookies (one standard package) — use the classic original Oreos here, filling and all. The filling is part of what binds everything together so do not scrape it out. You will crush the entire cookie, cream filling included. A food processor makes this fast and easy. No food processor? A zip-lock bag and a rolling pin work perfectly fine.
- 8 oz cream cheese — fully softened to room temperature. This is the binder that holds your Oreo mixture together and gives the filling that creamy, slightly tangy richness. Cold cream cheese will not blend smoothly into the crushed Oreos — you will end up with lumps. Room temperature only.
For the Coating and Decoration
- 16 oz white chocolate melting wafers or white chocolate chips — melting wafers are strongly recommended over regular white chocolate chips. They melt more smoothly, dip more cleanly, and set up with a better snap and shine. If you use white chocolate chips, add a teaspoon of coconut oil or vegetable shortening to help them melt more smoothly.
- Pastel colored candy melts or colored chocolate melting wafers — in pink, purple, yellow, and green for that classic Easter palette. You only need a small amount of each color — about 2 to 3 tablespoons per color is plenty for drizzling. Wilton candy melts are widely available and work great for this.
- Sprinkles (optional) — pastel Easter sprinkles on top of the drizzles add an extra festive touch and take about two seconds to apply. Totally optional but highly recommended if you are going for maximum Easter energy.
Step-by-Step Instructions
Step 1: Make the Oreo Filling
- Crush the Oreos into a fine crumb. Add all 36 cookies to a food processor and pulse until you have a uniform fine crumb with no large chunks remaining — about 30 seconds of processing. If you are using a zip-lock bag and rolling pin, really work it until the crumbs are as fine as possible. Large chunks make shaping harder and the texture less smooth.
- Add the softened cream cheese to the food processor with the Oreo crumbs and pulse until the mixture comes together into a uniform dark dough. It should hold its shape when you press a small amount between your fingers. If it is too crumbly, add cream cheese a tablespoon at a time. If you are mixing by hand, transfer the crumbs to a large bowl and beat in the cream cheese with a hand mixer until fully combined.
- Taste the mixture. Go ahead. You earned it.
Step 2: Shape the Easter Eggs
- Scoop out portions of the Oreo mixture using a tablespoon or a small cookie scoop — about 1 to 1.5 tablespoons per ball. Consistency in size makes for a more uniform and professional looking final product.
- Roll each portion between your palms into a smooth ball first, then gently pinch and shape one end slightly to form an oval egg shape. Do not overthink the shaping — they do not need to be perfect. The chocolate coating and drizzles hide a lot of imperfections and honestly a little variation makes them look more handmade and charming.
- Place each shaped egg on a parchment paper lined baking sheet as you go. You should get approximately 24 eggs from one batch.
Step 3: Chill
- Place the baking sheet in the refrigerator for at least 30 minutes. This step is not optional. Cold Oreo balls dip cleanly and hold their shape in the warm chocolate. Room temperature Oreo balls fall apart in the melted chocolate and you will have a very frustrating time. Set a timer and walk away.
Step 4: Coat in White Chocolate
- Melt the white chocolate melting wafers according to the package directions — typically 30-second intervals in the microwave, stirring between each interval until completely smooth. Do not overheat white chocolate — it seizes up quickly. Stop microwaving as soon as it is mostly melted and stir until the residual heat finishes the job.
- Working one at a time, drop a chilled Oreo egg into the melted white chocolate. Use a fork to roll it around until completely coated, then lift it out and let the excess chocolate drip off by tapping the fork gently against the side of the bowl.
- Place the coated egg back on the parchment lined baking sheet. If you see any bare spots, spoon a little extra chocolate over them quickly before it sets. Work fast — the chocolate sets quickly on the cold Oreo balls.
- Repeat until all eggs are coated. If the white chocolate starts to thicken as you work, reheat it in 15-second microwave intervals and stir until fluid again.
- Let the coated eggs set completely at room temperature or pop them back in the fridge for 10 minutes to speed up the process.
Step 5: Decorate with Pastel Drizzles
- Melt each pastel candy melt color separately in small microwave-safe bowls — 30-second intervals, stirring between each. You only need a small amount of each color so they melt fast. Transfer each melted color to a small zip-lock bag or piping bag and snip a tiny corner off the tip. The smaller the hole, the finer and more elegant the drizzle.
- Hold each bag about 6 inches above the eggs and drizzle the color back and forth across each egg in thin diagonal lines. You can do one color per egg or mix multiple colors on each one for a more festive look. There is no wrong way to do this step — just have fun with it.
- Add sprinkles immediately after drizzling before the chocolate sets if you are using them. Once the drizzle hardens you will not be able to get sprinkles to stick.
- Let all the drizzles set completely — about 15 minutes at room temperature or 5 minutes in the refrigerator — before handling or plating.
Serving Suggestions
These Easter Egg Oreo Balls are a complete showstopper on their own but here are a few ways to present and serve them:
- Pile them high on a white cake stand or platter. The height and the pastel colors together create a centerpiece that genuinely stops people in their tracks when they walk into the room.
- Arrange them in a decorative Easter basket lined with Easter grass. Nestle them among the green shreds for a presentation that looks like a basket of colorful Easter eggs. It is almost too cute to eat. Almost.
- Place them in individual mini cupcake liners for easy grabbing at a party or gathering. The liners make them look neat and keep the chocolate from scuffing.
- Include them on an Easter dessert board alongside other treats like chocolate covered strawberries, Easter candy, and cookies for a spread that looks absolutely incredible.
- Gift them in a small box or cellophane bag tied with a ribbon. These make a genuinely beautiful homemade Easter gift that people appreciate way more than a store-bought candy egg.
Storage Tips
- Refrigerator: Store the finished Oreo balls in a single layer in an airtight container in the refrigerator for up to 1 week. If you need to stack them, place a sheet of parchment paper between layers to prevent the drizzles from sticking together.
- Room Temperature: These can sit out at room temperature for up to 2 hours while serving. After that the cream cheese filling needs to go back in the fridge.
- Freezer: These freeze beautifully. Place them in a single layer on a baking sheet and freeze until solid — about 1 hour — then transfer to a freezer-safe zip-lock bag or airtight container. Freeze for up to 6 weeks. Thaw in the refrigerator overnight before serving. The chocolate coating stays perfectly intact.
- Make-Ahead Option: You can make these up to 3 days ahead and store them in the fridge. The flavor actually gets even better after a day as everything melds together. Make them the Wednesday or Thursday before Easter and cross one thing completely off your list.
Go Make the Cutest Easter Treat in the Room
Here is the thing about these Easter Egg Oreo Balls. They are the kind of treat that makes people genuinely happy the moment they see them. Not just because they taste incredible — and they do — but because there is something joyful about a pastel colored Easter egg made of Oreos sitting in front of you. It is playful, it is festive, and it is exactly the kind of food moment that makes a holiday feel special.
You do not need to be a professional baker to pull these off. You do not need any special equipment. You just need a pack of Oreos, some cream cheese, and about an hour of your time. Everything else is just having fun with it.
Make a batch this Easter, put them on your prettiest plate, and watch them disappear in minutes. And when people ask how you made them, you can be as vague and mysterious as you like. Your secret is safe with me. Drop a comment below and let me know how yours turned out — and if you make them, tag me on Pinterest or Instagram. I want to see those pastel drizzles.
Happy no-baking.
— Kip
Easter Egg Oreo Balls (No Bake, Fun & Ridiculously Easy)
Description
Crushed Oreos mixed with cream cheese, shaped into Easter eggs, dipped in white chocolate, and decorated with pastel drizzles. No baking required, no special skills needed, and they look absolutely stunning on any Easter dessert table.
Ingredients
For the Oreo Balls:
For the Coating and Decoration:
Instructions
-
Crush Oreos into fine crumbs in a food processor. Add softened cream cheese and pulse until a uniform dough forms.
-
Scoop 1 to 1.5 tablespoon portions. Roll into balls then shape into ovals to resemble eggs. Place on a parchment lined baking sheet.
-
Refrigerate for 30 minutes until firm.
-
Melt white chocolate in 30-second microwave intervals, stirring between each, until smooth.
-
Dip each chilled egg into white chocolate using a fork. Let excess drip off and place back on parchment. Let set completely.
-
Melt each pastel candy melt color separately. Transfer to small zip-lock bags with a tiny corner snipped off.
-
Drizzle pastel colors diagonally over each egg. Add sprinkles immediately if using.
-
Let drizzles set completely before plating and serving.
