

Let me paint you a picture. It is the middle of the afternoon, it is warm outside, and you want something cold, sweet, and satisfying. You open the freezer and instead of reaching for ice cream, you grab one of these little frozen bites and feel genuinely good about it. That is the exact situation these frozen Greek yogurt peanut butter bites were built for.
I started making these on a health kick that, unlike most of my health kicks, actually stuck. The reason it stuck is because these bites do not taste like a compromise. They are creamy, they are rich, they have that peanut butter depth that makes everything better, and the chocolate chips scattered throughout make every single bite feel like a proper treat.
The best part? You need about 10 minutes of actual effort and a freezer. That is it. FYI, once you make your first batch you will always want a stash of these on hand.
Why you’ll love this recipe
- Only 10 minutes of prep — the freezer does all the heavy lifting
- High in protein — Greek yogurt and peanut butter make these genuinely filling
- Naturally gluten free — no swaps needed
- Kid-friendly and adult-approved — the whole family goes for these
- Under 100 calories per bite — a frozen treat you can actually feel good about
- Freezer-friendly — make a big batch and have healthy snacks ready for weeks
Ingredients with key notes
- 2 cups plain Greek yogurt — Use full-fat Greek yogurt for the creamiest, richest texture. Non-fat works but the bites will be icier and less creamy. Vanilla Greek yogurt is also a great option if you want a little extra sweetness without adding sugar.
- 1/2 cup creamy peanut butter — Go with a commercial creamy peanut butter like Jif or Skippy for the smoothest result. Natural peanut butter can work but the oil separation can affect the texture of the final bite. Make sure it is well stirred if you use natural.
- 3 tablespoons honey or maple syrup — This is your sweetener. Honey gives a floral sweetness while maple syrup adds a deeper, more caramel-like flavor. Both work beautifully. Adjust the amount to your taste.
- 1 teaspoon vanilla extract — Rounds out all the flavors and adds warmth to the overall taste.
- 1/2 cup mini chocolate chips — Mini chips distribute more evenly throughout the mixture so you get chocolate in every single bite. Regular chocolate chips work too but mini is the move here.
- Pinch of salt — Do not skip this. A small pinch of salt makes the peanut butter flavor pop and balances the sweetness perfectly.
Step-by-step instructions
Step 1: Mix the base
In a large mixing bowl, combine the Greek yogurt, peanut butter, honey, vanilla extract, and salt. Whisk or stir everything together until the mixture is completely smooth and well combined. Taste it at this stage and adjust the sweetness if needed — add a little more honey if you want it sweeter. The mixture should be thick, creamy, and smooth with no streaks of peanut butter remaining.
Step 2: Fold in the chocolate chips
Add the mini chocolate chips to the mixture and fold them in gently with a spatula. You want them evenly distributed throughout the mixture so every bite gets its fair share of chocolate.
Step 3: Prepare your mold
You have a few options here. A silicone mini muffin mold is the easiest and gives you perfectly shaped round bites. You can also use a standard ice cube tray or line a mini muffin tin with small cupcake liners. Silicone molds make removal significantly easier, so use one if you have it.
Step 4: Fill the molds
Spoon or pipe the mixture into your prepared molds, filling each cavity almost to the top. Tap the mold gently on the counter a few times to remove any air bubbles and settle the mixture evenly. If using a piping bag or zip-lock bag with the corner snipped off, this step goes much faster and with less mess.
Step 5: Freeze
Place the filled mold on a flat surface in the freezer and freeze for at least 3 hours, or until the bites are completely solid. For best results, leave them overnight. Do not try to rush this step — partially frozen bites will fall apart when you try to remove them from the mold.
Step 6: Unmold and serve
Once fully frozen, press each bite out of the silicone mold from the bottom. If using a muffin tin with liners, simply peel the liner away. If the bites are sticking, let the mold sit at room temperature for 2 to 3 minutes and they will release easily. Serve immediately straight from the freezer.
Serving suggestions
- Serve them straight from the freezer on a small plate for an afternoon snack that keeps you full
- Arrange on a chilled platter for a party or gathering — they look impressive and disappear fast
- Serve alongside fresh berries for a light, refreshing dessert spread
- Pack them into a small insulated container for a post-workout snack on the go
- Drizzle with a little extra melted dark chocolate right before serving for a more indulgent presentation
- Serve as a kids’ after-school snack — they think it is dessert and you know it is packed with protein
Storage tips
Freezer: Once unmolded, transfer the bites to a freezer-safe zip-lock bag or airtight container and store in the freezer for up to 2 months. Place a sheet of parchment paper between layers if stacking to prevent them from sticking together.
Do not refrigerate: These bites are designed to be frozen. Storing them in the fridge will cause them to become soft and lose their shape. Keep them in the freezer right up until you are ready to eat them.
Serving from frozen: These bites are best eaten within 5 to 10 minutes of coming out of the freezer. They soften quickly at room temperature, especially in warm weather. Pull out only what you plan to eat immediately and keep the rest frozen.
Closing
Frozen Greek yogurt peanut butter bites are one of those recipes that earns a permanent place in your freezer rotation the moment you try them. They are simple, they are satisfying, and they prove that healthy snacking does not have to feel like a punishment.
Whether you are making them for the kids, fueling up after a workout, or just treating yourself on a warm afternoon, these bites deliver every single time.
Make a batch this week and let me know what you think in the comments. And if you tried a different mix-in or a fun variation, share it below. That kind of creativity is exactly what this community thrives on.
With gratitude, Kip.
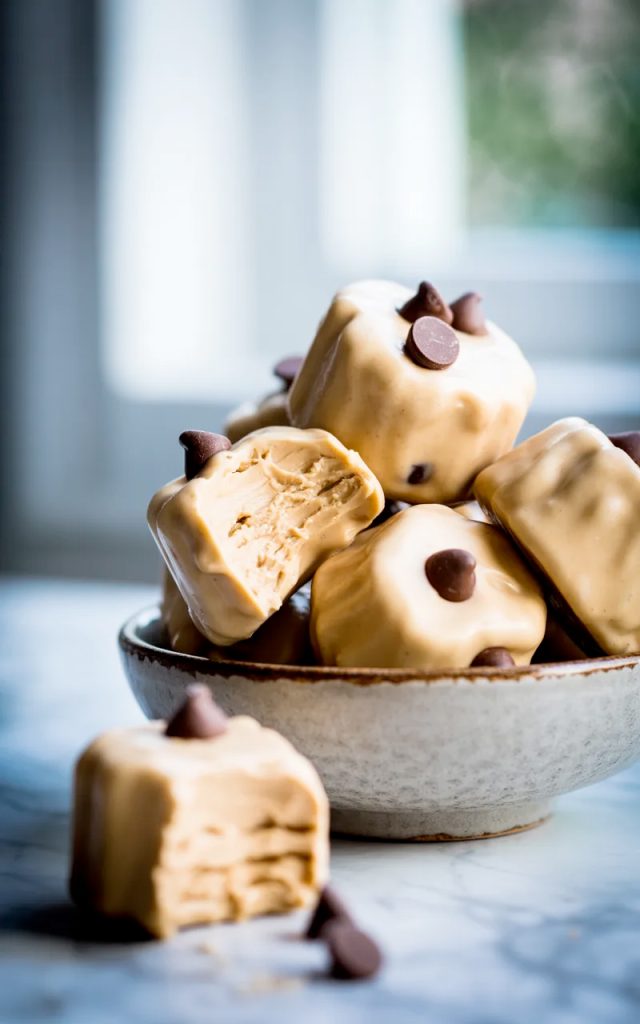
Frozen Greek yogurt peanut butter bites — the healthy frozen treat you’ll make all summer long
Description
Creamy Greek yogurt and peanut butter come together in these frozen bites loaded with mini chocolate chips. Ten minutes of prep, a few hours in the freezer, and you have a healthy frozen snack that genuinely tastes like a treat. High protein, naturally sweetened, and absolutely addictive.
Ingredients
Instructions
-
Combine Greek yogurt, peanut butter, honey, vanilla extract and salt in a large bowl. Whisk until completely smooth and well combined.
-
Fold in the mini chocolate chips until evenly distributed.
-
Spoon or pipe the mixture into a silicone mini muffin mold or ice cube tray, filling each cavity almost to the top.
-
Tap the mold gently on the counter to remove air bubbles.
-
Freeze for at least 3 hours or until completely solid.
-
Unmold and serve immediately straight from the freezer.
