

There are recipes you make because you need to eat and then there are recipes you make because you genuinely cannot stop thinking about them. These garlic butter cheese bombs fall firmly into the second category. From the moment they come out of the oven — golden, glistening with garlic butter, smelling like something from a proper bakery — they have this effect on people where all conversation stops and everyone just reaches for one at the same time.
I started making these on nights when I wanted something impressive without putting in impressive effort. Store bought biscuit dough, a block of mozzarella, some butter, garlic, and parsley — that is genuinely all it takes. You wrap the dough around a chunk of cheese, brush everything with garlic butter, and bake until golden. What comes out of the oven is something that tastes like it required significantly more skill than it actually did. That gap between effort and result is my favorite thing about this recipe.
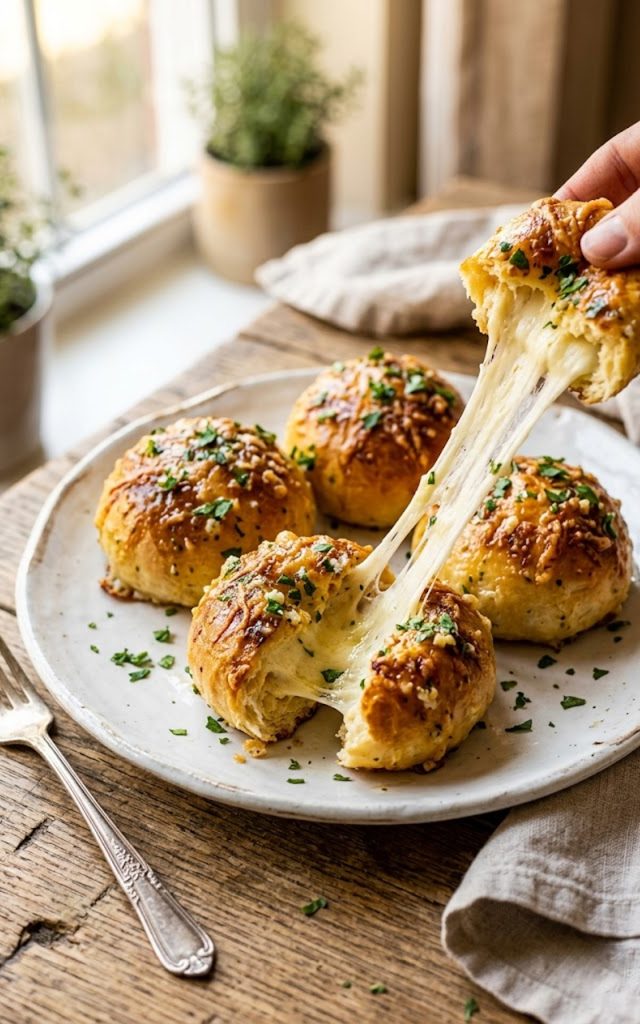
The moment you pull one apart and that cheese stretches and melts out of the center is one of those small but deeply satisfying kitchen moments that never gets old. Make these for a party, make them as a side dish, make them on a random Tuesday because you deserve something good. Whatever the occasion — or the lack of one — these cheese bombs always deliver.
Why you’ll love this recipe
- They are ready in 25 minutes from start to finish. Store bought biscuit dough eliminates all the time-consuming parts of bread making without sacrificing any of the satisfaction of pulling a fresh batch of golden rolls out of the oven.
- The gooey cheese center is absolutely next level. Every single bite has that molten melted cheese pull that makes people audibly react. It never gets old and it photographs beautifully if you want to share them on Pinterest.
- They are a guaranteed crowd pleaser. Kids go absolutely crazy for these. Adults pretend to be more restrained and then eat four of them anyway. These have a 100 percent approval rating in every household I have ever made them in.
- The garlic butter situation is non-negotiable and perfect. Brushed generously over the tops before and after baking, the garlic butter soaks into the dough and creates a flavor that is rich, savory, and completely addictive.
- They require almost zero cooking skill. If you can wrap dough around a cube of cheese and brush butter on top of something you can make these. This is a great recipe for beginner cooks who want to make something that genuinely impresses people.
- They are endlessly customizable. Different cheeses, different fillings, different herb combinations — the base recipe is a canvas you can take in any direction you want depending on your mood or what you have in the fridge.
Ingredients with key notes
- 1 can (16 oz) refrigerated biscuit dough — The store bought kind works perfectly here and saves a significant amount of time. Look for the standard original variety rather than the flaky layers kind which can be harder to seal around the cheese filling.
- 8 oz mozzarella cheese, cut into 8 equal cubes — Low moisture mozzarella melts beautifully and holds its shape better during baking than fresh mozzarella which releases too much water and can make the dough soggy. Cut the cubes generously — you want a real gooey center, not a hint of cheese.
- 4 tbsp unsalted butter, melted — This is the base of the garlic butter that makes these so irresistible. Unsalted so you control the salt level yourself. Use real butter here, not margarine or a substitute.
- 3 garlic cloves, finely minced — Fresh garlic minced as fine as possible so it distributes evenly in the butter and doesn’t leave large raw chunks on the dough. Garlic powder works in a real pinch but fresh garlic is noticeably better here.
- 2 tbsp fresh parsley, finely chopped — Adds color, freshness, and a slight herby note that balances the richness of the butter and cheese. Dried parsley works but fresh makes them look significantly more appealing.
- 1/2 tsp garlic powder — Added to the melted butter alongside the fresh garlic for a double hit of garlic flavor. This is the move that takes the garlic butter from good to genuinely addictive.
- 1/4 tsp salt — Just a pinch added to the garlic butter to bring all the flavors together.
- Optional: 2 tbsp grated parmesan for topping — Sprinkled over the tops before baking for an extra layer of savory cheesy flavor and a slightly more golden crust. Highly recommended if you have it on hand.
Step-by-step instructions
Step 1 — Preheat the oven and prepare the baking dish
Preheat your oven to 375F. Lightly grease a baking dish or cast iron skillet with butter or cooking spray. A cast iron skillet works particularly well here because it conducts heat evenly and gives the bottoms of the cheese bombs a beautifully golden crust. Set aside while you prepare everything else.
Step 2 — Make the garlic butter
In a small bowl combine the melted butter, minced garlic, garlic powder, chopped parsley, and salt. Stir everything together until well combined. Set aside. This garlic butter is going to be used twice — once before baking and once immediately after — so make sure you have enough. If you’re a garlic butter person you can absolutely make a little extra. No judgement here whatsoever.
Step 3 — Prepare the biscuit dough
Open the can of biscuit dough and separate each biscuit. Using your hands or a rolling pin, flatten each biscuit into a round disc about 3 to 4 inches in diameter. You want them flat enough to wrap around the cheese cube completely but not so thin that they tear. Work gently and take your time with this step — a good seal is what keeps that cheese inside during baking.
Step 4 — Stuff with cheese
Place one cube of mozzarella in the center of each flattened biscuit disc. Bring the edges of the dough up and around the cheese, pinching them together firmly at the top to create a tight seal. Roll the sealed dough ball gently between your palms to smooth it out into a round ball. Make sure there are no gaps or thin spots in the dough — any opening is an escape route for your cheese and that is a tragedy we want to avoid.
Step 5 — Arrange and brush with garlic butter
Place the filled dough balls sealed side down in the prepared baking dish or skillet, leaving a small amount of space between each one. Brush each ball generously with the garlic butter mixture, making sure to get the sides as well as the tops. If you’re using parmesan, sprinkle it over the tops now. The butter will pool slightly in the dish around the cheese bombs and that is absolutely fine — it just makes the bottoms even more delicious.
Step 6 — Bake until golden
Bake at 375F for 13 to 15 minutes until the cheese bombs are deep golden brown on top and cooked through. Keep a close eye on them in the last few minutes as ovens vary and you want golden not burnt. They should look puffed up, deeply golden, and glistening when they’re ready.
Step 7 — Brush again and serve immediately
As soon as they come out of the oven brush them immediately with the remaining garlic butter while they are still hot. This second coat of garlic butter is what gives them that incredible glossy, garlicky finish that makes them look as good as they taste. Serve immediately while the cheese center is still fully molten and gooey. These are not a make ahead situation — they are at their absolute best hot from the oven.
Serving suggestions
These garlic butter cheese bombs work in so many different contexts. Here are the best ways to enjoy them:
- Serve them as an appetizer at your next gathering with a small bowl of warm marinara sauce for dipping. The combination of garlic butter dough and gooey cheese with tangy marinara is one of the best flavor combinations in existence.
- Place them on the table as a side dish alongside a bowl of tomato soup or any pasta dish. They are perfect for sauce dipping and add something special to a simple weeknight dinner.
- Serve them alongside a Caesar salad for a lunch that feels indulgent and satisfying without being overly complicated.
- Set them out as a game day snack with a variety of dipping sauces — marinara, ranch, and honey butter all work beautifully. They disappear faster than almost any other snack on the table.
- Serve them as part of a brunch spread alongside eggs, bacon, and fresh fruit. They fill the bread role at brunch in the most satisfying way possible.
- Pair them with a simple arugula salad dressed with lemon and olive oil for a light lunch that still feels a little indulgent. The peppery arugula balances the richness of the cheese bombs really nicely.
Storage tips
Best enjoyed fresh: These cheese bombs are genuinely at their best the moment they come out of the oven while the cheese is still fully molten. Plan to serve them immediately if at all possible.
Room temperature: If you have leftovers, store them in an airtight container at room temperature for up to 1 day. The cheese will solidify as they cool but they still taste great reheated.
Refrigerator: Store in an airtight container in the refrigerator for up to 3 days. The dough stays soft and the cheese remelts nicely when reheated properly.
Reheating: The best way to reheat these is in a 350F oven for 5 to 8 minutes until warmed through and the cheese has melted again. Cover them loosely with foil to prevent the tops from over-browning. The microwave works in a pinch but can make the dough slightly chewy — the oven always gives better results.
Freezer: You can freeze unbaked cheese bombs for up to 1 month. Assemble them completely, place them on a baking sheet, freeze until solid, then transfer to a freezer bag. Bake from frozen at 375F adding 5 to 7 extra minutes to the baking time.
Closing
Garlic butter cheese bombs are one of those recipes that earns a permanent spot in your rotation from the very first batch. They are fast, they are simple, and the reaction they get from everyone who eats them is completely disproportionate to the amount of effort involved. That is exactly the kind of recipe this kitchen was built for.
Make them this week, pull one apart at the table while the cheese is still stretching, and enjoy every single second of the reaction from whoever is sitting across from you. Leave a comment below, share your photos on Pinterest, or tag me so I can see your golden, gooey creations. I read every single one and I genuinely love seeing them.
With love from my kitchen, Kip
Garlic butter cheese bombs — gooey, cheesy, and gone in minutes
Description
These garlic butter cheese bombs are exactly what they sound like — pillowy soft dough balls brushed generously with garlic butter, stuffed with a molten center of gooey melted cheese, and baked until golden and irresistible. They come together in under 30 minutes using store bought biscuit dough which means the hardest part of this recipe is waiting for them to come out of the oven. Kip's version keeps it simple, indulgent, and completely over the top in the best possible way because some recipes exist purely to make people happy and this is one of them.
Ingredients
Instructions
-
Preheat oven to 375F. Lightly grease a baking dish or cast iron skillet.
-
Combine melted butter, minced garlic, garlic powder, parsley, and salt in a small bowl. Set aside.
-
Separate biscuit dough and flatten each piece into a 3 to 4 inch disc.
-
Place one mozzarella cube in the center of each disc. Wrap the dough around the cheese, pinching tightly to seal. Roll into a smooth ball.
-
Place sealed side down in the prepared dish. Brush generously with garlic butter. Sprinkle with parmesan if using.
-
Bake at 375F for 13 to 15 minutes until deep golden brown.
-
Brush immediately with remaining garlic butter and serve hot.
