

Mornings in my house used to look like this — alarm goes off, I hit snooze twice, then scramble around the kitchen trying to put together something that qualifies as breakfast before the day runs away from me.
Sound familiar? For a long time, breakfast was either skipped entirely or whatever I could grab that required zero effort. Neither of those options felt great.
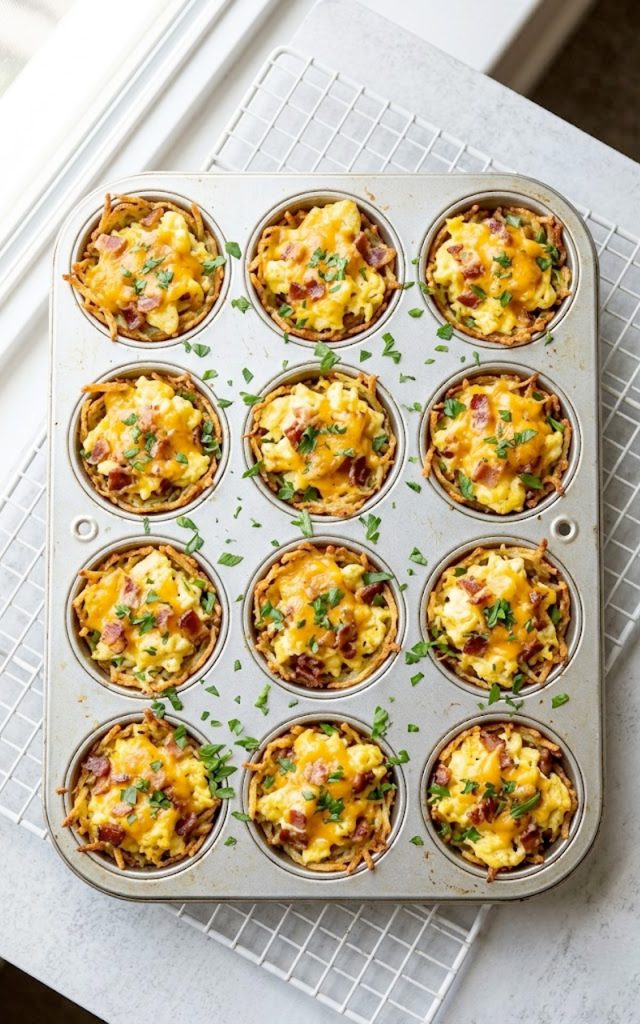
Then I started making these hash brown egg cups on Sunday evenings and honestly, it changed my entire morning routine. You get a crispy golden hash brown shell on the outside, a fluffy cheesy egg filling on the inside, bits of bacon throughout, and the whole thing is perfectly portioned and ready to grab straight from the fridge. Reheat for 60 seconds and you have a real breakfast that actually keeps you full. That is the dream, right?
What I love most about this recipe is that it feels like real comfort food — the kind of breakfast you would order at a diner — but it fits into a busy week without any of the hassle. Every time I make a batch I find myself wondering why I ever settled for anything less. These are that good.
Why you’ll love this recipe
- Built for meal prep — Make a full batch on Sunday and you have breakfast sorted for the entire week. They reheat in under two minutes and taste just as good on day four as they do fresh out of the oven.
- Crispy on the outside, fluffy on the inside — The hash brown shell gets genuinely golden and crispy while the egg filling stays soft and fluffy. That texture contrast in every bite is what makes these so addictive.
- Completely portable — No plate required. These are the perfect grab and go breakfast for busy mornings, road trips, school runs, or any time you need to eat on the move without making a mess.
- Kid approved — Every kid I have ever served these to has demolished them without complaint. The fun muffin cup shape helps, but mostly it is because they taste incredible.
- Endlessly customizable — The base recipe is just a starting point. Swap the bacon for sausage, change up the cheese, add vegetables, go spicy — the formula works with almost any filling combination you like.
- Naturally gluten free — No flour, no bread, no bun. The hash brown shell handles all of that and it just so happens to be gluten free, which makes these a solid option for a lot of different dietary needs.
Ingredients
For the hash brown cups:
- 3 cups frozen shredded hash browns, thawed and excess moisture squeezed out
- 2 tablespoons olive oil or melted butter
- 1/2 teaspoon garlic powder
- 1/2 teaspoon onion powder
- Salt and black pepper to taste
For the egg filling:
- 8 large eggs
- 1/4 cup milk
- 1/2 cup cooked bacon, crumbled (about 4 to 5 strips)
- 1/2 cup shredded cheddar cheese, plus extra for topping
- 1/4 cup diced red bell pepper
- Salt and black pepper to taste
Optional garnish:
- Fresh chopped parsley or chives
- Hot sauce on the side
- Extra shredded cheese
Key ingredient notes:
Hash browns — Frozen shredded hash browns work best here. The most important step is squeezing out as much moisture as possible after thawing. Excess water in the hash browns is the number one reason the cups come out soggy instead of crispy. Use a clean kitchen towel or several layers of paper towels and really wring them out. Do not skip this step.
Eggs — Eight eggs fills a standard 12-cup muffin tin perfectly. If you want a slightly fluffier filling, add an extra splash of milk. If you prefer a denser egg texture, skip the milk entirely. Either way works.
Bacon — Cook and crumble your bacon before you start assembling the cups. You want it fully cooked since the egg filling does not bake long enough to fully cook raw bacon through. Pre-cooked real bacon bits from a bag also work well here as a shortcut on busy mornings.
Cheddar cheese — Sharp cheddar gives the best flavor but any melting cheese works. Pepper jack adds a nice kick, Monterey Jack gives a milder creamier result, and a Mexican blend is a great all-rounder. Use whatever you have on hand.
Red bell pepper — This adds a little color, a little sweetness, and a pop of freshness to the egg filling. Totally optional but it makes the cups look beautiful when you slice into them. Dice it small so it distributes evenly through the filling.
Step-by-step instructions
Step 1: Preheat and prep your muffin tin
Preheat your oven to 400°F. Generously grease a standard 12-cup muffin tin with cooking spray or melted butter. Do not be shy with the greasing — the hash brown cups need to release cleanly and a well-greased tin is what makes that happen. Every single cup, right to the very top of each cavity.
Step 2: Prepare the hash browns
Place your thawed hash browns in a clean kitchen towel and squeeze out as much moisture as you possibly can. This step is non-negotiable. Transfer the squeezed hash browns to a bowl and toss them with olive oil, garlic powder, onion powder, salt, and black pepper until evenly coated.
Step 3: Form the hash brown cups
Divide the seasoned hash browns evenly between the 12 muffin cups, about 2 to 3 tablespoons per cup. Use your fingers or the back of a spoon to press the hash browns firmly into the bottom and up the sides of each cavity to form a cup shape. Press them as firmly and evenly as you can — the tighter you pack them, the better the cup holds its shape after baking.
Step 4: Pre-bake the hash brown shells
Place the muffin tin in the oven and bake the hash brown shells for 15 minutes until they start to turn golden and crispy on the edges. This pre-bake step is important — it sets the shell and gives you that crispy texture before the egg filling goes in. Pull the tin out of the oven and set it aside while you prepare the filling.
Step 5: Prepare the egg filling
While the shells are pre-baking, crack your eggs into a medium bowl or large measuring jug. Add the milk, a pinch of salt, and black pepper and whisk everything together until well combined. Stir in the crumbled bacon, shredded cheddar cheese, and diced red bell pepper.
Step 6: Fill the cups
Pour the egg mixture evenly into each pre-baked hash brown cup, filling each one about three quarters of the way full. The eggs will puff up slightly as they bake so leave a little room at the top. Sprinkle a little extra shredded cheddar over the top of each cup.
Step 7: Bake until set
Return the muffin tin to the oven and bake for another 12 to 15 minutes until the egg filling is fully set and the tops are lightly golden. The eggs should not jiggle when you gently shake the tin. If they do, give them another 2 to 3 minutes. The cheese on top should be melted and starting to get a few golden spots.
Step 8: Cool and remove from the tin
Remove the tin from the oven and let the cups cool for 5 minutes before attempting to remove them. Run a thin knife or small offset spatula around the edge of each cup to loosen it, then carefully lift them out. Garnish with fresh chopped parsley or chives and serve immediately.
Serving suggestions
Serve them straight as a grab and go — These are a complete breakfast on their own. Two or three cups and you are set for the morning with protein, carbs, and fat all in one tidy package.
Pair with fresh fruit — A small bowl of fresh berries or sliced fruit on the side balances the richness of the eggs and cheese perfectly. It also makes the plate look great if you are serving these to guests.
Add a simple green salad for brunch — If you are serving these for a weekend brunch rather than a weekday breakfast, a light arugula salad with lemon dressing alongside turns this into a proper spread without any extra cooking effort.
Serve with hot sauce — A few dashes of your favorite hot sauce on top of these cups is genuinely one of the best ways to eat them. The heat cuts through the richness of the egg and cheese in a way that just works.
Make a breakfast board — Arrange a batch of these cups on a large wooden board alongside fresh fruit, sliced avocado, a small bowl of salsa, and some hot sauce options. It looks impressive and requires almost no extra work.
Top with sliced avocado — A few slices of ripe avocado on the side or on top of each cup adds creaminess and healthy fat that rounds out the meal beautifully. A squeeze of lime over the avocado takes it even further.
Storage tips
Refrigerator — Let the cups cool completely before storing. Place them in an airtight container and refrigerate for up to 5 days. They stack well so you can fit a full batch into one container without any issues.
Freezer — These freeze beautifully, which makes them one of the best freezer breakfast options out there. Let them cool completely, then place on a baking sheet and freeze until solid before transferring to a freezer-safe bag or container. They keep in the freezer for up to 3 months. Freeze them individually so you can pull out exactly as many as you need.
Reheating from the fridge — Microwave for 60 to 90 seconds until heated through. If you want to bring back some of the crispiness on the hash brown shell, pop them in an air fryer at 350°F for 3 to 4 minutes instead.
Reheating from frozen — Microwave straight from frozen for 2 to 3 minutes, flipping halfway through. Alternatively, reheat in a 350°F oven for 15 to 20 minutes until heated all the way through. The oven method gives the best texture result from frozen.
Make ahead tip — You can pre-bake the hash brown shells the night before, cover the tin with plastic wrap, and refrigerate overnight. In the morning just add the egg filling and bake for 12 to 15 minutes. This cuts your morning prep down to almost nothing.
A quick note before you go
There is something really satisfying about opening the fridge on a Wednesday morning and already having breakfast sorted. No scrambling, no skipping, no sad granola bar eaten in the car. Just two of these cups reheated in 90 seconds and you are walking out the door fed and ready.
That is the kind of cooking I am always chasing here at Recipes By Kip — simple, real, and genuinely useful in your everyday life. If you make these, I would love to hear how they turned out. Leave a comment, share them on Pinterest, or tag me on social. Let’s keep building a good food life together.
With gratitude, Kip
Hash brown egg cups – The grab and go breakfast you’ll want to make every week
Description
Golden crispy hash brown cups filled with seasoned scrambled eggs, crumbled bacon, and melted cheddar cheese, all baked together in a muffin tin. These hash brown egg cups are the ultimate make-ahead breakfast — portable, satisfying, and genuinely delicious straight out of the oven or reheated on a busy morning.
Ingredients
Hash brown cups:
Egg filling:
Instructions
-
Preheat oven to 400°F. Generously grease a 12-cup muffin tin.
-
Squeeze all moisture from thawed hash browns. Toss with olive oil, garlic powder, onion powder, salt, and pepper.
-
Press hash browns firmly into the bottom and sides of each muffin cup.
-
Pre-bake hash brown shells for 15 minutes until golden on the edges.
-
Whisk eggs with milk, salt, and pepper. Stir in bacon, cheese, and bell pepper.
-
Pour egg mixture into each pre-baked shell, three quarters full. Top with extra cheese.
-
Bake for 12 to 15 minutes until eggs are fully set and tops are golden.
-
Cool for 5 minutes, loosen edges, remove from tin, garnish, and serve.
