
I have a confession. For a long time, Kit Kats were my weakness. Not in a casual, "oh I'll have one finger" kind of way. In a "I just ate the entire four-finger bar standing over the kitchen counter and I'm not even sorry" kind of way. If you know, you know.
The problem was never the craving — it was everything that came with it. The processed ingredients, the dairy, the sugar crash that followed about 20 minutes later. So I did what any self-respecting home cook would do. I got into the kitchen and figured out how to make a version that tastes just as good but doesn't make you feel like you owe your body an apology afterward.
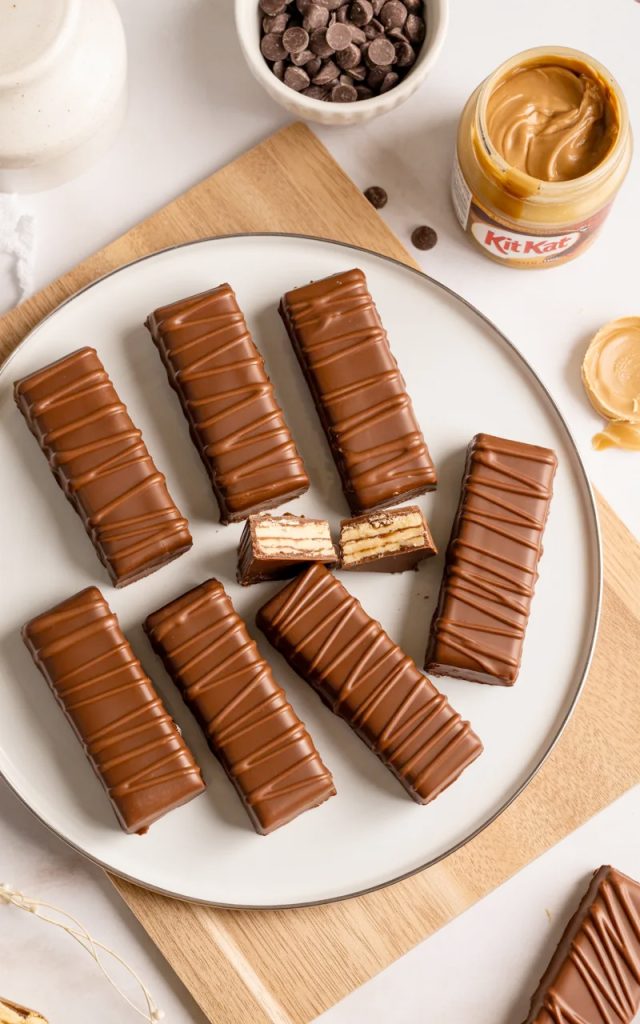
These homemade Kit Kat bars are the result of that mission. Crispy wafer layers, a creamy peanut butter-based filling, and a rich dark chocolate coating — all made with clean ingredients, completely gluten free and dairy free. They taste ridiculously close to the real thing. My family tasted them and immediately asked if I had just bought Kit Kats and broken them apart. That told me everything I needed to know.
For the wafer layers:
For the peanut butter filling:
For the chocolate coating:
Key ingredient notes:
Gluten free crackers or wafers — The cracker you choose is the foundation of the whole bar. You want something thin, crisp, and neutral so it does not overpower the filling or the chocolate. Plain gluten free rice crackers are the most reliable option. Avoid anything with a strong flavor like rosemary or sesame — trust me on that one.
Natural peanut butter — Use smooth, natural peanut butter with no added sugar or hydrogenated oils. The oil separation kind, where you have to stir it before using. That natural fat content is what gives the filling its creamy, melt-in-your-mouth texture. Regular commercial peanut butter is too thick and sweet and will throw off the balance of the filling.
Coconut oil — Used in both the filling and the chocolate coating. In the filling, it helps everything bind together smoothly. In the chocolate coating, it thins the melted chocolate just enough to dip and coat evenly without it being too thick or chunky. Use refined coconut oil if you want a neutral flavor, or unrefined if you don't mind a slight coconut note.
Pure maple syrup — This is your sweetener for the filling. It blends seamlessly into the peanut butter mixture and adds a subtle warmth without being overpowering. Do not substitute with honey if you want to keep these vegan.
Dairy free dark chocolate chips — Check the label carefully. Many dark chocolate chips are technically dairy free, but some are processed in facilities that also handle dairy. If you are making these for someone with a serious dairy allergy, look for a brand that is certified dairy free. Enjoy Life is a reliable option widely available in most grocery stores.
Step 1: Mix the filling
In a medium bowl, combine the natural peanut butter, melted coconut oil, maple syrup, vanilla extract, and pinch of salt. Stir everything together until the mixture is completely smooth and well combined. It should be thick but spreadable — similar to a soft frosting consistency. If it feels too thin, refrigerate it for 10 minutes to firm up slightly before using.
Step 2: Prepare your work surface
Line a baking sheet or a flat tray with parchment paper. This is where you will assemble and chill the bars before dipping them in chocolate.
Step 3: Start layering
Place one cracker flat on the parchment paper. Spread a thin, even layer of the peanut butter filling over the top — about 1/4 inch thick. Place a second cracker directly on top and press down gently. Spread another thin layer of filling on top of the second cracker. Place a third cracker on top and press down gently again.
You should now have a three-layer stack: cracker, filling, cracker, filling, cracker. That is your Kit Kat bar base. Repeat this process with the remaining crackers and filling until you have used everything up.
Step 4: Chill the assembled bars
Transfer the tray to the freezer and chill for at least 30 minutes. You want the filling to firm up completely before you dip the bars in chocolate. If the filling is too soft when you dip, the bars will fall apart. Do not rush this step.
Step 5: Melt the chocolate
Once the bars have chilled and firmed up, melt the dairy free chocolate chips and coconut oil together. You can do this in a microwave-safe bowl in 30-second intervals, stirring between each one, until the chocolate is completely smooth. Alternatively, use a double boiler on the stovetop. The coconut oil thins the chocolate slightly and gives it a beautiful glossy finish once it sets.
Step 6: Dip the bars
Working quickly, remove the bars from the freezer one or two at a time. Using a fork or dipping tool, lower each bar into the melted chocolate, turning it to coat all sides completely. Lift it out, let the excess chocolate drip off, and place it back on the parchment-lined tray.
Step 7: Add the chocolate drizzle
Once all bars are coated, use a spoon or a piping bag to drizzle a little extra melted chocolate over the tops in a back-and-forth motion. This gives them that signature Kit Kat drizzle look and makes them look genuinely impressive.
Step 8: Final chill
Return the coated bars to the freezer or refrigerator for another 15–20 minutes until the chocolate coating has fully set and hardened. Once set, they are ready to eat.
These bars are incredible straight from the fridge, but here are a few ways to enjoy them even more:
Refrigerator: Store the finished bars in an airtight container in the refrigerator for up to 2 weeks. Place a sheet of parchment paper between layers to prevent the bars from sticking to each other. The chocolate coating stays firm and the layers stay crisp when kept cold.
Freezer: These bars are freezer-friendly and honestly taste fantastic straight from frozen. Store them in a freezer-safe airtight container or zip-lock bag with parchment between layers for up to 3 months. Let them sit at room temperature for 3–5 minutes before eating if you prefer them slightly less firm.
Room temperature: These bars do not do well at room temperature for extended periods — the chocolate coating can soften and the filling can get too loose. If you are serving them at a party or event, keep them refrigerated until right before serving and try to get them eaten within an hour or two of taking them out.
Make-ahead tip: You can assemble the layered bars and keep them in the freezer uncoated for up to a month. When you are ready to serve, melt the chocolate fresh, dip, drizzle, and chill. This way the chocolate coating is always at its best.
There you have it — homemade Kit Kat bars that are healthy, gluten free, dairy free, and genuinely delicious. No guilt, no compromises, no settling for a sad alternative that barely resembles the real thing.
This is the kind of recipe I love most — the ones that prove you do not have to choose between eating well and eating food that actually brings you joy. These bars do both, and they do it without asking you to spend hours in the kitchen or track down obscure ingredients.
Make a big batch, stash them in the freezer, and thank yourself later. And if you try this recipe, drop a comment below or tag me on Pinterest and Instagram — seeing your versions of these bars is genuinely one of my favorite things.
Happy cooking — Kip
These homemade Kit Kat bars give you everything you love about the original — crispy layers, a creamy peanut butter filling, and a rich chocolate coating — but made with clean, simple ingredients that are completely gluten free and dairy free. No store-bought candy bars, no artificial ingredients, and no complicated techniques. Just a handful of wholesome ingredients, a little patience while they set, and one of the most satisfying homemade treats you will ever make.