

If you’ve ever found yourself buying four boxes of Samoas during Girl Scout cookie season and then rationing them like they’re precious cargo — first of all, same.
Second of all, this recipe is about to change your life. Because now you can make them whenever you want, in whatever quantity you want, without waiting for a table outside a grocery store.
I’ll be honest — the first time I attempted homemade Samoas I was a little intimidated. Shortbread dough, homemade caramel, toasted coconut, chocolate coating. It sounds like a lot. But once you break it down step by step it’s actually very manageable, even for a beginner baker. The payoff is absolutely worth every minute.
What you get at the end is a cookie that’s arguably better than the original — buttery, chewy, rich, and layered with flavors that just work together perfectly. These have become one of the most requested recipes in my kitchen and I have a feeling they’re about to become a staple in yours too.
Why you’ll love this recipe
- Better than the original. Made with real butter, real caramel and quality chocolate, these blow the boxed version out of the water. IMO there’s no comparison.
- No special equipment needed. You don’t need a stand mixer or any fancy tools. A bowl, a baking sheet and a saucepan are really all you need.
- Make them any time of year. No more waiting for cookie season. You’re in control now.
- Great for gifting. These look incredibly impressive on a cookie platter or packaged in a gift box. Nobody needs to know how straightforward they were to make.
- Freezer friendly. Make a big batch and freeze them. Future you will be very grateful.
- Completely customizable. Use dark, milk or semi-sweet chocolate depending on your preference. Add a pinch of sea salt on top for an elevated finish. Make them your own.
Ingredients with key notes
For the shortbread base
- 1 cup unsalted butter, softened — Room temperature is important here. Softened butter creams properly and gives the shortbread that tender, melt-in-your-mouth texture. Cold butter will make the dough too stiff and crumbly.
- 1/2 cup powdered sugar — Powdered sugar gives shortbread a finer, more delicate crumb compared to granulated sugar. Don’t substitute with regular sugar here.
- 1 tsp vanilla extract — Pure vanilla extract adds a warmth that makes the shortbread base taste rich and buttery rather than plain.
- 2 cups all-purpose flour — Spoon and level your flour — don’t scoop directly from the bag. Too much flour makes the shortbread dense and dry.
- 1/4 tsp salt — Balances the sweetness and enhances the butter flavor.
- 2 tbsp heavy cream — Helps bring the dough together and adds a little richness. Milk works as a substitute if that’s what you have.
For the coconut caramel topping
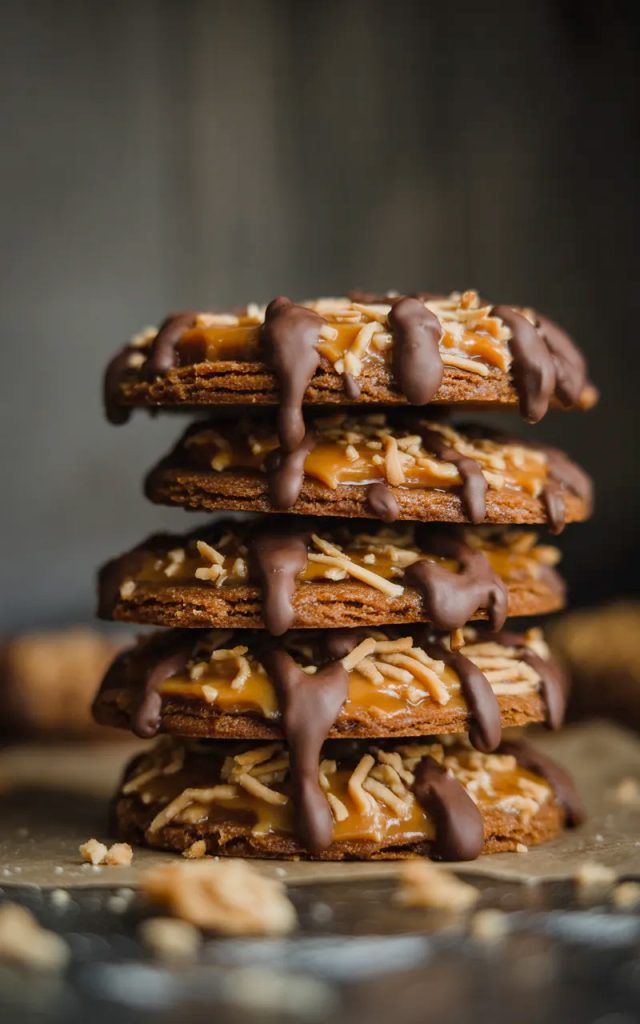
- 3 cups shredded sweetened coconut — The coconut gets toasted which brings out a deep, nutty flavor that’s central to the whole cookie. Don’t skip the toasting step.
- 1 bag (11 oz) soft caramel candies, unwrapped — Using store-bought caramel candies is the easiest route here. Werther’s soft caramels or Kraft caramels both work well.
- 3 tbsp heavy cream — Added to the caramels when melting to keep the mixture smooth and spreadable.
- 1/4 tsp salt — A little salt in the caramel mixture cuts through the sweetness and makes the flavor more complex.
For the chocolate coating and drizzle
- 2 cups dark chocolate chips or chopped dark chocolate — Good quality chocolate makes a difference here. Use at least 60% cacao for a rich flavor that balances the sweetness of the caramel.
- 1 tbsp coconut oil — Added to the melted chocolate to make it smoother and easier to dip and drizzle. It also gives the chocolate a nice glossy finish when it sets.
Step-by-step instructions
Step 1 — Make the shortbread dough
In a large mixing bowl beat the softened butter and powdered sugar together until light and fluffy, about 2 minutes. Add the vanilla extract and mix until combined. Gradually add the flour and salt, mixing until the dough just comes together. Add the heavy cream one tablespoon at a time until the dough holds together without crumbling. It should be soft but not sticky.
Step 2 — Roll and cut the cookies
Turn the dough out onto a lightly floured surface and roll it to about 1/4 inch thickness. Use a round cookie cutter about 2.5 inches in diameter to cut out rounds, then use a smaller cutter or the wide end of a piping tip to cut a small hole in the center of each round. This gives you the classic Samoas ring shape. Re-roll the scraps and repeat until all the dough is used. Place the cut cookies on a parchment-lined baking sheet.
Step 3 — Bake the shortbread
Bake at 350°F for 10–12 minutes until the edges are just barely starting to turn golden. You want them pale and tender — not browned. They will look slightly underdone when you pull them out but they firm up as they cool. Let them cool completely on a wire rack before adding the topping.
Step 4 — Toast the coconut
Spread the shredded coconut in an even layer on a dry baking sheet. Toast in the oven at 350°F for 5–8 minutes, stirring every 2 minutes. Keep a very close eye on it — coconut goes from perfectly golden to burnt very quickly. You’re looking for a light golden brown color with a nutty aroma. Remove from the oven and set aside to cool.
Step 5 — Make the caramel coconut topping
In a medium saucepan over low heat, combine the unwrapped caramel candies and heavy cream. Stir constantly until the caramels are completely melted and the mixture is smooth. Add the salt and stir to combine. Remove from heat and immediately stir in the toasted coconut until everything is well coated. Work quickly here — the mixture thickens as it cools.
Step 6 — Top the cookies
Using a spoon or small offset spatula, spread a generous layer of the coconut caramel mixture on top of each cooled shortbread round. Press it down gently so it adheres to the cookie. Try to keep the hole in the center clear for that classic Samoas look. Let the topped cookies sit for about 15 minutes to firm up slightly before adding the chocolate.
Step 7 — Dip the bottoms in chocolate
Melt the dark chocolate chips and coconut oil together in a microwave-safe bowl in 30-second intervals, stirring between each, until smooth and glossy. Dip the bottom of each cookie into the melted chocolate, letting the excess drip off, then place them chocolate side down on a parchment-lined surface to set.
Step 8 — Drizzle with chocolate
Transfer the remaining melted chocolate to a small piping bag or a zip-lock bag with a tiny corner snipped off. Drizzle stripes of chocolate over the tops of all the cookies. Let everything set completely at room temperature or speed things up by placing them in the refrigerator for 15–20 minutes.
Serving suggestions
- With a cup of coffee. The bitterness of a good black coffee against the sweet caramel and chocolate is a combination that genuinely elevates both. This is my personal favorite way to eat these.
- On a holiday cookie platter. These are showstoppers on a dessert table. Stack them in a small tower and watch them disappear first.
- As a gift. Package them in a cellophane bag tied with a ribbon or layer them in a cookie tin. They look bakery-level impressive and taste even better.
- With vanilla ice cream. Crumble a cookie or two over a scoop of vanilla ice cream and drizzle with a little extra chocolate. Absolutely no notes.
- With a glass of cold milk. Classic and always right. The cold milk cuts through the richness of the caramel and chocolate perfectly.
- As a midday treat. These are rich enough that one or two is genuinely satisfying. Great with an afternoon cup of tea or coffee when you need a little something sweet.
Storage tips
At room temperature
Store the cookies in an airtight container at room temperature for up to 5 days. Place parchment paper between the layers to prevent them from sticking together. Keep them away from direct sunlight or heat which can cause the chocolate to bloom or melt.
In the refrigerator
These store well in the refrigerator for up to 2 weeks. The chocolate and caramel firm up when cold so let them sit at room temperature for about 10 minutes before eating for the best texture.
Freezing
These cookies freeze beautifully for up to 3 months. Layer them between sheets of parchment paper in a freezer-safe container. Thaw at room temperature for about 20–30 minutes before serving. You can also freeze the baked shortbread rounds before adding the topping — just add the caramel and chocolate fresh when you’re ready to serve.
A quick word before you go
There is something genuinely satisfying about making a cookie that people associate with a specific season or brand and just doing it better in your own kitchen. These homemade Samoas are one of those recipes that earns real reactions — the kind where someone takes a bite and goes quiet for a second before reaching for another one.
They take a little more effort than your average drop cookie but every single step is worth it. And once you’ve made them yourself, going back to the box honestly feels like a step backwards. Make a big batch, share them with people you like, and save a few for yourself. You’ve earned it.
Drop a comment below and let me know how yours turned out — or tag me on Pinterest so I can see your creations. Happy baking! 🙂
Homemade samoas cookies — chewy, chocolatey and better than the box
Description
These homemade Samoas cookies are the kind of treat that makes you question why you ever waited for Girl Scout cookie season in the first place. Built on a buttery shortbread base and loaded with chewy toasted coconut, rich gooey caramel and a generous dark chocolate drizzle, every single bite is an experience. The best part? You can make them from scratch in your own kitchen with simple ingredients and no special skills required. Whether you're baking these for a holiday cookie platter, a weekend treat, or just because the craving hit — this recipe delivers the real deal every time.
Ingredients
Shortbread base
Coconut caramel topping
Chocolate coating and drizzle
Instructions
-
Beat butter and powdered sugar until fluffy. Add vanilla, flour, salt and cream. Mix until dough forms.
-
Roll dough to 1/4 inch thickness. Cut into rings using round cutters. Place on parchment-lined baking sheet.
-
Bake at 350°F for 10–12 minutes until edges are just set. Cool completely.
-
Toast coconut at 350°F for 5–8 minutes, stirring every 2 minutes until golden. Set aside.
-
Melt caramels with heavy cream and salt over low heat. Stir in toasted coconut.
-
Spread coconut caramel mixture over each cooled cookie. Let sit 15 minutes.
-
Melt chocolate chips with coconut oil. Dip cookie bottoms in chocolate and place on parchment to set.
-
Drizzle remaining chocolate over the tops. Let set completely before serving.
