

Let’s be real: weeknight dinners can be a struggle. You’re tired, you’re hungry, and the last thing you want to do is cook something complicated that dirties every pot in your kitchen. That’s exactly why I created this honey BBQ chicken and rice recipe.
One pan. Thirty minutes. Minimal cleanup. And somehow, it tastes like you actually tried. The chicken gets this sticky, sweet-tangy glaze from the honey BBQ sauce, and it all sits on top of fluffy rice that soaks up all those delicious flavors. My kids literally cheer when I make this, which is saying something because they’re usually suspicious of anything green or healthy.
This has become my default “I forgot to meal plan and need dinner fast” recipe. It’s foolproof, uses ingredients you probably already have, and nobody ever complains about eating it. That’s a weeknight dinner win in my book.
Why You’ll Love This Recipe
Truly One-Pan – Everything cooks in a single skillet. Brown the chicken, make the rice in the same pan, add the sauce. That’s it. Minimal dishes means more time doing literally anything else.
Ready in 30 Minutes – This is legitimately fast food, just homemade. By the time you’d get takeout delivered, you could have this on the table. No marinating required, no long cook times, just straightforward weeknight cooking.
Kid-Approved Every Time – The honey BBQ sauce is sweet and mild, not spicy or weird. Rice is universally loved. Even picky eaters clean their plates. I’ve served this to multiple families and every single kid has asked for seconds.
Perfect for Meal Prep – Make a big batch on Sunday and you’ve got lunches for the week. The flavors actually get better after sitting overnight. Just reheat in the microwave and you’re good to go.
Budget-Friendly – Chicken, rice, BBQ sauce, honey. Nothing expensive or fancy. You’re feeding four people for about $12-15. Try getting that value from a restaurant.
Customizable – Want it spicier? Add hot sauce. Want veggies? Toss in broccoli or bell peppers. Want it healthier? Use brown rice. The base recipe is flexible enough to adapt to whatever you need.
Ingredients
For the Chicken:
- 1.5 lbs boneless, skinless chicken breasts or thighs – Cut into bite-sized pieces (about 1-inch cubes).
- 1 tablespoon olive oil – For searing the chicken.
- ½ teaspoon garlic powder
- ½ teaspoon onion powder
- ½ teaspoon paprika
- Salt and black pepper to taste
For the Rice:
- 1½ cups long-grain white rice (jasmine or basmati work great) – Rinsed well.
- 2 cups chicken broth – Adds more flavor than water.
- ½ cup water
For the Honey BBQ Sauce:
- 1 cup BBQ sauce – Use your favorite. Sweet Baby Ray’s is classic.
- ¼ cup honey – Makes it sticky and sweet.
- 2 tablespoons soy sauce – Adds depth and saltiness.
- 1 tablespoon apple cider vinegar – Balances the sweetness with tang.
- 1 teaspoon garlic powder
- ½ teaspoon ground ginger (optional) – Adds a subtle warmth.
For Garnish:
- Sliced green onions
- Sesame seeds
- Fresh cilantro or parsley
Optional Add-Ins:
- 1 cup broccoli florets – Add during the last 5 minutes of cooking.
- 1 bell pepper, diced – Sauté with the chicken.
- 1 cup frozen peas – Stir in with the rice.
- Red pepper flakes – For heat.
Key Notes:
- Rinse your rice: This removes excess starch and prevents gummy, sticky rice.
- Cut chicken evenly: Same-sized pieces cook at the same rate.
- Don’t skip searing: Browning the chicken adds flavor you can’t get otherwise.
Step-by-Step Instructions
Step 1: Prep the Chicken
Cut the chicken into bite-sized pieces, about 1-inch cubes. Season them with garlic powder, onion powder, paprika, salt, and pepper. Toss to coat evenly.
Step 2: Sear the Chicken
Heat the olive oil in a large skillet (one with a lid) over medium-high heat. Once hot, add the chicken pieces in a single layer. Don’t overcrowd the pan—work in batches if needed. Sear for 2-3 minutes per side until golden brown. The chicken doesn’t need to be cooked through yet; you’re just building flavor. Remove the chicken from the skillet and set aside on a plate.
Step 3: Make the Honey BBQ Sauce
In a small bowl, whisk together the BBQ sauce, honey, soy sauce, apple cider vinegar, garlic powder, and ground ginger (if using). Set aside. This takes literally 30 seconds and makes all the difference.
Step 4: Cook the Rice
In the same skillet (don’t wipe it out—those browned bits are flavor), add the rinsed rice. Stir it around for about 30 seconds to toast it slightly in the chicken fat and browned bits. Pour in the chicken broth and water. Stir once to combine, then bring to a boil.
Step 5: Simmer Everything Together
Once the liquid is boiling, nestle the seared chicken pieces on top of the rice. Pour about half of the honey BBQ sauce over the chicken. Reduce the heat to low, cover the skillet with a tight-fitting lid, and let it simmer for 15-18 minutes. Don’t lift the lid during this time—the steam is cooking the rice.
Step 6: Check for Doneness
After 15-18 minutes, remove the lid and check. The rice should have absorbed all the liquid and be tender. The chicken should be cooked through (internal temp of 165°F). If the rice is still a bit wet, let it sit uncovered for a few minutes to finish absorbing.
Step 7: Add the Remaining Sauce
Pour the remaining honey BBQ sauce over the chicken and rice. Gently toss everything together so the rice gets coated in that sticky, sweet sauce. Let it sit for 2-3 minutes so the sauce can thicken and glaze the chicken.
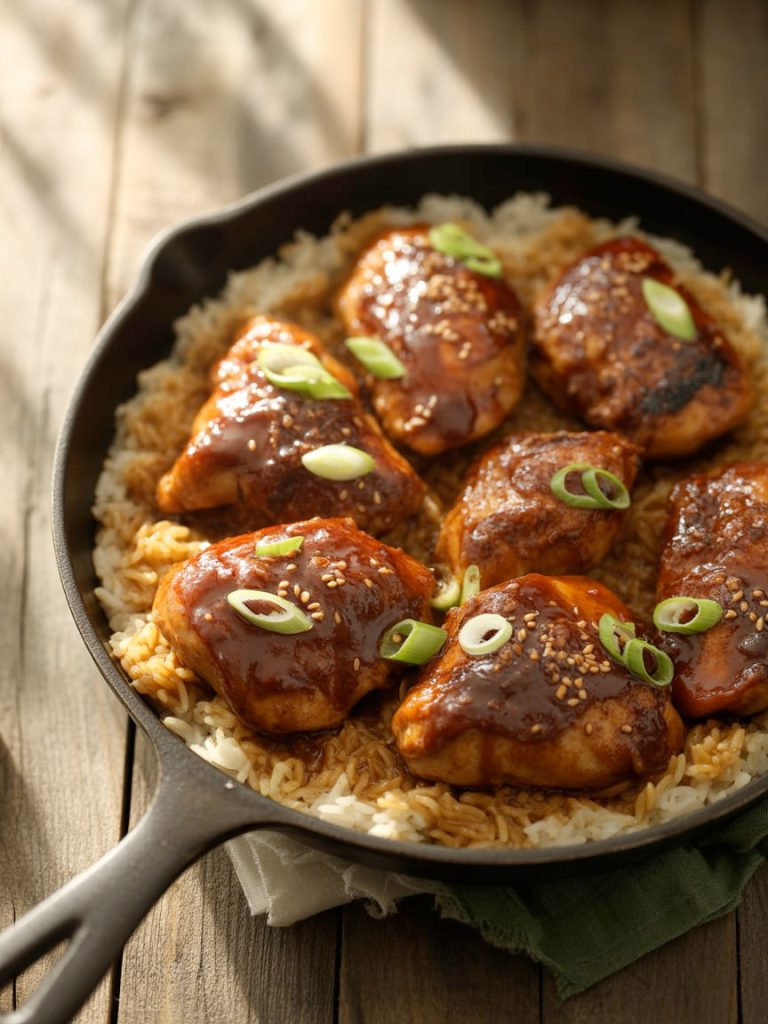
Step 8: Garnish and Serve
Sprinkle with sliced green onions, sesame seeds, and fresh herbs. Serve hot directly from the skillet or transfer to a serving dish if you’re feeling fancy.
Serving Suggestions
This honey BBQ chicken and rice is pretty much a complete meal, but here’s how to round it out:
Simple Side Salad – Something light and fresh to balance the sweetness. A basic green salad with ranch or a cucumber salad with vinegar works perfectly.
Steamed or Roasted Vegetables – Broccoli, green beans, or roasted Brussels sprouts add color and nutrition without complicating things.
Coleslaw – The crunch and tang of coleslaw is perfect with BBQ flavors. You can use store-bought to keep it easy.
Garlic Bread – Not necessary, but if you want to make it feel like a bigger meal, some garlic bread on the side never hurts.
Corn on the Cob – Keeps with the BBQ theme and kids love it. Grill it or boil it, whatever’s easier.
Pickles – Sounds random, but pickles on the side cut through the sweetness and add a nice tangy contrast.
Storage Tips
Refrigerator: Store leftovers in an airtight container in the fridge for up to 4 days. The rice will firm up as it cools, which is normal. When reheating, add a splash of water or chicken broth to bring back moisture.
Freezing: This freezes surprisingly well! Let it cool completely, then portion into freezer-safe containers. It’ll keep for up to 3 months. Thaw overnight in the fridge before reheating. The texture might be slightly different (the rice can get a bit softer), but the flavor stays great.
Reheating: Microwave individual portions for 2-3 minutes, stirring halfway through. Add a tablespoon of water to keep it from drying out. You can also reheat in a skillet over medium-low heat with a splash of broth, stirring occasionally until heated through.
Meal Prep: This is perfect for meal prep. Divide into individual containers with lids and you’ve got lunch for the week. The honey BBQ sauce actually tastes better after marinating the chicken and rice overnight. Some people like to pack the sauce separately and add it when reheating, but I usually just mix it all together.
Make-Ahead: You can prep the chicken (cut and season it) up to 24 hours ahead. You can also make the honey BBQ sauce a few days in advance and store it in the fridge. When you’re ready to cook, just follow the recipe from Step 2.
Oven Method: If you want to make this in the oven, brown the chicken in an oven-safe skillet, add the rice and liquids, bring to a boil on the stovetop, then cover tightly with foil and transfer to a 375°F oven. Bake for 20-25 minutes until the rice is cooked and liquid is absorbed. Add the sauce and finish as directed.
Final Thoughts
Here’s what I love most about this recipe: it’s the kind of dinner that makes you look like you have your life together, even when you absolutely don’t. One pan, basic ingredients, 30 minutes, and somehow everyone thinks you’re a kitchen genius.
I make this at least once a week because it checks every box. My kids eat it without complaining. It’s fast enough for busy weeknights. It makes great leftovers. And honestly? It just tastes really good. That sticky, sweet honey BBQ glaze coating tender chicken and fluffy rice is comfort food at its finest.
The best part is how adaptable it is. Throw in whatever vegetables you have. Use whatever BBQ sauce is in your fridge. Swap white rice for brown rice if you’re feeling healthy. The basic formula works no matter what you do to it.
Make this once and I guarantee it becomes part of your regular dinner rotation. It’s too easy and too delicious not to.
– Kip
Honey BBQ Chicken and Rice (One-Pan 30-Minute Dinner)
Description
This honey BBQ chicken and rice is the ultimate weeknight dinner with juicy chicken glazed in sweet and tangy honey BBQ sauce served over perfectly cooked fluffy rice. Everything cooks in one pan for easy cleanup. Kid-friendly, meal prep ready, and packed with flavor.
Ingredients
Chicken:
Rice:
Garnish:
Instructions
-
Cut chicken into 1-inch cubes. Season with garlic powder, onion powder, paprika, salt, and pepper.
-
Heat oil in large skillet over medium-high heat. Sear chicken 2-3 minutes per side until golden. Remove and set aside.
-
Whisk together BBQ sauce, honey, soy sauce, vinegar, garlic powder, and ginger. Set aside.
-
In same skillet, add rinsed rice. Toast 30 seconds. Add chicken broth and water. Bring to boil.
-
Nestle chicken pieces on top of rice. Pour half the honey BBQ sauce over chicken. Reduce heat to low, cover, and simmer 15-18 minutes without lifting lid.
-
Check that rice is tender and liquid absorbed. Chicken should reach 165°F internal temp.
-
Pour remaining sauce over everything. Toss gently to coat rice. Let sit 2-3 minutes to thicken.
-
Garnish with green onions, sesame seeds, and herbs. Serve hot.
