

You know those dishes that make you forget about everything else the moment you take the first bite? These Honey Butter Chicken Bites are exactly that. Crispy, sticky, sweet, buttery—basically everything you want in one perfect little package.
I made these for the first time when I had friends coming over and realized I had nothing planned. Twenty minutes later, I was watching grown adults fight over the last piece. No joke. My friend Sarah actually tried to hide a few in her napkin to take home.
The best part? They’re stupidly easy to make. Like, if you can cut chicken and stir a pan, you’re golden. And they come together so fast that by the time you’re done, your kitchen barely even looks like you cooked.
Why You’ll Love These Honey Butter Chicken Bites
Sweet and savory perfection in every bite – The honey brings sweetness while the butter adds richness and the garlic gives it depth. It’s that magical combination that makes you reach for just one more piece… and then another… and suddenly the whole plate’s gone.
Ready in just 30 minutes – From cutting your chicken to plating, you’re looking at half an hour max. This is my go-to recipe when I need something impressive but don’t have time to actually, you know, cook properly.
Kids and adults absolutely love them – I’ve never met a person who didn’t like these. Picky eaters? They devour them. Your skeptical uncle who “doesn’t like sweet chicken”? He’ll ask for the recipe. They’re universally crowd-pleasing.
Great as an appetizer or main dish – Serve them with toothpicks for a party appetizer, or plate them over rice with veggies for dinner. They work for literally any occasion—game day, date night, random Tuesday when you need comfort food.
Simple ingredients, restaurant-quality results – You probably have everything you need already. Just chicken, honey, butter, garlic, and soy sauce. That’s it. But somehow it tastes like something you’d pay $15 for at a restaurant.
Naturally gluten-free and can be made dairy-free – Skip the flour coating and use cornstarch instead for gluten-free. Use ghee or coconut oil instead of butter for dairy-free. Still tastes incredible either way.
Ingredients You’ll Need
For the Chicken:
- 1.5 pounds boneless, skinless chicken breast – Cut into bite-sized pieces, about 1-inch cubes. Thighs work great too if you prefer dark meat.
- 1/4 cup cornstarch – This creates that crispy coating. You can use all-purpose flour if you’re not worried about gluten-free.
- 1/2 teaspoon garlic powder – Adds flavor to the coating.
- 1/2 teaspoon onion powder
- Salt and black pepper to taste – Season generously. This is your base flavor.
- 2 tablespoons vegetable oil – For frying. Use avocado oil if you want something with a higher smoke point.
For the Honey Butter Sauce:
- 1/3 cup honey – Good quality honey makes a difference here. It’s the star of the show.
- 4 tablespoons butter – Unsalted is best so you can control the salt level.
- 3 cloves garlic, minced – Fresh garlic is essential. The jarred stuff won’t give you the same flavor.
- 2 tablespoons soy sauce – Adds that savory umami depth. Use tamari for gluten-free or coconut aminos for soy-free.
- 1 tablespoon apple cider vinegar – Cuts through the sweetness and adds brightness.
- 1/4 teaspoon red pepper flakes – Optional, but highly recommended. Just enough to make it interesting without making it spicy.
For Garnish:
- Sliced green onions
- Sesame seeds
- Fresh parsley or cilantro
Key Notes:
- Chicken size matters: Cut your pieces evenly so they cook at the same rate. Too big and they won’t cook through; too small and they’ll dry out.
- Honey substitute: You can use maple syrup, but the flavor will be different. Agave works in a pinch.
- Butter alternative: Ghee or coconut oil both work great if you need dairy-free.
- Coating: Cornstarch makes them crispier than flour, but both work fine.
How to Make Honey Butter Chicken Bites (Step-by-Step)
Step 1: Prep the Chicken
Cut your chicken breasts into bite-sized pieces—about 1-inch cubes. Try to keep them roughly the same size so they cook evenly. Nobody wants half-raw, half-burnt chicken.
Pat them dry with paper towels. This is important. Wet chicken won’t get crispy, and crispy is what we’re going for here.
Step 2: Coat the Chicken
In a large bowl or zip-top bag, combine your cornstarch, garlic powder, onion powder, salt, and pepper. Add the chicken pieces and toss until every piece is evenly coated. Give the bag a good shake or use your hands to really work that coating in.
Don’t skip this step thinking you’ll save time. The coating is what makes these crispy and helps the sauce cling to the chicken. It’s non-negotiable.
Step 3: Cook the Chicken
Heat 2 tablespoons of oil in a large skillet over medium-high heat. You want it hot—when you drop a piece of chicken in, it should sizzle immediately.
Add your coated chicken pieces in a single layer. Don’t overcrowd the pan or they’ll steam instead of getting crispy. Work in batches if you need to. I usually do two batches and it’s worth it.
Cook for about 3-4 minutes per side, until golden brown and cooked through. The chicken should reach an internal temperature of 165°F if you want to be technical about it. Transfer the cooked chicken to a plate and set aside.
Step 4: Make the Honey Butter Sauce
In the same skillet (don’t wipe it out—those brown bits are flavor), reduce heat to medium-low. Add your butter and let it melt. Once it’s melted and starting to foam, add the minced garlic and sauté for about 30 seconds until fragrant.
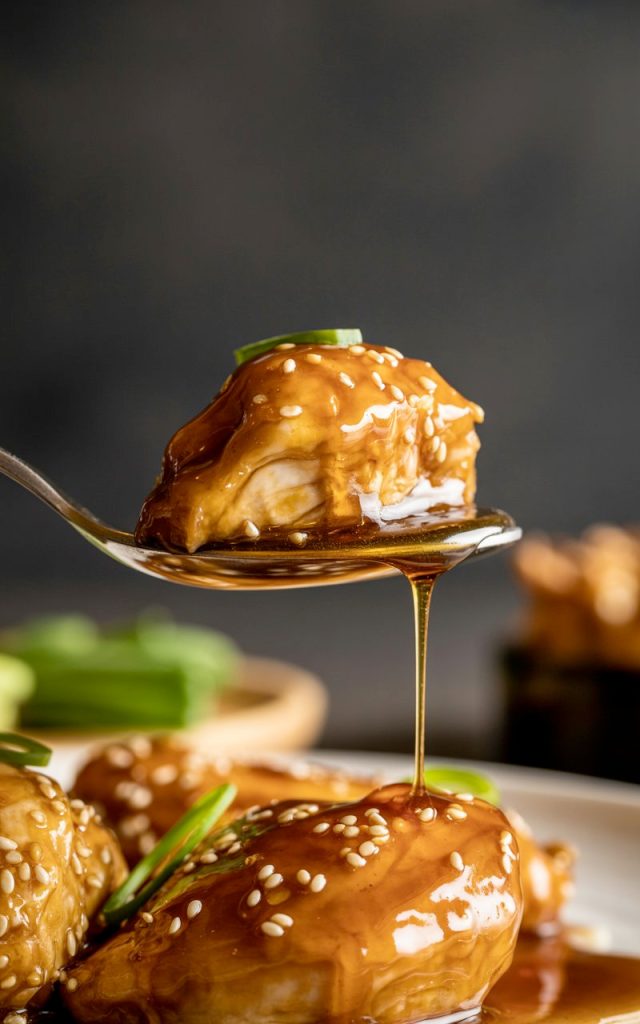
Pour in the honey, soy sauce, apple cider vinegar, and red pepper flakes. Whisk everything together and let it simmer for 2-3 minutes. The sauce will bubble and thicken slightly. It should look glossy and coat the back of a spoon.
Here’s the thing about honey—it can burn quickly. Keep the heat at medium-low and watch it. If it starts to smell burnt or gets too dark, pull it off the heat immediately.
Step 5: Combine and Coat
Add your cooked chicken back to the skillet with the sauce. Toss everything together until every single piece is completely coated in that gorgeous, sticky glaze. Let it cook together for another minute or two so the flavors meld and the sauce gets even thicker and stickier.
The chicken should be glistening and looking absolutely irresistible at this point.
Step 6: Garnish and Serve
Transfer to a serving plate. Sprinkle with sliced green onions and sesame seeds if you’re feeling fancy. A little fresh parsley or cilantro doesn’t hurt either.
Serve immediately while they’re hot and the coating is still crispy. Trust me, these don’t last long enough to worry about keeping them warm.
Serving Suggestions
These honey butter chicken bites are versatile enough to work for pretty much any meal or occasion:
Over rice – White rice, brown rice, cauliflower rice—they all work. The rice soaks up that extra sauce and it’s heavenly. I usually do jasmine rice because it’s fluffy and slightly sticky.
With roasted vegetables – Roasted broccoli, Brussels sprouts, or green beans make excellent sides. They cut through the sweetness and add some nutrition to balance things out.
As an appetizer – Stick toothpicks in them and arrange on a platter. Perfect for parties, game day, or when you need to impress people with minimal effort.
In a rice bowl – Make it a complete meal with rice, steamed veggies, avocado, and extra sauce drizzled on top. Add some sriracha if you want to spice things up.
With a simple salad – A crisp Asian-style slaw or cucumber salad with sesame dressing pairs beautifully. The freshness balances the richness.
Slider situation – Put them on mini buns with some pickles and extra sauce. Game changer for parties.
Storage and Reheating Tips
Storing Leftovers
Let the chicken cool completely, then store in an airtight container in the fridge for 3-4 days. The sauce will continue to thicken as it sits, which is actually kind of great because it becomes even more flavorful.
Fair warning: the coating won’t stay as crispy once refrigerated. It’s still delicious, just not quite as crunchy as when fresh.
Freezing Instructions
You can freeze these! Let them cool completely, then freeze in a single layer on a baking sheet. Once frozen solid, transfer to a freezer bag. They’ll keep for up to 2 months.
Personally, I prefer to freeze the cooked chicken pieces without the sauce, then make fresh sauce when I’m ready to eat. The texture holds up better that way.
Reheating
Oven method (best for maintaining texture): Preheat to 375°F. Spread chicken on a baking sheet and heat for 10-12 minutes until warmed through and slightly crispy again.
Skillet method (my favorite): Heat a bit of oil in a skillet over medium heat. Add the chicken and cook, stirring occasionally, until heated through and the coating crisps up again. Takes about 5-7 minutes.
Microwave method (fastest but least crispy): Heat on 50% power in 30-second intervals, stirring between each. Won’t be crispy but still tastes good.
Air fryer method (for maximum crispiness): 350°F for 5-6 minutes. This actually brings back a lot of the original crispiness. Highly recommend if you have an air fryer.
Final Thoughts
These Honey Butter Chicken Bites have become one of those recipes I make at least once a week. They’re quick, delicious, and never fail to put smiles on faces—including mine.
Give them a try, and don’t be surprised when they become your new favorite weeknight dinner.
– Kip
Honey Butter Chicken Bites Recipe (Sweet, Sticky & Ready in 30 Minutes!)
Description
These Honey Butter Chicken Bites feature tender pieces of chicken coated in a glossy, buttery honey glaze that's perfectly balanced between sweet and savory. They're crispy on the outside, juicy on the inside, and absolutely addictive!
Ingredients
For the Chicken:
For the Honey Butter Sauce:
For Garnish:
Instructions
-
Cut chicken into bite-sized cubes and pat dry with paper towels.
-
Combine cornstarch, garlic powder, onion powder, salt, and pepper in a bowl. Toss chicken pieces until evenly coated.
-
Heat oil in a large skillet over medium-high heat. Add chicken in a single layer (work in batches if needed).
-
Cook chicken for 3-4 minutes per side until golden brown and cooked through. Transfer to a plate.
-
Reduce heat to medium-low. Add butter to the same skillet and let melt.
-
Add garlic and sauté for 30 seconds until fragrant.
-
Pour in honey, soy sauce, apple cider vinegar, and red pepper flakes. Whisk and simmer for 2-3 minutes until slightly thickened.
-
Return chicken to skillet and toss until completely coated in sauce. Cook for 1-2 minutes more.
-
Garnish with green onions and sesame seeds. Serve immediately.
