
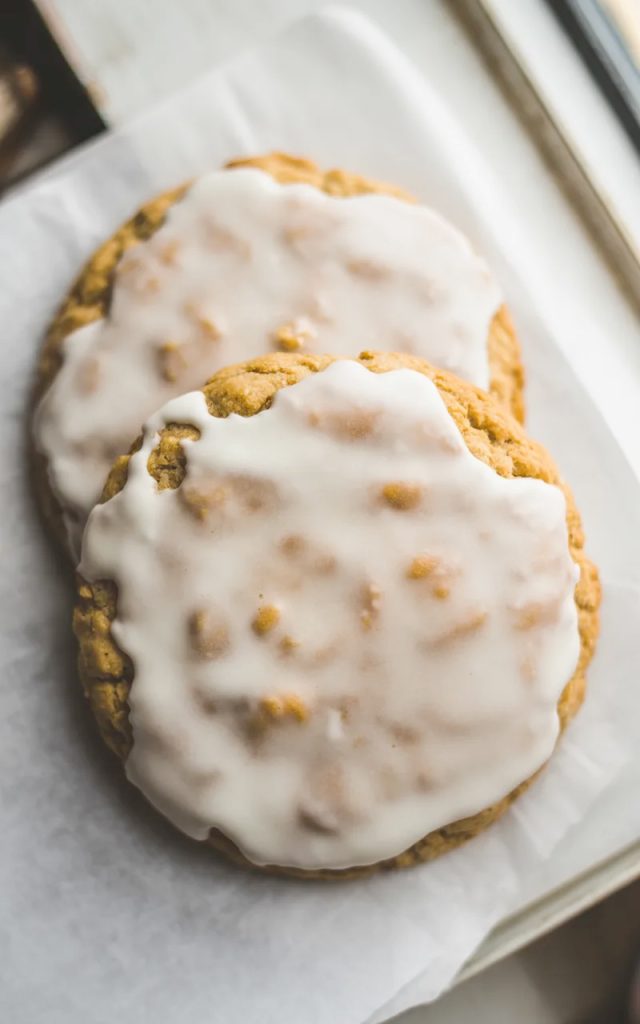

You know those cookies that hit differently? The ones that take you straight back to your grandmother’s kitchen before you even finish chewing? That’s exactly what these old fashioned iced oatmeal cookies do. Thin, crispy edges, a slightly chewy center, and a sweet vanilla glaze that sets into that beautiful crackled finish — these are the real deal.
I made these for the first time on a rainy Saturday afternoon when I was craving something nostalgic and comforting. One batch later, half of them were gone before they even had a chance to cool completely. No regrets. These cookies have that old school charm that store-bought versions try to replicate but never quite nail.
If you’ve never made iced oatmeal cookies from scratch, you are genuinely missing out. Let’s fix that right now.
Why you’ll love this recipe
- That crackled icing is everything. The vanilla glaze sets into a gorgeous crackled finish that looks like it came straight out of a bakery window. People will ask you how you made them.
- Simple pantry ingredients. Nothing fancy, nothing you can’t pronounce. Just straightforward ingredients you probably already have sitting in your kitchen right now.
- Crispy edges, slightly chewy center. The texture combination here is absolutely perfect. These are not your average soft and cakey oatmeal cookies — these have character.
- They keep really well. Unlike a lot of cookies that go stale fast, these actually stay crispy and delicious for days. That is, if they last that long.
- Great for gifting. Stack them in a tin, wrap them up, and you have a homemade gift that will genuinely impress people. FYI, nobody has ever been disappointed to receive a tin of these.
- Kid and adult approved. The nostalgic flavor crosses every generation. Kids love them, adults get misty-eyed over them. It’s a win all around.
Ingredients with key notes
For the cookies:
- 2 cups old fashioned rolled oats — Do not use quick oats here. Old fashioned rolled oats give you that distinct texture and slightly nutty flavor that makes these cookies what they are. Quick oats will make them too dense.
- 1.5 cups all-purpose flour — Standard all-purpose flour works perfectly. No need to reach for anything fancy.
- 1 tsp baking soda — Helps the cookies spread and gives them that thin, crispy character.
- 1 tsp baking powder — Works alongside the baking soda for the right lift and texture.
- 1 tsp ground cinnamon — This is non-negotiable. The cinnamon is a big part of that nostalgic flavor profile. Don’t skip it.
- 1/2 tsp ground nutmeg — Just a touch adds warmth and depth without being overpowering.
- 1/2 tsp salt — Balances the sweetness and brings all the flavors together.
- 1 cup unsalted butter, softened — Make sure your butter is properly softened at room temperature. Cold butter will not cream properly and warm butter will make the cookies spread too much.
- 1 cup granulated sugar
- 1/2 cup brown sugar, packed — The brown sugar adds a subtle molasses flavor and helps with that slightly chewy center.
- 2 large eggs, room temperature — Room temperature eggs incorporate much more evenly into the batter. Pull them out of the fridge about 30 minutes before you start.
- 1 tsp pure vanilla extract
For the vanilla glaze:
- 2 cups powdered sugar, sifted — Sifting is important here. Unsifted powdered sugar will give you a lumpy glaze and nobody wants that.
- 3-4 tbsp whole milk — Add it gradually until you reach a thick but pourable consistency. You want it thick enough to coat the cookies but thin enough to drip slightly over the edges.
- 1/2 tsp pure vanilla extract
Step-by-step instructions
Step 1 — Process the oats
Add the rolled oats to a food processor or blender and pulse 8-10 times until they are coarsely ground. You don’t want a fine powder — you want them broken down but still with some texture and visible pieces. This step is what gives these cookies their signature look and texture. Don’t skip it.
Step 2 — Mix the dry ingredients
In a large mixing bowl, whisk together the ground oats, all-purpose flour, baking soda, baking powder, cinnamon, nutmeg, and salt until well combined. Set aside.
Step 3 — Cream the butter and sugars
In a separate large bowl, beat the softened butter, granulated sugar, and brown sugar together using a hand mixer or stand mixer on medium speed for 3-4 minutes until the mixture is light, pale, and fluffy. This step matters — properly creamed butter and sugar is what gives you the right cookie texture. Don’t rush it.
Step 4 — Add eggs and vanilla
Add the eggs one at a time to the butter and sugar mixture, beating well after each addition. Add the vanilla extract and mix until everything is fully combined and smooth.
Step 5 — Combine wet and dry ingredients
Gradually add the dry ingredient mixture to the wet ingredients, mixing on low speed until just combined. Do not overmix — stop as soon as you no longer see streaks of flour. Overmixing develops the gluten and makes the cookies tough instead of tender.
Step 6 — Chill the dough
Cover the bowl with plastic wrap and refrigerate the dough for at least 1 hour, or up to overnight. Chilling the dough is what prevents the cookies from spreading too much in the oven and helps develop the flavor. This step is not optional if you want that perfect thin and crispy result.
Step 7 — Preheat and prep
When you’re ready to bake, preheat your oven to 350°F. Line two baking sheets with parchment paper. Scoop the chilled dough into balls about 1.5 tablespoons each and place them 2 inches apart on the prepared baking sheets. Slightly flatten each ball with the palm of your hand.
Step 8 — Bake
Bake for 10-12 minutes until the edges are golden brown and the centers look just set. They will look slightly underdone in the middle when you pull them out — that’s exactly right. They will firm up as they cool on the pan. Let them cool on the baking sheet for 5 minutes before transferring to a wire cooling rack.
Step 9 — Make the vanilla glaze
While the cookies cool completely, whisk together the sifted powdered sugar, vanilla extract, and milk in a bowl. Start with 3 tablespoons of milk and add more a little at a time until you reach a thick but pourable consistency. It should coat the back of a spoon but still drip slowly off the edge.
Step 10 — Glaze the cookies
Once the cookies are completely cool, dip the top of each cookie face-down into the glaze, letting the excess drip off, or spoon the glaze over the top of each cookie. Place them back on the wire rack and let the glaze set completely — about 20-30 minutes. As it sets it will develop that beautiful crackled finish that makes these cookies so iconic.
Serving suggestions
These old fashioned iced oatmeal cookies are perfect on their own but here are a few ways to enjoy them even more:
- With a cold glass of milk — Classic combination. The crispy cookie and cold milk is a pairing that has stood the test of time for a very good reason.
- Alongside a hot cup of coffee — The cinnamon and nutmeg in the cookie pair beautifully with a strong black coffee or a creamy latte.
- With hot tea — Earl grey or chai tea works especially well with the warm spice notes in these cookies.
- As a holiday cookie tin gift — Layer them between sheets of parchment paper in a decorative tin and you have a heartfelt homemade gift.
- Crumbled over vanilla ice cream — If you want to take things up a notch, crumble a couple of these over a scoop of good vanilla ice cream. You can thank me later.
Storage tips
Room temperature: Store the glazed cookies in an airtight container at room temperature for up to 5 days. Place a sheet of parchment paper between layers to protect the glaze. They actually get even crispier on day two.
Freezing baked cookies: You can freeze the fully baked and glazed cookies in an airtight freezer-safe container for up to 2 months. Place parchment paper between layers to prevent sticking. Thaw at room temperature for about 30 minutes before serving.
Freezing the dough: The cookie dough freezes beautifully. Roll it into balls, freeze them on a baking sheet until solid, then transfer to a zip-lock freezer bag. Freeze for up to 3 months. Bake straight from frozen, adding 2-3 extra minutes to the bake time.
Wrapping it up
Old fashioned iced oatmeal cookies are one of those recipes that remind you why simple, classic baking never goes out of style. Crispy, warmly spiced, topped with that gorgeous crackled glaze — they deliver every single time. No complicated techniques, no hard to find ingredients, just honest, delicious cookies that people genuinely get excited about.
Bake a batch, share them with someone you love, and enjoy every single crumb. Let me know how yours turn out — happy baking 🙂
Old fashioned iced oatmeal cookies — the crispy, glazed cookies that taste like childhood
Description
These old fashioned iced oatmeal cookies are thin, crispy, warmly spiced with cinnamon and nutmeg, and topped with a thick vanilla glaze that sets into a stunning crackled finish. Simple ingredients, nostalgic flavor, and absolutely impossible to eat just one.
Ingredients
For the cookies:
For the vanilla glaze:
Instructions
-
Add rolled oats to a food processor and pulse 8-10 times until coarsely ground. You still want visible texture — not a fine powder.
-
In a large bowl, whisk together the ground oats, flour, baking soda, baking powder, cinnamon, nutmeg, and salt. Set aside.
-
Beat softened butter, granulated sugar, and brown sugar together on medium speed for 3-4 minutes until light, pale, and fluffy.
-
Add eggs one at a time, beating well after each addition. Mix in vanilla extract until fully combined.
-
Gradually add the dry ingredients to the wet ingredients on low speed, mixing until just combined. Do not overmix.
-
Cover the dough and refrigerate for at least 1 hour or overnight.
-
Preheat oven to 350°F. Line baking sheets with parchment paper. Scoop dough into 1.5 tablespoon balls, place 2 inches apart, and slightly flatten each one.
-
Bake for 10-12 minutes until edges are golden brown. Let cool on the baking sheet for 5 minutes then transfer to a wire rack to cool completely.
-
Whisk together sifted powdered sugar, vanilla extract, and milk until thick but pourable.
-
Dip or spoon glaze over completely cooled cookies. Place back on the wire rack and allow the glaze to set for 20-30 minutes until crackled and firm.
