

Every family has that one recipe that shows up every single year without fail. The one that signals a holiday is actually happening. The one that kids ask about before they ask about anything else on the menu.
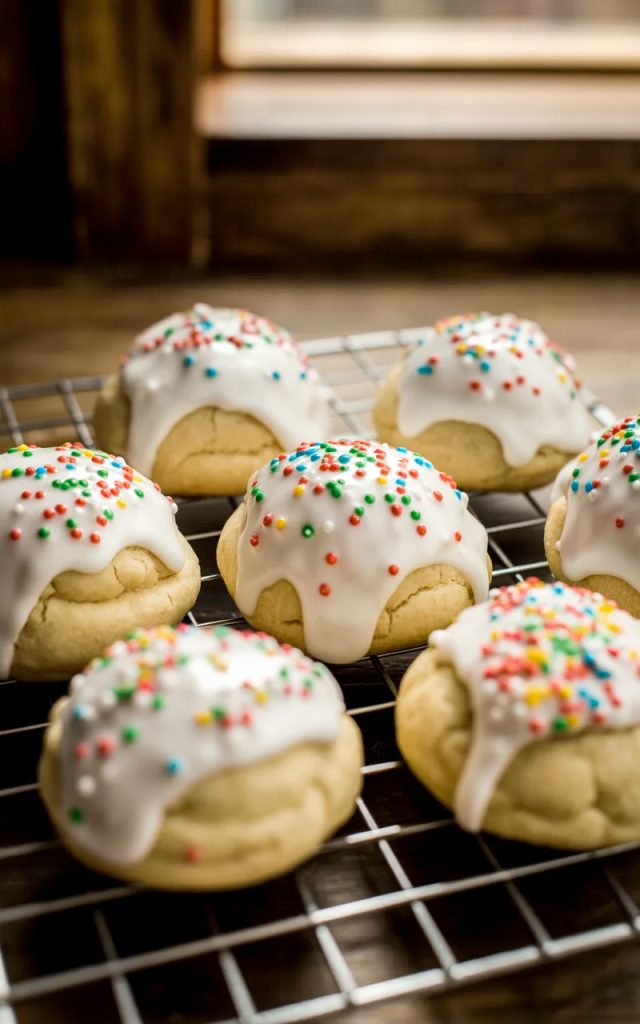
In a lot of Italian households, these cookies are that recipe. Soft, pillowy, dipped in a sweet vanilla glaze, and covered in those bright little nonpareil sprinkles that look like confetti — Italian Easter Cookies are as much a part of the holiday as the egg hunt itself.
I first came across these cookies through a friend whose grandmother made them every Easter without a recipe card in sight — just decades of muscle memory and the same worn mixing bowl she had used since the 1970s.
The texture is unlike any other cookie. Not crispy, not chewy in the traditional sense — soft and almost cake-like with a fine, tender crumb that melts in your mouth.
The glaze sets into a smooth, slightly crackled coating that gives every bite that perfect sweet finish. And those sprinkles are not just decoration. They are a statement.
The good news is that this recipe does not require decades of experience or a grandmother’s intuition. It is genuinely straightforward, the ingredients are simple, and the results are consistently beautiful. Whether this is a family tradition you are continuing or a new one you are starting — these cookies belong on your Easter table. Let me show you how to make them.
Why You’ll Love This Recipe
- That texture is unlike anything else. Soft, pillowy, and almost cake-like — these are not your average cookies. They are tender and light with a fine crumb that makes them completely irresistible and very easy to eat several of before you realize what happened.
- Simple ingredients you already have. Flour, butter, eggs, sugar, sour cream, vanilla — nothing exotic, nothing you need to hunt for. The simplicity of the ingredient list is part of what makes this such a beloved traditional recipe.
- The glaze sets beautifully. The vanilla glaze goes on smooth and liquid and then sets into a slightly crackled, matte coating that looks completely professional and holds the sprinkles in place perfectly.
- Kids absolutely love making these. The dipping step and the sprinkle step are exactly the kind of hands-on cooking moments that kids remember for years. These are genuinely fun to make as a family activity.
- They make a beautiful homemade gift. Pack them in a box or a tin and they look like something from a specialty Italian bakery. Nobody needs to know how easy they were to make.
- They freeze beautifully. Bake a big batch, freeze them unglazed, and glaze on the day you need them. Perfect for getting ahead of Easter prep without sacrificing freshness.
Ingredients
For the Cookies
- 3 1/2 cups all-purpose flour — spooned and leveled as always. The right amount of flour is critical here because too much makes the cookies dense and dry rather than soft and pillowy. Measure carefully.
- 1 tbsp baking powder — yes, a full tablespoon. This is not a typo. The generous amount of baking powder is what gives these cookies their characteristic pillowy lift and soft, airy texture. Do not reduce it.
- 1/2 tsp salt — balances the sweetness throughout.
- 1/2 cup unsalted butter, softened — room temperature. Creamed butter gives you the light, tender texture that makes these cookies so special. Do not melt it.
- 3/4 cup granulated sugar — enough sweetness without going overboard. The glaze adds additional sweetness so the cookies themselves do not need to be super sweet.
- 3 large eggs — room temperature. They incorporate more evenly into the batter and help give the cookies a uniform, light texture.
- 1/2 cup full-fat sour cream — the secret to the soft, moist, cake-like texture of these cookies. The acidity of the sour cream also reacts with the baking powder to give you an extra lift. Full-fat only — low-fat sour cream has too much water and will make the dough too soft to handle.
- 2 tsp vanilla extract — pure vanilla for the best flavor. Some traditional recipes use anise extract instead of or alongside vanilla for a more classic Italian flavor profile. If you want to honor the tradition, use 1 teaspoon of vanilla and 1 teaspoon of anise extract. The anise gives a subtle licorice note that is very classic and very delicious.
- 1 tsp lemon zest — a small but important addition that brightens the flavor of the whole cookie without making them taste lemony. Just enough to make you wonder what that extra something is.
For the Vanilla Glaze
- 2 cups powdered sugar, sifted — sifting is essential for a smooth, lump-free glaze that dips cleanly and sets evenly. Do not skip this step.
- 3 to 4 tbsp whole milk — start with 3 tablespoons and add more a teaspoon at a time until you reach the right consistency. You want the glaze thin enough to dip smoothly but thick enough to coat the cookie and not run completely off. It should coat the back of a spoon and drip slowly.
- 1 tsp vanilla extract — adds flavor to the glaze so it tastes like more than just sugar.
- Pinch of salt — balances the sweetness.
For Decoration
- Colorful nonpareil sprinkles — the classic choice for Italian Easter cookies. Add them immediately after dipping while the glaze is still wet so they adhere properly. Use a mix of red, green, blue, yellow, and white for that traditional look.
Step-by-Step Instructions
Step 1: Make the Cookie Dough
- Whisk together the flour, baking powder, and salt in a medium bowl and set aside.
- Beat the softened butter and sugar in a large bowl with an electric mixer on medium-high speed for 2 to 3 minutes until light and fluffy. Scrape down the sides of the bowl.
- Add the eggs one at a time, beating well after each addition. The mixture should look smooth and pale after all three eggs are incorporated.
- Add the sour cream, vanilla extract, and lemon zest and mix on low until just combined. The mixture may look slightly curdled — that is fine and normal.
- Add the flour mixture and mix on low speed until a soft dough forms. The dough will be slightly sticky — that is correct. Do not add more flour trying to make it less sticky or you will end up with dense cookies.
Step 2: Chill the Dough
- Cover the bowl with plastic wrap and refrigerate the dough for at least 30 minutes. Chilling firms up the butter and makes the dough much easier to handle and shape. Do not skip this step — room temperature dough is too soft and sticky to roll into neat balls and the cookies will spread too much in the oven.
Step 3: Shape the Cookies
- Preheat your oven to 350°F (175°C). Line two large baking sheets with parchment paper.
- Scoop the chilled dough using a tablespoon or small cookie scoop — about 1 to 1.5 tablespoons per cookie. Roll each portion between your palms into a smooth ball. Work quickly — the dough gets sticky fast as it warms up. If it starts sticking to your hands, lightly flour your palms or pop the dough back in the refrigerator for 10 minutes.
- Place the dough balls on the prepared baking sheets about 2 inches apart. These cookies puff up significantly so give them plenty of room.
Step 4: Bake
- Bake for 12 to 14 minutes until the bottoms are very lightly golden and the tops are set but still pale. These cookies should not brown on top — pale is correct and intentional. They will look almost underdone when you pull them out and that is exactly right. Overbaked Italian Easter cookies are dry and lose that signature soft texture.
- Let the cookies cool on the baking sheet for 5 minutes then transfer to a wire cooling rack. Let them cool completely before glazing — at least 30 minutes. Glazing warm cookies means the glaze runs completely off and does not set properly.
Step 5: Make the Vanilla Glaze
- Whisk together the sifted powdered sugar, 3 tablespoons of milk, vanilla extract, and salt in a medium bowl until completely smooth. The glaze should be thick enough to coat a spoon and drip slowly but thin enough to dip easily. If it is too thick, add milk a teaspoon at a time. If it is too thin, add a little more sifted powdered sugar.
- Test the consistency by dipping a cooled cookie and letting the excess drip off. The cookie should have a smooth, even coat that does not run completely off within a few seconds. Adjust as needed.
Step 6: Dip and Decorate
- Dip the top of each cooled cookie into the glaze, letting it coat the top surface completely. Lift the cookie out and gently shake it once or twice to let the excess drip back into the bowl. Place it glazed-side up on the wire rack.
- Immediately add the sprinkles while the glaze is still wet — within about 30 seconds of dipping. Once the glaze starts to set it will not hold sprinkles. Work in small batches — dip 4 or 5 cookies, sprinkle those, then move to the next batch.
- Let the glaze set completely — about 20 to 30 minutes at room temperature. The glaze will go from shiny and wet to a slightly matte, crackled finish that looks beautiful and holds everything in place.
Serving Suggestions
These Italian Easter Cookies are perfect on their own but here are some ways to serve and enjoy them:
- Arrange them on a tiered cookie stand for your Easter table. The colorful sprinkles against the white glaze look absolutely festive piled up on a stand and make for an instant conversation piece.
- Serve alongside coffee or espresso. In Italian tradition, these cookies are often enjoyed with a cup of strong coffee or espresso. The slight bitterness of the coffee balances the sweetness of the glaze beautifully.
- Include them on an Easter dessert board alongside the Easter Egg Oreo Balls, Easter Bunny Chow, and other spring treats for a spread that looks completely over the top in the most wonderful way.
- Pack them in a decorative tin or box as an Easter gift. Line the tin with parchment paper, arrange the cookies in a single layer, and tie a ribbon around the tin. They look and feel like a genuine artisan gift.
- Serve at Easter brunch alongside other sweet items. These cookies work just as well in the morning as they do as an after-dinner treat — they are not too heavy and the flavor is light and fresh.
- Let kids decorate their own. Set up a little decorating station with the glaze and different colors of sprinkles and let kids dip and decorate their own cookies. It is one of those simple Easter activities that kids absolutely love and remember.
Storage Tips
- Room Temperature: Store glazed cookies in a single layer in an airtight container at room temperature for up to 5 days. If you need to stack them, place a sheet of parchment paper between each layer to protect the glaze and sprinkles.
- Refrigerator: These keep well in the refrigerator in an airtight container for up to 1 week. Bring to room temperature before serving for the best texture — cold cookies lose some of their pillowy softness.
- Freezer — Unglazed: The best way to freeze these is before glazing. Let the baked cookies cool completely, place them in a single layer on a baking sheet, freeze until solid, then transfer to a freezer-safe zip-lock bag. Freeze for up to 2 months. Thaw at room temperature and glaze on the day you plan to serve them.
- Freezer — Glazed: You can freeze glazed cookies but the sprinkles can bleed color into the glaze after thawing. If appearance matters, freeze unglazed. If you are not worried about it, glazed cookies freeze fine for up to 6 weeks.
- Make-Ahead Option: Make the dough up to 2 days ahead and refrigerate covered. The chilled dough actually scoops and shapes even more cleanly after sitting in the fridge for a couple of days. Bake and glaze fresh when you are ready.
Some Recipes Are More Than Just Food
These Italian Easter Cookies are the kind of recipe that carries something with it beyond just flavor and ingredients. They carry memory and tradition and the feeling of a kitchen that smelled like butter and vanilla on an Easter morning a long time ago. Every family that has made these has their own version — slightly different proportions, anise instead of vanilla, a slightly different shape — but the spirit is always the same.
Starting or continuing that tradition in your own kitchen is one of the simplest and most meaningful things you can do around the holidays. And the fact that they taste absolutely incredible and take less than an hour and a half to make from start to finish is just a bonus.
Make a big batch this Easter. Share them generously. And if someone in your life taught you to make a version of these — call them and tell them you made them. Drop a comment below and let me know how yours turned out. And as always, if you make them, tag me on Pinterest or Instagram. Happy baking.
— Kip
Italian Easter Cookies (Soft, Glazed & Covered in Sprinkles)
Description
Traditional Italian Easter cookies with a soft, cake-like texture, dipped in a smooth vanilla glaze and finished with colorful nonpareil sprinkles. A beloved holiday tradition that is simple enough for beginner bakers and impressive enough to gift, serve at Easter brunch, or bring to any spring gathering.
Ingredients
For the Cookies:
For the Vanilla Glaze:
For Decoration:
Instructions
-
Whisk flour, baking powder, and salt together in a medium bowl. Set aside.
-
Beat softened butter and sugar on medium-high for 2 to 3 minutes until light and fluffy.
-
Add eggs one at a time, beating well after each. Mix in sour cream, vanilla, and lemon zest on low.
-
Add flour mixture and mix on low until a soft dough forms.
-
Cover and refrigerate dough for 30 minutes.
-
Preheat oven to 350°F. Line baking sheets with parchment paper.
-
Scoop and roll dough into 1 to 1.5 tablespoon balls. Place 2 inches apart on prepared baking sheets.
-
Bake 12 to 14 minutes until set but still pale on top. Cool on baking sheet 5 minutes then transfer to wire rack. Cool completely.
-
Whisk sifted powdered sugar, 3 tablespoons milk, vanilla, and salt until smooth. Adjust consistency as needed.
-
Dip tops of cooled cookies in glaze. Return to wire rack and immediately top with sprinkles.
-
Let glaze set completely — about 20 to 30 minutes — before serving or storing.
