

The first time I ordered katsu at a Japanese restaurant, I couldn’t figure out what made it so incredibly addictive. The breading was impossibly crispy, the meat was tender and juicy, and that sauce—that sweet, tangy, slightly fruity sauce—had me scraping the plate clean.
I spent weeks trying to recreate it at home, and after way too many batches of soggy, disappointing cutlets, I finally cracked the code. The secret? Super fine panko breadcrumbs, the right frying temperature, and not skimping on the sauce ingredients.
Now I make these katsu bowls at least once a week. They’re the perfect combination of crispy, savory, and comforting. Plus, they’re way cheaper than ordering takeout and honestly taste better than most restaurants I’ve tried.
Why You’ll Love These Japanese Katsu Bowls
Restaurant-quality crispy katsu at home – That ultra-crispy coating isn’t magic—it’s technique. Once you nail the breading and frying process, you’ll be making katsu that rivals any Japanese restaurant. The crunch when you bite into it is genuinely satisfying.
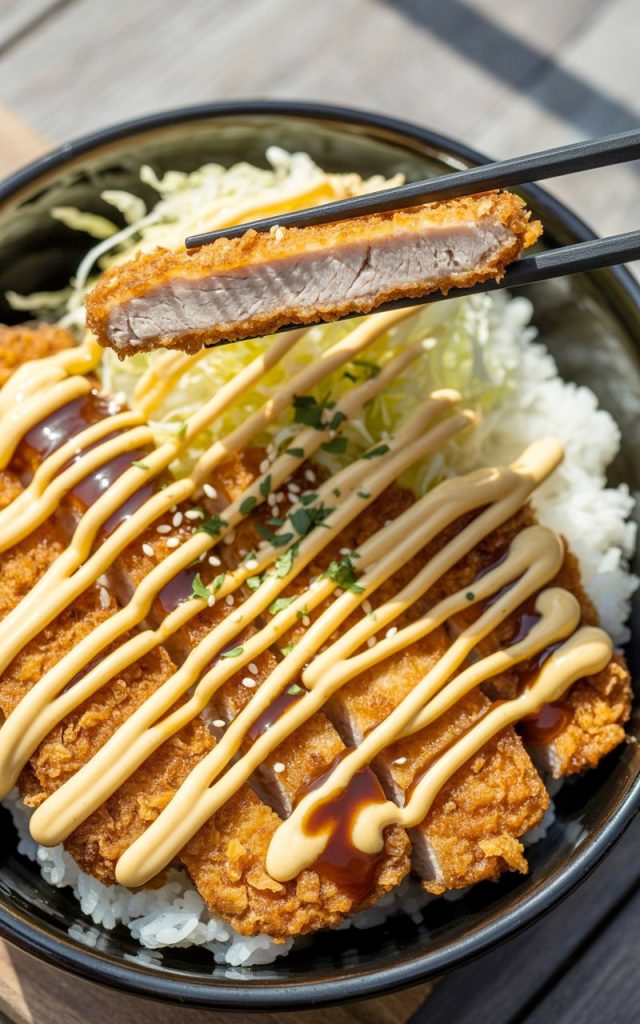
That homemade tonkatsu sauce is a game-changer – Store-bought is fine, but homemade tonkatsu sauce takes this dish to another level. It’s tangy from Worcestershire sauce, sweet from sugar, with hints of ketchup and soy sauce. It sounds weird but tastes incredible. You’ll want to put it on everything.
Ready in just 40 minutes – Including making the sauce and frying the cutlets. This is totally doable for a weeknight dinner, especially if you prep the breading station while your rice cooks. Most of the time is just waiting for oil to heat up.
Incredibly satisfying and comforting – There’s something deeply comforting about crispy breaded meat over rice with a sweet-savory sauce. It’s the kind of meal that makes you feel good while you’re eating it and satisfied for hours afterward.
Great for meal prep—stays crispy when stored properly – Unlike most fried foods that get soggy, katsu can be stored and reheated to maintain most of its crispiness. The trick is in how you store and reheat it, which I’ll cover later.
Customizable with chicken or pork – Traditional katsu uses pork (tonkatsu), but chicken katsu is just as popular and slightly leaner. Both are excellent, so use whatever you prefer or have on hand.
Ingredients You’ll Need
For the Katsu:
- 2 boneless pork chops or chicken breasts – About 1/2 to 3/4 inch thick. Thicker pieces need longer cooking.
- Salt and black pepper to taste – For seasoning the meat.
- 1/2 cup all-purpose flour – First layer of the breading station.
- 2 eggs, beaten – Helps the breadcrumbs stick.
- 1.5 cups panko breadcrumbs – Japanese panko is essential. It’s coarser than regular breadcrumbs and creates that signature crunch.
- Vegetable oil for frying – Enough to fill your pan about 1/2 inch deep. Use neutral oil like vegetable, canola, or peanut.
For the Tonkatsu Sauce:
- 1/4 cup ketchup – The base of the sauce.
- 2 tablespoons Worcestershire sauce – Adds tang and depth.
- 1 tablespoon soy sauce – For saltiness and umami.
- 2 tablespoons sugar – Balances the tang with sweetness.
- 1 tablespoon mirin – Optional but adds authentic flavor.
- 1 teaspoon Dijon mustard – A little sharpness that makes it complex.
For the Bowls:
- 3 cups cooked white rice – Short-grain Japanese rice is ideal but any rice works.
- Shredded cabbage – Traditional accompaniment that adds freshness.
- Sesame seeds – For garnish.
- Sliced green onions – Optional but adds color and flavor.
- Lemon wedges – Optional, but a squeeze of lemon is traditional.
Key Notes:
- Panko is essential: Regular breadcrumbs won’t give you that signature crunch. Panko is coarser and creates air pockets that stay crispy.
- Meat thickness matters: Pound your meat to an even 1/2 to 3/4 inch thickness. Too thick and the outside burns before the inside cooks. Too thin and it dries out.
- Oil temperature: Keep it at 340-350°F. Too hot and the breading burns. Too cool and it absorbs oil and gets soggy.
- Store-bought sauce works: If you don’t want to make the sauce, Bull-Dog or Otafuku brand tonkatsu sauce from Asian markets are excellent.
How to Make Japanese Katsu Bowls (Step-by-Step)
Step 1: Make the Tonkatsu Sauce
Start with the sauce so the flavors have time to meld. In a small bowl, whisk together ketchup, Worcestershire sauce, soy sauce, sugar, mirin, and Dijon mustard until smooth and the sugar dissolves.
Taste it—it should be tangy-sweet with a bit of savoriness. Adjust if needed. Too tangy? Add more sugar. Too sweet? More Worcestershire sauce. Set aside.
The sauce can be made days ahead and stored in the fridge. It actually gets better as it sits.
Step 2: Prepare the Meat
Pat your pork chops or chicken breasts completely dry with paper towels. Moisture is the enemy of crispy breading.
If your meat is thicker than 3/4 inch, pound it thinner using a meat mallet or the bottom of a heavy pan. Place the meat between two pieces of plastic wrap or in a zip-top bag to prevent splattering. Pound until it’s an even 1/2 to 3/4 inch thickness.
Season both sides generously with salt and pepper. Don’t skip this—it’s your only chance to season the actual meat.
Step 3: Set Up Your Breading Station
Grab three shallow bowls or plates. Set them up in a line:
- Bowl 1: All-purpose flour
- Bowl 2: Beaten eggs
- Bowl 3: Panko breadcrumbs
This assembly line makes breading way easier and less messy. Have a clean plate ready for your breaded cutlets.
Step 4: Bread the Cutlets
Take one piece of meat and coat it completely in flour, shaking off any excess. The flour helps the egg stick.
Dip it in the beaten eggs, letting excess drip off. Make sure it’s completely coated.
Press it firmly into the panko breadcrumbs on both sides. Really press the panko into the meat—you want it to adhere well. The cutlet should be completely covered in an even layer of panko.
Place on the clean plate and repeat with the remaining pieces. Let them rest for 5-10 minutes if you have time. This helps the coating set and makes it less likely to fall off during frying.
Step 5: Heat the Oil
Pour vegetable oil into a large, deep skillet to a depth of about 1/2 inch. Heat over medium-high heat until it reaches 340-350°F. Use a thermometer if you have one.
No thermometer? Drop a pinch of panko into the oil. If it sizzles immediately and floats, you’re ready. If it burns instantly, the oil’s too hot. If it sinks and doesn’t sizzle much, it needs more time.
Step 6: Fry the Katsu
Carefully lower your breaded cutlets into the hot oil. Don’t crowd the pan—work in batches if needed. Crowding lowers the oil temperature and makes things soggy.
Fry for 3-4 minutes on the first side without moving them. You want a deep golden brown color. Flip carefully and fry another 3-4 minutes on the other side.
The cutlets should be golden brown and crispy, and the internal temperature should hit 165°F for chicken or 145°F for pork. If they’re browning too fast but not cooked through, lower the heat slightly.
Transfer to a wire rack set over paper towels to drain. Don’t put them directly on paper towels or the bottom gets soggy. The wire rack is key.
Step 7: Rest and Slice
Let the katsu rest for 2-3 minutes before slicing. This lets the juices redistribute so they don’t all run out when you cut into it.
Slice the katsu into strips about 3/4 inch wide. This makes it easier to eat and looks more authentic.
Step 8: Assemble Your Bowls
Put a generous scoop of warm rice in each bowl. Add a mound of shredded cabbage on the side.
Arrange the sliced katsu on top of or beside the rice. Drizzle generously with tonkatsu sauce—be generous here, the sauce makes the dish.
Sprinkle with sesame seeds and green onions. Serve with lemon wedges on the side if desired. The lemon adds a nice bright note that cuts through the richness.
Serving Suggestions
Katsu bowls are pretty complete on their own, but here’s how to make them even better:
With miso soup – The traditional accompaniment. A warm bowl of miso soup alongside your katsu bowl is perfection. The savory, umami-rich soup complements the crispy, sweet-sauced katsu beautifully.
Extra shredded cabbage – The fresh, crunchy cabbage is essential. It adds lightness and helps balance the richness of the fried cutlet. Some people dress theirs with a simple sesame dressing.
Japanese pickles (tsukemono) – Pickled vegetables like takuan (daikon radish), cucumber, or ginger add tang and refresh your palate between bites.
Katsu curry style – Pour Japanese curry over the katsu instead of tonkatsu sauce. This is called katsu curry and it’s next-level comfort food. The combination of crispy cutlet and rich curry is incredible.
Extra sauces – Some people like adding Kewpie mayo drizzled on top along with the tonkatsu sauce. Sounds weird, tastes amazing. The creamy mayo contrasts perfectly with the tangy sauce.
With a soft-boiled egg – Add a jammy soft-boiled egg on the side or on top. The runny yolk adds richness and makes it feel even more indulgent.
Storage and Reheating Tips
Storing Leftovers
Let the katsu cool completely, then store it separately from the rice and sauce. This prevents the breading from getting soggy.
Store the katsu in an airtight container with a paper towel underneath and on top to absorb any moisture. It’ll keep in the fridge for 2-3 days.
Store rice, sauce, and cabbage separately as well.
Keeping Katsu Crispy
The secret to keeping katsu crispy is proper storage and reheating:
Storage: Don’t let it touch wet things. Keep it separated from sauces and moist sides.
Reheating: Never microwave katsu if you want it to stay crispy. Use the oven or air fryer.
Reheating Methods
Oven method (best for crispiness): Preheat to 375°F. Place katsu on a wire rack over a baking sheet. Heat for 10-12 minutes until warmed through and crispy. The wire rack lets air circulate underneath so it doesn’t steam.
Air fryer method (fastest and crispiest): 350°F for 5-7 minutes. Check halfway through. The air fryer is honestly the best way to reheat fried foods.
Toaster oven method: Same as regular oven but watch it carefully—it can brown faster in a smaller space.
Avoid: Microwaving turns the crispy breading soft and rubbery. Only use the microwave if you absolutely don’t care about texture.
Make-Ahead Tips
You can prep the cutlets through the breading step up to 24 hours ahead. Store them breaded but uncooked in the fridge, covered. Fry them fresh when you’re ready to eat.
The tonkatsu sauce can be made a week ahead and stored in the fridge.
Freezing
Freeze cooked katsu after it’s completely cooled. Wrap individual pieces in plastic wrap, then store in a freezer bag for up to 2 months.
Reheat from frozen in the oven at 375°F for 15-20 minutes, or thaw overnight and use one of the methods above.
Final Thoughts
These Japanese Katsu Bowls have become one of my favorite comfort meals to make at home. Once you get the technique down, they’re surprisingly easy and way more affordable than ordering out.
That first bite of crispy, juicy katsu with the sweet-tangy sauce over rice? Pure satisfaction. Give these a try this week—your taste buds will thank you.
– Kip
Japanese Katsu Bowls with Tonkatsu Sauce Recipe (Crispy & Ready in 40 Minutes!)
Description
These Japanese Katsu Bowls feature perfectly crispy breaded chicken or pork cutlets served over fluffy rice and drizzled with tangy-sweet homemade tonkatsu sauce. It's the ultimate Japanese comfort food that tastes like it came from a restaurant but is surprisingly easy to make at home!
Ingredients
For the Katsu:
For the Tonkatsu Sauce:
For the Bowls:
Instructions
-
Make sauce by whisking together ketchup, Worcestershire sauce, soy sauce, sugar, mirin, and mustard until smooth. Set aside.
-
Prepare meat by patting dry and pounding to even 1/2 to 3/4 inch thickness. Season with salt and pepper.
-
Set up breading station with three bowls: flour in first, beaten eggs in second, panko in third.
-
Bread cutlets by coating in flour, then egg, then pressing firmly into panko. Let rest 5 minutes.
-
Heat oil to 340-350°F in deep skillet, about 1/2 inch deep.
-
Fry katsu for 3-4 minutes per side until golden brown and cooked through (165°F for chicken, 145°F for pork). Drain on wire rack.
-
Rest cutlets for 2-3 minutes, then slice into 3/4-inch strips.
-
Assemble bowls with rice, shredded cabbage, sliced katsu, and generous drizzle of tonkatsu sauce. Garnish with sesame seeds and green onions.
