
Can we talk about chicken legs for a second? Because somewhere along the way, chicken breast got all the glory — the lean protein, the meal prep staple, the thing everyone orders at restaurants.
And meanwhile chicken legs have been sitting quietly in the background, juicier, more flavorful, and cheaper per pound, just waiting for someone to give them the recipe they actually deserve.
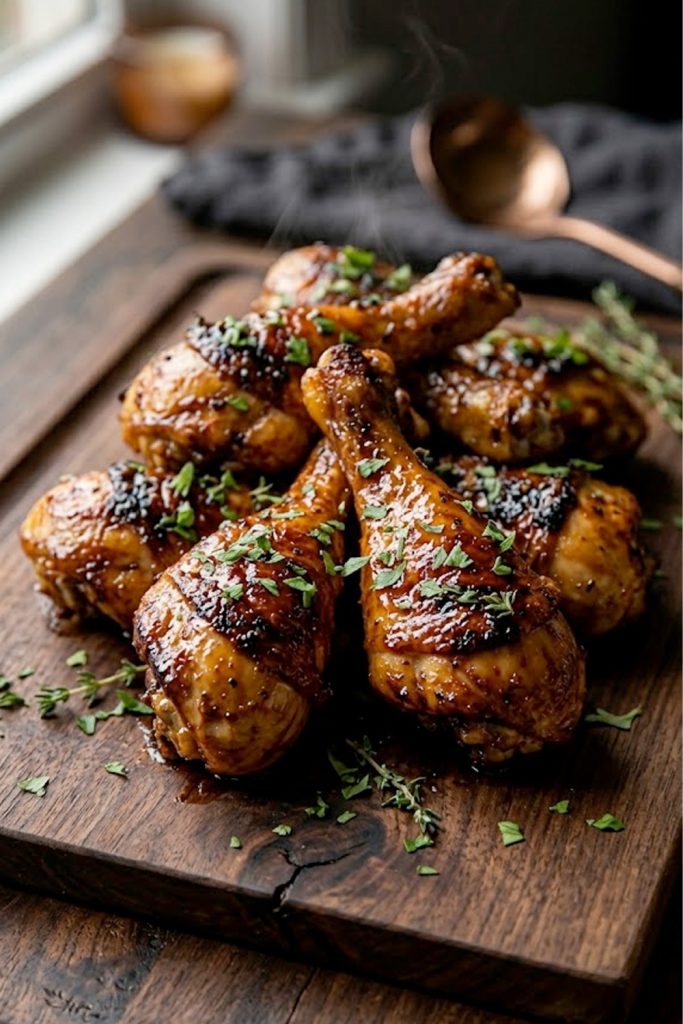
This is that recipe. Crispy oven-baked honey garlic chicken legs with a deep, sticky glaze that caramelizes in the oven until the skin is crackling and golden and the meat underneath is so tender it slides right off the bone.
The kind of chicken that makes you pull the tray out of the oven, look at it for a moment, and then immediately eat one standing over the counter before you even plate it. Not that I would know anything about that. :/
The method here is deliberate — a dry seasoning rub first to get the skin crispy, then a honey garlic glaze that goes on halfway through baking so it has time to caramelize properly without burning.
A quick broil at the very end seals the deal. The result is chicken legs that look and taste like they came from a really good restaurant, made entirely in your oven with about 15 minutes of actual effort.
Step 1: Prep the chicken legs
Start by preheating your oven to 425°F (220°C). Line a large baking sheet with foil and place a wire rack on top — baking the chicken on a rack allows hot air to circulate underneath the legs, which is key to getting crispy skin on all sides rather than just the top. Pat every chicken leg completely dry with paper towels. Take your time with this step. Surface moisture is the enemy of crispy skin. Dry chicken equals crispy chicken. That is the rule.
Step 2: Apply the dry seasoning
In a small bowl, mix together the garlic powder, onion powder, smoked paprika, dried thyme, dried oregano, salt, and black pepper. Drizzle the tablespoon of olive oil over the chicken legs and rub it evenly over every surface. Then sprinkle the dry seasoning mix over the chicken and rub it in thoroughly — get under any loose skin where you can, cover every side, and make sure no piece is left unseasoned. Arrange the seasoned legs on the wire rack skin-side up and let them sit at room temperature for 10-15 minutes while the oven finishes preheating. This brief rest helps the seasoning adhere properly.
Step 3: Make the honey garlic glaze
While the oven heats and the chicken rests, whisk together the honey, minced garlic, soy sauce, melted butter, apple cider vinegar, red pepper flakes, and dried thyme in a small bowl until fully combined. The glaze should be smooth, glossy, and smell absolutely incredible. Set it aside — you will use it in two stages during baking.
Step 4: First bake — get the skin crispy
Slide the baking sheet into the preheated oven and bake the chicken legs at 425°F for 25 minutes without opening the oven door. This first phase is purely about getting the skin dry and beginning to crisp. Resist the urge to check on them — every time you open the oven you release heat and steam, which works against the crispy skin you are building. After 25 minutes the skin should be starting to turn golden and the fat should be rendering out beautifully.
Step 5: Glaze and bake again
Remove the baking sheet from the oven and brush the honey garlic glaze generously over every chicken leg, making sure to coat all sides. Use about half of the glaze at this stage and reserve the rest. Return the chicken to the oven and bake for another 15 minutes at 425°F. During this phase the glaze soaks into the chicken at the edges and begins to caramelize on the skin. You will start to see the deep amber and mahogany tones developing on the surface.
Step 6: Final broil for caramelized finish
Remove the chicken from the oven one more time and brush the remaining glaze over every leg. Switch your oven to broil on high. Slide the chicken back in and broil for 3-5 minutes, watching the entire time. The glaze will bubble, darken, and caramelize into that deep, sticky, lacquered finish that makes this recipe look like it belongs in a magazine. Pull the chicken out the moment it looks deeply golden and caramelized — honey moves from perfect to burnt very quickly under a broiler, so do not walk away from the oven during this step.
Step 7: Rest, garnish, and serve
Let the chicken legs rest on the rack for 5 minutes before serving. This is not optional — resting allows the juices to redistribute back into the meat so they do not all run out the moment someone takes a bite. After resting, transfer to a serving plate or wooden board. Scatter fresh thyme sprigs, finely chopped parsley, and sliced green onions over the top. Serve immediately with any remaining glaze spooned alongside for dipping.
Refrigerator: Store leftover chicken legs in an airtight container in the fridge for up to 4 days. The glaze firms up when cold but loosens beautifully when reheated. Store any leftover glaze separately in a small container to use when reheating.
Reheating for best results: The best way to reheat these is in the oven or air fryer. Place the chicken legs on a baking sheet and reheat at 375°F for 10-12 minutes until warmed through and the skin has crisped back up. The air fryer at 350°F for 5-6 minutes works even better and brings the skin back close to its original crispy state. Brush with a little reserved glaze before reheating for the best result. Avoid the microwave — it softens the skin and dries out the meat.
Freezer: These chicken legs freeze well. Let them cool completely, wrap each leg individually in plastic wrap, then transfer to a freezer-safe bag. Freeze for up to 2 months. Thaw overnight in the fridge before reheating in the oven at 375°F until warmed through and the skin has crisped back up.
Meal prep: Season and glaze the chicken legs, then freeze them raw before baking. When ready to cook, thaw overnight in the fridge and bake as directed. This gives you the freshest possible result with very little day-of effort.
Chicken legs have been the underdog of the poultry world for too long. They are cheaper, juicier, more flavorful, and — with the right recipe — every bit as impressive as anything you could put on a dinner table.
This crispy oven-baked honey garlic version is the recipe that finally gives them the treatment they deserve. Crispy skin, sticky glaze, fall-off-the-bone meat, and a flavor that keeps people reaching back into the pan long after dinner is technically over.
Make this once and chicken legs move permanently to the top of your grocery list. I would genuinely bet on it.
If you tried this recipe and loved it, leave a comment below — I read every single one. Share it with someone who still thinks chicken breast is the only option, or save it to your Pinterest boards for your next weeknight dinner. Let's keep making good food together.
With gratitude, Kip
These crispy oven-baked honey garlic chicken legs deliver everything you want from a great chicken recipe — genuinely crispy skin, fall-off-the-bone tender meat, and a deep honey garlic glaze that caramelizes in the oven into a sticky, lacquered finish that is impossible to stop eating. A two-stage baking method followed by a quick broil is the secret to skin that is crispy on the outside and juicy underneath, with a glaze that clings to every inch of the chicken. This is the chicken leg recipe that earns requests every single time.