

Every Easter there is that moment in the candy aisle where you pick up a bag of the fancy speckled eggs and look at the ingredient list and think — there has to be a better version of this that I can make myself. There is. And it is sitting in this recipe.
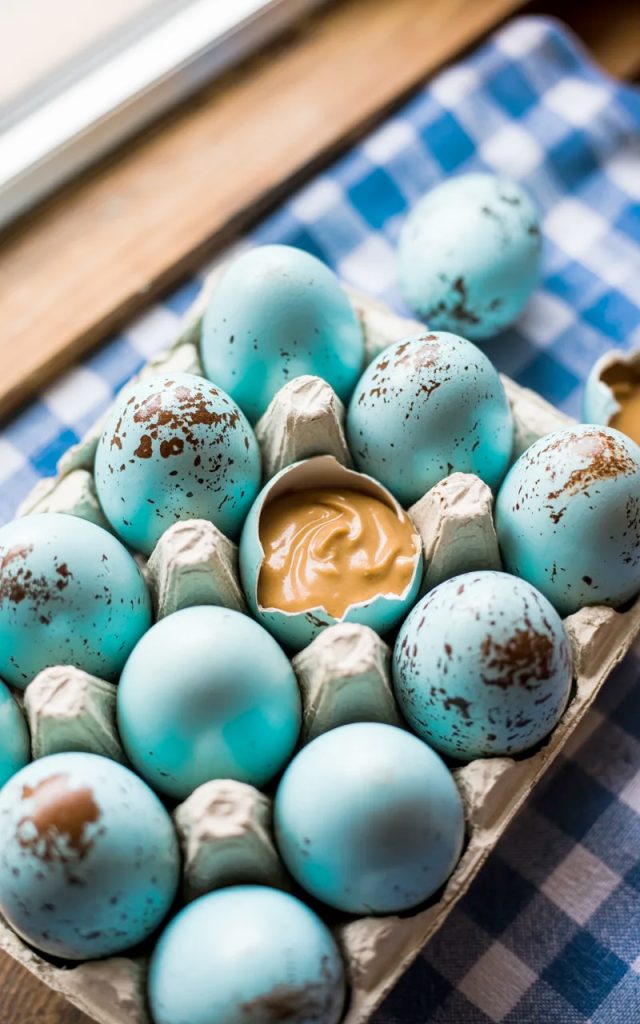
These Homemade Peanut Butter Easter Eggs look so much like real robin eggs that people do a double take when you put them on the table. The sky blue candy coating is smooth and matte.
The cocoa powder speckles are applied with a brush in a flicking motion that creates a completely natural, organic pattern on every egg. And inside — a creamy, sweet peanut butter filling made from real peanut butter, butter, powdered sugar, and a touch of vanilla that is better than any store-bought candy filling you have ever tasted. It is rich without being cloying and has that real peanut butter flavor that the mass-produced versions never quite get right.
The speckle technique sounds intimidating but it takes about two minutes and is one of the most satisfying steps in the whole process. A dry pastry brush, a small amount of cocoa powder mixed with a drop of water or vanilla, and a quick flick of the wrist over each egg.
Every single one comes out looking completely unique and completely beautiful. IMO this is the Easter treat project that is most worth making and the one people talk about the longest after the holiday. Let me show you exactly how it is done.
Why You’ll Love This Recipe
- They look absolutely stunning. The combination of the sky blue candy coating and the cocoa powder speckles makes these look like genuine robin eggs. They are the kind of treat that makes people stop and stare and ask if you bought them from somewhere special.
- That peanut butter filling is better than any store-bought version. Made from real peanut butter, softened butter, powdered sugar, and vanilla — it is creamy, sweet, and deeply peanut buttery in a way that the mass-produced versions simply cannot replicate.
- No baking whatsoever. The filling is mixed and shaped. The coating is melted and dipped. The speckles are flicked on with a brush. No oven, no special equipment, no stress.
- The speckle technique is easier than it looks. A dry brush, a little cocoa mixture, and a flick of the wrist is all it takes. Every egg comes out looking unique and completely natural. Once you see how easy it is you will want to speckle everything.
- Completely make-ahead friendly. These can be made up to a week ahead and stored in the refrigerator. They actually taste even better after a day as the filling firms up and the flavors meld together.
- Kids go absolutely wild for these. Both the making and the eating. The shaping step is perfect for little hands and the finished product looks like genuine Easter magic.
Ingredients
For the Peanut Butter Filling
- 1 cup creamy peanut butter — use a standard processed peanut butter like Jif or Skippy rather than natural peanut butter. Natural peanut butter has too much oil separation and produces a filling that is greasy, difficult to shape, and never quite sets up properly. The processed variety has a consistent fat content that gives you a smooth, moldable filling that holds its egg shape beautifully after chilling.
- 1/4 cup unsalted butter, softened — room temperature butter blends smoothly into the peanut butter and adds richness and a slight dairy note that makes the filling taste more complex and less one-dimensional.
- 2 cups powdered sugar, sifted — gives the filling its sweetness and also its structure. The powdered sugar absorbs the fat from the peanut butter and butter and transforms the mixture from a soft paste into something that can be rolled and shaped. Sift it first for a smoother filling — lumpy powdered sugar creates a gritty texture.
- 1 tsp vanilla extract — adds warmth and depth that rounds out the peanut butter flavor beautifully.
- 1/4 tsp salt — just a small pinch to balance the sweetness and make the peanut butter flavor more pronounced. Do not skip it.
For the Candy Shell Coating
- 16 oz sky blue candy melts or white chocolate melting wafers — if you are using white melting wafers, you will need sky blue gel food coloring to achieve the robin egg color. Add the gel color a drop at a time, stirring between each addition, until you reach a pale sky blue. Gel food coloring is essential here — liquid food coloring adds water to the chocolate and can cause it to seize. Blue candy melts eliminate this step entirely if you can find them. Wilton makes a light blue candy melt that is perfect.
- 1 tsp coconut oil or vegetable shortening — stirred into the melted candy coating to thin it slightly and give you a smoother, more fluid dip that coats each egg evenly without being too thick or clumpy.
For the Speckled Effect
- 2 tsp unsweetened cocoa powder — the base of the speckle mixture. Natural unsweetened cocoa powder gives you the warm brown speckle color that looks exactly like a real robin egg. Dutch process cocoa is darker and works well if you want deeper, more dramatic speckles.
- 1 to 2 tsp vanilla extract or water — mixed with the cocoa powder to create a thin, paint-like consistency for the speckle mixture. Vanilla extract adds a very subtle flavor note if any of the speckle mixture happens to get into a crack in the coating. Start with 1 teaspoon and add more if the mixture is too thick to flick easily.
Step-by-Step Instructions
Step 1: Make the Peanut Butter Filling
- Beat the softened butter and peanut butter together in a large bowl with an electric hand mixer on medium speed until completely smooth and combined — about 1 minute.
- Add the sifted powdered sugar one cup at a time, mixing on low after each addition to prevent a powdered sugar cloud in your kitchen. Once all the sugar is incorporated, increase speed to medium and beat until the mixture is smooth and uniform.
- Add the vanilla extract and salt and mix until combined. The filling should be firm enough to roll into a ball that holds its shape without sticking to your hands. If it is too sticky, add a little more powdered sugar a tablespoon at a time. If it is too stiff and crumbly, add a teaspoon of softened butter and mix again.
- Taste the filling. Adjust sweetness and salt as needed. This is the most important step.
Step 2: Shape the Eggs
- Scoop the filling using a tablespoon or small cookie scoop — about 1 to 1.5 tablespoons per egg for a good bite-sized size.
- Roll each portion between your palms into a smooth ball first, then gently pinch one end slightly to create an oval egg shape. These do not need to be perfect — slight imperfections look more realistic and natural once the coating and speckles are applied.
- Place each shaped egg on a parchment paper lined baking sheet as you work. You should get approximately 24 eggs from one batch.
Step 3: Chill the Eggs
- Place the baking sheet in the freezer for 30 minutes or the refrigerator for 1 hour. The filling must be very cold before dipping — cold eggs hold their shape in the warm candy coating and give you a cleaner, more even coat. Room temperature filling softens in the warm chocolate and makes a mess.
Step 4: Coat in Candy Shell
- Melt the blue candy melts according to package directions — 30-second microwave intervals, stirring between each, until completely smooth. Stir in the coconut oil until fully incorporated. If using white melting wafers, add sky blue gel food coloring now and stir until you reach the desired robin egg blue color.
- Working one at a time, drop a chilled peanut butter egg into the melted candy coating. Use a fork to roll it until completely coated, then lift it out and let the excess coating drip back into the bowl by tapping the fork gently against the rim.
- Place each coated egg back on the parchment lined baking sheet. If you see any bare patches, spoon a small amount of coating over them quickly before it sets. Work efficiently — the coating sets fast on the cold filling.
- Let all the coated eggs set completely — about 15 minutes at room temperature or 5 minutes in the refrigerator. They should be completely firm and matte looking before you apply the speckles.
Step 5: Create the Speckled Effect
- Mix the cocoa powder and vanilla extract together in a small bowl until you have a thin, paint-like consistency. It should be loose enough to flick off a brush easily but not so watery that it drips. Start with 1 teaspoon of vanilla and add more if needed.
- Dip a dry pastry brush or clean paint brush into the cocoa mixture, then hold the brush about 6 inches above the eggs and flick the bristles quickly with your finger or with a skewer to send small droplets of cocoa mixture flying onto the egg surfaces.
- Rotate the eggs and repeat the flicking from different angles so every surface gets some speckles. Each egg will look completely unique which is exactly what you want — no two robin eggs are ever identical.
- Work over a sheet of parchment paper or in the sink — the speckles go everywhere and cleanup is much easier with some protection in place. The more you practice the flicking motion the more control you have over the size and distribution of the speckles.
- Let the speckles dry completely — about 10 minutes — before handling or placing in the egg carton for display. The cocoa mixture dries quickly and becomes completely set within minutes.
Serving Suggestions
These Peanut Butter Easter Eggs are stunning enough to stand completely on their own but here are some ways to serve and present them:
- Display them in a white ceramic egg carton. This is the presentation that makes people gasp. Nestled in an egg carton they look so much like real robin eggs that guests have to look twice. A white ceramic carton is the most elegant option but a plain cardboard egg carton works just as well and adds to the rustic naturalistic feel.
- Arrange them in a nest of Easter grass. Place a small bird nest or a nest of green Easter grass in a basket and arrange the speckled eggs inside for an Easter centerpiece that is almost too beautiful to eat. Almost.
- Include them in Easter baskets as the homemade highlight alongside the store-bought candy. A few of these nestled in Easter grass in a basket immediately elevate the whole thing and make it feel genuinely special.
- Serve on a spring dessert board alongside the Cadbury Egg Cookies, Easter Oreo Balls, and other Easter treats for a spread that looks completely intentional and absolutely stunning.
- Gift them in a small box lined with tissue paper or parchment. Four to six eggs in a gift box with a ribbon make a genuinely beautiful and thoughtful Easter gift that people appreciate far more than store-bought candy.
- Set them out as a table decoration at Easter dinner that guests can eat. A scattering of these speckled eggs along a table runner with spring flowers is both decorative and edible — the kind of detail that makes a holiday table look completely curated.
Storage Tips
- Refrigerator: Store in a single layer in an airtight container in the refrigerator for up to 1 week. If you need to stack them, place a sheet of parchment paper between layers to protect the speckles and coating. The filling firms up beautifully in the refrigerator and the flavor improves after the first day.
- Room Temperature: These can sit out at room temperature for up to 2 hours while on display or serving. The candy coating holds up well at room temperature but the peanut butter filling softens slightly over time. In a warm room limit display time to 1 hour.
- Freezer: These freeze beautifully. Place in a single layer on a parchment-lined baking sheet, freeze until solid, then transfer to a freezer-safe zip-lock bag. Freeze for up to 2 months. Thaw in the refrigerator overnight. The candy coating and speckles stay perfectly intact after freezing.
- Make-Ahead Option: These are one of the best make-ahead Easter treats available. Make them up to 1 week ahead, store in the refrigerator, and they will be perfectly fresh and beautiful when Easter arrives. Make the filling and shape the eggs up to 2 days before coating if you want to spread the work out further.
The Easter Treat That Makes People Think You Are Way More Talented Than You Are
There is something specifically satisfying about making something that looks professionally made and knowing that you did it in your kitchen in an afternoon with basic pantry ingredients and a pastry brush.
These Peanut Butter Easter Eggs are that project. The speckle technique takes five minutes to learn and produces results that look genuinely artisan. The filling takes ten minutes to make and tastes better than any store-bought version.
Put them in an egg carton on your Easter table and watch people reach for their phones before they reach for the candy. Make a batch for gifts and watch people genuinely not believe you made them at home. That is one of the best feelings in cooking.
Make them this Easter and drop a comment below letting me know how the speckle technique went — especially if it is your first time. And as always, tag me on Pinterest or Instagram if you make them. Those robin egg photos are some of my absolute favorites to see. Happy no-baking.
— Kip
Peanut Butter Easter Eggs (Homemade, Speckled & Better Than the Store Bought Kind)
Description
A sweet and creamy peanut butter filling shaped into eggs, dipped in sky blue candy coating, and finished with a cocoa powder speckle effect that makes every single one look like a genuine robin egg. No baking, no special equipment, and a result that is so beautiful people will not believe you made them at home.
Ingredients
For the Peanut Butter Filling:
For the Candy Shell Coating:
For the Speckled Effect:
Instructions
-
Beat peanut butter and softened butter together until smooth. Add sifted powdered sugar one cup at a time and mix until combined. Add vanilla and salt. Mix until firm and smooth.
-
Scoop 1 to 1.5 tablespoon portions. Roll into balls then shape into egg ovals. Place on parchment lined baking sheet.
-
Freeze for 30 minutes or refrigerate for 1 hour until very cold and firm.
-
Melt candy melts with coconut oil until smooth. Add gel food coloring if using white wafers. Dip each cold egg using a fork until fully coated. Return to parchment and let set completely.
-
Mix cocoa powder and vanilla into a thin paint-like mixture. Dip a dry pastry brush in the mixture and flick bristles over the eggs from about 6 inches away to create natural speckle patterns. Rotate eggs and repeat. Let dry 10 minutes.
-
Display in an egg carton or nest of Easter grass and serve.
