
I'll be straight with you — I am not a fancy dessert person. I love food deeply, but the kind of desserts that require a piping bag, a blowtorch, or fourteen steps before you even get to the fun part? Not really my scene. So when I first stumbled onto raspberry tiramisu, I was skeptical. It looked too good. Too elegant. Too much like something that would require skills I definitely don't have.
I made it anyway. And twenty minutes of actual work later, I had something sitting in my fridge that looked like it came out of a proper Italian restaurant. My family thought I had lost my mind — in the best possible way. My sister actually asked if I had ordered it from somewhere. I let her believe it for a full five minutes before telling her the truth.
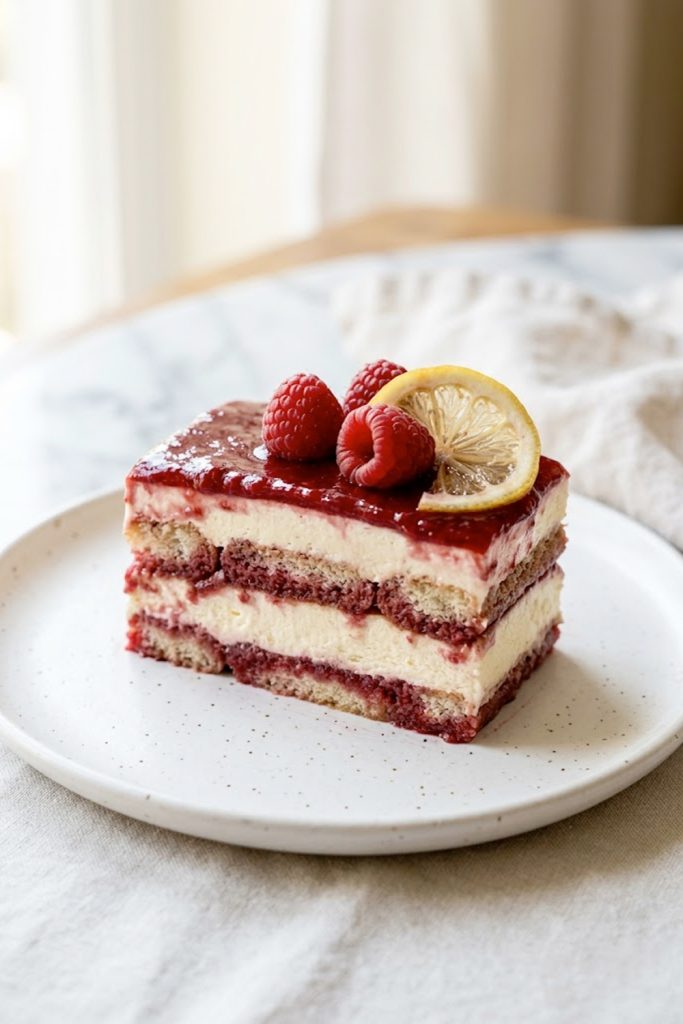
This raspberry tiramisu is what happens when a classic Italian dessert gets a fresh, fruity makeover. No coffee, no raw eggs, no complicated techniques. Just soft ladyfingers soaked in raspberry goodness, layered with the creamiest mascarpone filling you've ever tasted, and topped with a glossy raspberry sauce that makes the whole thing look like a million dollars. If you've been looking for a dessert that genuinely impresses without genuinely stressing you out, you just found it.
For the raspberry soak:
For the mascarpone cream:
For the layers:
For the topping:
Step 1: Make the raspberry soak
Combine the raspberries, sugar, lemon juice, and water in a small saucepan over medium heat. Cook for about 5 minutes, stirring occasionally, until the raspberries break down and the mixture thickens slightly into a loose sauce. Remove from heat and press through a fine mesh strainer to remove the seeds — this gives you a smooth, clean soak. Let it cool completely before using.
Step 2: Make the mascarpone cream
In a large mixing bowl, beat the mascarpone, powdered sugar, vanilla extract, and lemon zest together until smooth and well combined. In a separate bowl, whip the cold heavy cream until stiff peaks form. Gently fold the whipped cream into the mascarpone mixture in three additions, being careful not to deflate it. You want a light, airy, but still stable cream. Taste it. Try not to eat the whole bowl with a spoon.
Step 3: Dip the ladyfingers
Pour your cooled raspberry soak into a shallow dish. Working quickly, dip each ladyfinger into the soak for about 2-3 seconds per side — just enough to absorb the liquid without getting soggy. This is the most important step to get right. Too little and the ladyfingers stay dry and crunchy; too long and they fall apart. Two to three seconds is your sweet spot.
Step 4: Build the first layer
Arrange a single layer of soaked ladyfingers in the bottom of a 9x13 inch dish or a similar deep rectangular dish. Pack them in snugly side by side. Spread half of the mascarpone cream evenly over the ladyfingers, smoothing it out with a spatula or the back of a spoon.
Step 5: Add the second layer
Repeat with another layer of soaked ladyfingers on top of the cream. Spread the remaining mascarpone cream over the top, smoothing it out as evenly as possible. This top cream layer is what everything sits on, so take a little time to get it flat and clean at the edges.
Step 6: Add the topping
Arrange fresh raspberries over the top of the cream in any pattern you like — neat rows, clustered groups, whatever feels right to you. Warm the raspberry jam slightly and brush or drizzle it over the fresh raspberries for that glossy, professional finish. Add lemon slices for garnish.
Step 7: Chill
Cover the dish tightly with plastic wrap and refrigerate for at least 4 hours. Overnight is better. The chilling time allows the ladyfingers to soften fully and the cream to set properly, making the dessert easier to slice and giving the flavors time to really come together. This step is non-negotiable — don't try to rush it.
Step 8: Slice and serve
Use a sharp knife dipped in warm water and wiped clean between cuts for the cleanest slices. Serve cold, straight from the fridge.
In the fridge: Cover tightly with plastic wrap or transfer to an airtight container and refrigerate for up to 3 days. The dessert actually tastes better on day two once everything has fully settled and the flavors have had time to develop. Don't leave it uncovered — it will absorb fridge odors.
In the freezer: This tiramisu freezes surprisingly well. Cover the whole dish tightly with plastic wrap and then a layer of foil and freeze for up to 1 month. Thaw overnight in the fridge before serving. The texture of the cream may change very slightly but it will still taste excellent.
Do not leave at room temperature for more than 2 hours. The mascarpone cream needs to stay cold. If you're serving this at a gathering, keep it in the fridge until the last possible moment.
Here's what I love most about this raspberry tiramisu — it's proof that a dessert doesn't have to be complicated to be genuinely special. Twenty minutes of work, a few good ingredients, and a little patience while it chills is all it takes to put something on the table that makes people stop mid-bite and ask for the recipe.
That's the kind of cooking I've always believed in. Not cooking that shows off, but cooking that connects. That makes people feel cared for and fed well without you spending your whole day in the kitchen.
Give this one a go and let me know how it turns out. Drop a comment below, or find me on Pinterest — I genuinely love seeing your recreations. Until next time, let's keep making something delicious together.
With gratitude, Kip.
Layers of raspberry-soaked ladyfingers, silky mascarpone cream, and a glossy raspberry topping make this tiramisu a showstopper. No coffee, no baking, no stress — just pure fruity, creamy dessert magic.