
Let's talk about pecan pie for a second. It's delicious, right? That sweet, gooey filling with crunchy pecans and buttery crust—absolute perfection. But here's the thing: making an actual pecan pie is kind of a pain.
You've got to make or buy a pie crust, blind bake it, pray it doesn't get soggy, worry about the edges burning, and then try to cut clean slices without the whole thing falling apart. It's a lot of work for something that's inevitably going to look messy when you serve it.
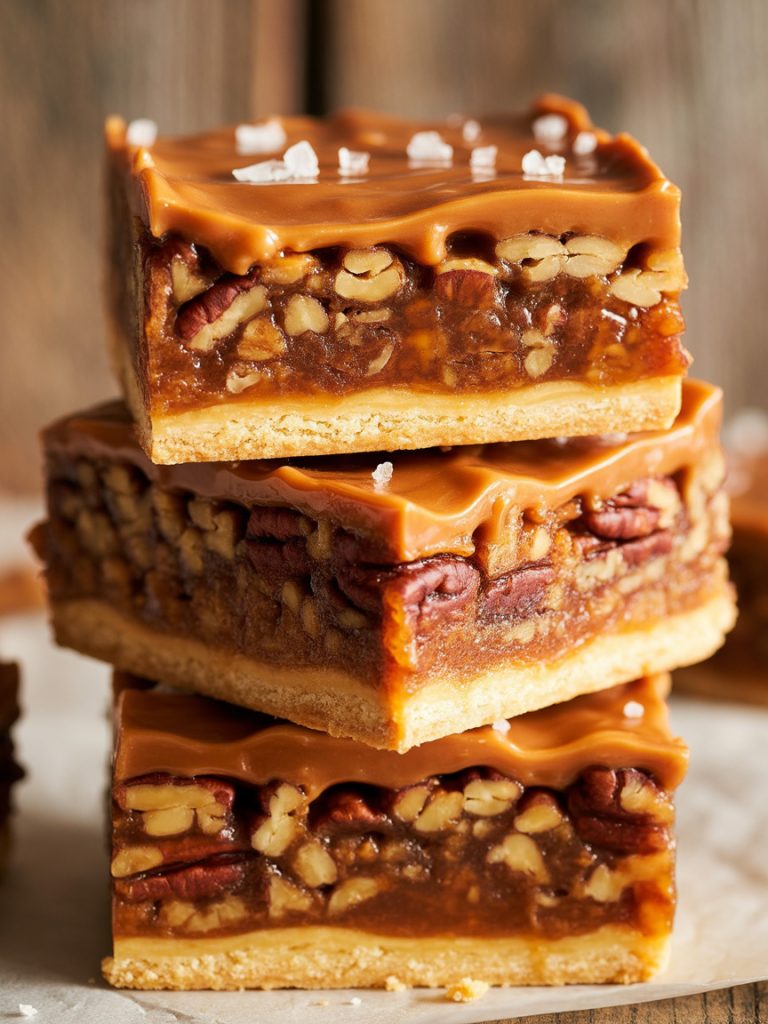
Enter pecan pie bars. Same incredible flavors, same gooey texture, but in a much more practical format. I discovered this when I volunteered to bring dessert to a Thanksgiving potluck and realized halfway through my planning that transporting a whole pie in my car sounded like a disaster waiting to happen. Bars? Way easier. They stack, they travel, they cut cleanly, and honestly, they taste even better than traditional pecan pie because of that shortbread crust.
But I couldn't leave well enough alone. Regular pecan pie bars are great, but I wanted something that felt a little more special. So I swapped in maple syrup for some of the sweetener—because maple and pecans are basically soulmates—and added a salted caramel drizzle on top. The result? These bars became the dessert everyone asks me to make. They're rich, they're indulgent, and they're surprisingly easy once you get the hang of it.
Way Easier Than Making Pie: No rolling out dough, no crimping edges, no worrying about whether your crust is going to hold up. You press the shortbread crust into a pan, pour in the filling, and bake. That's it. If you can press cookie dough into a pan, you can make these bars.
Perfect for Feeding a Crowd: One batch makes 16 generous bars. That's way more servings than a single pie, and everyone gets a perfectly portioned piece. No awkward "is this slice too big?" moments. No fighting over who gets the corner piece with extra crust.
No Soggy Bottom Crust: This is the curse of pecan pie, right? You spend all this time making a beautiful crust, and then the filling makes it soggy. Not here. The shortbread crust bakes up firm and buttery, and it stays that way even after you add the filling. Every bite has that perfect contrast between crisp crust and gooey filling.
Make-Ahead Friendly: You can make these a full day ahead—actually, they're better the next day because the flavors have time to develop and everything sets up perfectly. No last-minute stress trying to get them done before guests arrive. Make them the day before, store them, and show up looking like you have your life together.
Transport Like a Dream: These bars travel beautifully. They don't leak, they don't fall apart, and you can stack them in a container without destroying them. Perfect for potlucks, bake sales, or bringing to family gatherings. IMO, this alone makes them superior to traditional pie.
Salted Caramel Takes It Over the Top: The maple pecan filling is fantastic on its own, but that salted caramel drizzle? It elevates these bars from "really good" to "I need the recipe immediately." The salt cuts through the sweetness and adds this sophisticated flavor that makes people think you're some kind of baking wizard.
These bars have three distinct layers, and each one is important. The good news? None of the ingredients are weird or hard to find. Everything is grocery store standard, though I do have opinions about quality that I'll share in the notes.
Butter Temperature: For the crust, you want cold butter that you cut into cubes. Cold butter creates that crumbly, shortbread texture. For the filling, melted butter works best because it needs to combine smoothly with the eggs and sugar. Don't try to use the same butter at the same temperature for both—the textures will be wrong.
Maple Syrup Quality Matters: Please, for the love of all that's delicious, use real maple syrup. Not "pancake syrup" or "maple-flavored syrup" that's mostly corn syrup with artificial flavor. Real maple syrup has depth and complexity that fake stuff just can't replicate. It's more expensive, yes, but it makes a huge difference in these bars. Grade A Dark Amber is my preference—it has more robust maple flavor.
Pecan Selection: Buy whole pecans and chop them yourself rather than buying pre-chopped. Whole pecans stay fresher longer and you can control the size of the pieces. Chop them roughly—you want some texture, not pecan dust. Toast them lightly in a dry skillet for 5 minutes before using if you want extra nuttiness, but it's optional.
Sea Salt for Caramel: Not all salt is created equal here. Flaky sea salt (like Maldon) is ideal because it has a clean flavor and nice texture. Table salt works but can taste harsh. The salt is what makes this caramel special, so don't skip it or reduce it—you want that sweet-salty contrast.
Brown Sugar: Use light or dark brown sugar—either works. Dark brown sugar has more molasses flavor, which adds depth. I usually use light brown because it's what I keep in my pantry, but dark brown would be even more decadent if you have it.
These bars come together in layers. Don't try to rush any of the steps—each layer needs its moment to shine. But once you understand the process, it's actually pretty straightforward. The timing is the only thing that takes patience.
Preheat your oven to 350°F. Line a 9x13 inch baking pan with parchment paper, leaving some overhang on the sides. This overhang becomes your handles for lifting the bars out later—trust me, it makes life so much easier.
In a large bowl, whisk together the flour, powdered sugar, and salt. Add the cold cubed butter and use a pastry cutter, fork, or your fingers to work the butter into the flour mixture. You're aiming for a texture like coarse sand with some pea-sized butter chunks remaining. This takes a few minutes of working the mixture. Add the vanilla and mix just until the dough starts to come together.
Dump the mixture into your prepared pan and press it evenly into the bottom. Really press it down firmly—use your hands or the bottom of a measuring cup to compact it. You want a solid, even layer with no gaps or thin spots.
Bake the crust for 15-18 minutes until it's just starting to turn golden at the edges. It won't be fully cooked yet, and that's fine—it'll finish baking under the filling. Remove from the oven and let it cool for about 10 minutes while you make the filling.
In a large mixing bowl, whisk together the eggs until they're lightly beaten. Add the maple syrup, brown sugar, melted butter, flour, vanilla, and salt. Whisk everything together until it's smooth and well combined. The mixture should be glossy and pourable but not super thin—kind of like a slightly thick caramel sauce.
Stir in the chopped pecans. Make sure they're evenly distributed throughout the mixture. You want pecans in every bite, not all floating on top or sinking to the bottom.
Pour the filling over the partially-baked crust. Use a spatula to spread it evenly, making sure the pecans are distributed well and the filling reaches all the corners. The filling should come almost to the top of the pan but not overflow—if your pan is running over, you may have overfilled it slightly. No big deal, just scoop out a bit before baking.
Return the pan to the oven and bake for 25-30 minutes. You're looking for the filling to be set around the edges but still have a slight jiggle in the center—kind of like a pumpkin pie. The center will firm up as it cools, so don't overbake or you'll end up with dry bars instead of gooey ones.
The edges should be golden brown and slightly puffed. If the edges are getting too dark before the center is set, tent the pan loosely with foil for the last 10 minutes of baking.
Remove from the oven and let the bars cool completely in the pan on a wire rack. This is crucial—if you try to cut them while they're warm, they'll fall apart into a delicious but messy pile. Let them cool for at least 2 hours, or refrigerate for 1 hour if you're impatient.
While the bars are cooling, make your salted caramel. In a medium saucepan, heat the granulated sugar over medium heat. Don't stir it at first—just let it melt. Once it starts melting, you can gently swirl the pan to help it melt evenly. The sugar will clump up before it melts—this is normal. Keep swirling gently.
Once the sugar is completely melted and amber-colored (not dark brown—that's burnt), remove from heat and immediately whisk in the butter. It'll bubble up violently, so be careful. Whisk until the butter is completely melted and incorporated.
Slowly pour in the heavy cream while whisking constantly. Again, it'll bubble up—this is normal caramel behavior. Whisk until smooth. Add the sea salt and whisk to combine. Let the caramel cool for about 10 minutes—it'll thicken as it cools to the perfect drizzling consistency.
If your caramel seems too thick to drizzle, warm it gently over low heat or microwave it for 10-15 seconds. If it's too thin, let it cool longer.
Once the bars are completely cooled, use the parchment paper overhang to lift them out of the pan onto a cutting board. This is so much easier than trying to cut them in the pan.
Use a sharp knife to cut the bars into 16 pieces (4 rows by 4 rows). Wipe the knife clean between cuts for the cleanest edges. If the filling is sticking to the knife, run it under hot water and dry it between cuts.
Drizzle the salted caramel over the bars. You can drizzle it over all of them at once or individually—dealer's choice. Some people like a lot of caramel, some like just a little. I usually do a generous zigzag pattern over the whole thing.
Let the caramel set for a few minutes before serving, though honestly, they're delicious even when the caramel is still warm and melty. Sprinkle a tiny bit of extra flaky sea salt on top if you want to be fancy.
These bars are rich and decadent, so a little goes a long way. Here's how I like to serve them depending on the occasion.
Cut them into smaller pieces if you're serving them alongside other desserts—you can easily get 20-24 bars from one pan if you cut them smaller. Arrange them on a platter with the caramel drizzle visible. They look impressive without requiring any fancy plating.
Serve them at room temperature or slightly chilled. Both ways are delicious, but room temperature gives you the gooiest texture. If it's a warm day, keep them refrigerated until just before serving so they don't get too soft.
These are perfect for Thanksgiving dessert tables, Christmas cookie exchanges, fall potlucks, or any time you need a crowd-pleasing dessert that's not cake or cookies.
Pair them with lighter desserts like fruit tart or pumpkin mousse to balance out the richness. They're quite sweet and indulgent, so having some contrast on your dessert table is nice.
Cut them into bars and wrap individually in clear cellophane tied with ribbon—instant hostess gifts or party favors. People love getting homemade treats, and these feel special enough to gift.
With Coffee: The slight bitterness of black coffee cuts through the sweetness perfectly. These bars were basically made to be enjoyed with a good cup of coffee on a lazy Sunday morning. Or Tuesday afternoon. Or whenever, honestly.
With Vanilla Ice Cream: Serve them warm (pop them in the microwave for 10 seconds) with a scoop of vanilla ice cream on top. The cold ice cream melting into the warm gooey pecan filling is absolutely incredible. This turns them from a bar cookie into a legitimate plated dessert.
With Whipped Cream: A dollop of lightly sweetened whipped cream on the side adds a nice creamy contrast to the dense, sticky bars. This is my mom's preferred way to eat them, and she's not wrong.
How to Know When They're Done: The edges should be set and slightly puffed, while the center still has a slight jiggle when you gently shake the pan. Think of how a custard or pumpkin pie looks when it's done—same concept. The residual heat will finish cooking the center as it cools. If you bake them until the center is completely firm, they'll be overdone and dry once cooled.
Cutting Clean Bars: Let them cool completely—this cannot be stressed enough. Warm bars are impossible to cut cleanly. Once cooled, use a large sharp knife and wipe it clean between each cut. For the absolute cleanest cuts, chill the bars in the refrigerator before cutting. Some people even run their knife under hot water and dry it between cuts for super clean edges.
Preventing Burnt Edges: If you notice the edges browning too quickly before the center is set, tent the pan loosely with aluminum foil for the remaining baking time. This shields the edges from direct heat while still allowing the center to cook through. Also, make sure your oven temperature is accurate—an oven thermometer is a cheap investment that prevents a lot of baking disasters.
Caramel Consistency Tips: Making caramel can be intimidating, but it's actually pretty forgiving once you understand it. The key is watching the color—you want amber, not dark brown. Dark brown means burnt and bitter. If your caramel hardens too much as it cools, you can gently reheat it. If it's too thin, let it cool longer—it thickens as it sits. And if you completely mess it up? Just start over. Sugar is cheap, and the second attempt usually goes better anyway.
Room Temperature Storage: These bars can stay at room temperature for up to 2 days if stored in an airtight container. Keep them in a cool, dry place away from direct sunlight. The caramel stays soft and the bars maintain their texture beautifully.
Refrigerator Storage: For longer storage, refrigerate them in an airtight container for up to 1 week. The bars firm up when cold, which actually makes them easier to handle and less messy to eat. Let them sit at room temperature for 10-15 minutes before serving if you want them softer and gooier.
Freezing Instructions: These freeze exceptionally well. Wrap individual bars in plastic wrap, then place them all in a freezer-safe bag or container. They'll keep for up to 3 months. Thaw at room temperature for about an hour, or microwave individual bars for 20-30 seconds for a warm treat. I usually add the caramel drizzle after thawing rather than before freezing—it looks prettier that way.
Make-Ahead Timeline: You can make these completely a day ahead and store them covered at room temperature or refrigerated. You can also make the crust and filling separately, refrigerate them, and assemble/bake the next day. The caramel can be made up to a week ahead and stored in the refrigerator—just reheat it gently before drizzling.
For maximum efficiency, I usually bake the bars in the evening, let them cool overnight, then cut and drizzle them the next morning. This spreads out the work and ensures they're perfectly set before cutting.
These salted caramel maple pecan pie bars are everything you love about pecan pie, but way easier to make and serve. A buttery shortbread base holds a luscious maple pecan filling that's perfectly gooey without being too sweet, then gets finished with a drizzle of homemade salted caramel. They're make-ahead friendly, transport like a dream, and disappear faster than you can say "pass me another one."
Use real maple syrup, not pancake syrup—it makes a huge difference. Don't skip the cooling time before cutting or bars will fall apart. Caramel can be made ahead and reheated. Bars are even better the next day after flavors develop. Store at room temperature 2 days or refrigerate up to 1 week.