

The first time I had bulgogi was at a tiny Korean restaurant in my neighborhood, and I remember thinking, “There’s no way I can make this at home.” The flavors were so complex, the beef so tender—it had to be some kind of culinary magic, right?
Wrong. Turns out, bulgogi is actually one of the most beginner-friendly Korean dishes you can make. The marinade does most of the heavy lifting, and the cooking part takes less time than waiting for delivery.
Now I make these bowls at least twice a month, and they’ve become my answer to “What’s for dinner?” when I want something that feels special but doesn’t require me to spend hours in the kitchen. Plus, they’re way better than takeout and cost a fraction of the price.
Why You’ll Love These Beef Bulgogi Bowls
Restaurant-quality Korean flavors at home – The marinade is the real MVP here. Soy sauce, sesame oil, garlic, ginger, and a touch of sweetness create those authentic Korean flavors that make you feel like you’re eating at your favorite restaurant. Except you’re in your pajamas.
Ready in just 40 minutes – Including marinating time! If you’re really in a hurry, even 15 minutes of marinating works. But if you can swing 30 minutes, the flavors get even better. Either way, you’re eating way faster than delivery would arrive.
Perfectly balanced sweet and savory taste – This isn’t cloying-sweet like some Asian-inspired dishes can be. The marinade hits that perfect balance where you get sweetness from the pear and sugar, savory depth from soy sauce, and aromatic notes from garlic and sesame.
Customizable with your favorite toppings – Fried egg, kimchi, pickled cucumbers, avocado, extra green onions—make it your own. The beef is the star, but the toppings let you customize each bowl exactly how you like it.
Great for meal prep and leftovers – The marinated beef keeps well, and you can prep everything in advance. Cook the beef when you’re ready to eat, and boom—instant weeknight dinner that doesn’t taste like leftovers.
Healthier and cheaper than takeout – You control the ingredients, the sodium levels, and the quality of the beef. Plus, you’re looking at maybe $15-18 to feed four people versus $50+ for takeout. That’s a win in my book.
Ingredients You’ll Need
For the Bulgogi Marinade:
- 1.5 pounds ribeye or sirloin steak, thinly sliced – Ribeye is more tender and flavorful, but sirloin works great and is more budget-friendly. Slice against the grain for maximum tenderness.
- 1/3 cup soy sauce – Use low-sodium if you’re watching your salt intake. Regular works fine too.
- 3 tablespoons brown sugar – Adds sweetness and helps with caramelization.
- 2 tablespoons sesame oil – This is non-negotiable. It gives bulgogi that distinctive nutty flavor.
- 1/4 Asian pear, grated – This is the secret ingredient. The enzymes tenderize the meat and add subtle sweetness. See notes for substitutes.
- 4 cloves garlic, minced – Fresh garlic only. This isn’t the time for shortcuts.
- 1 tablespoon fresh ginger, grated – Fresh is best, but ginger paste works in a pinch.
- 2 tablespoons mirin – Japanese sweet rice wine. Adds depth and a touch of sweetness.
- 1 tablespoon rice vinegar – Balances the sweetness with a bit of tang.
- 1 teaspoon black pepper
- 2 green onions, chopped – Both white and green parts.
For the Bowls:
- 3 cups cooked white rice – Short-grain is most authentic, but jasmine or brown rice work too.
- 4 eggs – For frying. The runny yolk mixed with the beef is chef’s kiss.
- 1 cucumber, thinly sliced – Adds freshness and crunch.
- Kimchi – Optional but highly recommended. Store-bought is perfectly fine.
- Sesame seeds – For garnish.
- Extra green onions, sliced – More is more when it comes to green onions.
- Cooking oil – For frying the beef and eggs.
Optional Toppings:
- Sliced avocado
- Pickled radish (danmuji)
- Shredded carrots
- Gochujang (Korean red pepper paste) for extra heat
- Extra sesame oil for drizzling
Key Notes:
- Slicing the beef: Partially freeze your beef for 20-30 minutes before slicing. It makes cutting thin, even slices SO much easier.
- Asian pear substitute: No Asian pear? Use regular pear, apple, or even kiwi. All have enzymes that tenderize meat.
- Thinly sliced is key: You want your beef slices about 1/8-inch thick. Thicker pieces won’t absorb the marinade as well and take longer to cook.
- Don’t skip the sesame oil: It’s what makes bulgogi taste like bulgogi.
How to Make Simple Beef Bulgogi Bowls (Step-by-Step)
Step 1: Slice the Beef
Put your beef in the freezer for about 20-30 minutes. This firms it up just enough to make slicing easier without actually freezing it solid. Remove and slice the beef as thinly as possible—about 1/8-inch thick.
Slice against the grain. Look for the lines running through the meat and cut perpendicular to them. This breaks up the muscle fibers and makes the beef way more tender. Trust me, this step matters.
Step 2: Make the Marinade
In a large bowl, whisk together your soy sauce, brown sugar, sesame oil, grated Asian pear, minced garlic, grated ginger, mirin, rice vinegar, black pepper, and chopped green onions.
Taste the marinade. It should be sweet, salty, and a little funky from the sesame oil. If it’s too salty, add a bit more sugar. Too sweet? Splash in more soy sauce or vinegar.
Step 3: Marinate the Beef
Add your sliced beef to the marinade and toss until every piece is coated. Cover and refrigerate for at least 20-30 minutes. If you have time, go for an hour or even overnight. The longer it sits, the more flavor it absorbs.
FYI, the Asian pear contains enzymes that tenderize the meat, so don’t marinate for more than 24 hours or the texture can get a bit mushy. Not ideal.
Step 4: Prep Your Bowl Components
While the beef marinates, get everything else ready. Cook your rice according to package directions. Slice your cucumber into thin rounds. Get your kimchi out. Prep any other toppings you want.
This is also a good time to set up your serving bowls. Having everything ready makes assembly way easier once the beef is cooked.
Step 5: Cook the Beef
Heat a large skillet or wok over high heat. Add about 1 tablespoon of oil and swirl to coat. Once it’s smoking hot, add your marinated beef in a single layer. You’ll probably need to work in batches—don’t crowd the pan or the beef will steam instead of getting that nice caramelized char.
Cook for 2-3 minutes per side until the beef is browned and slightly charred at the edges. The sugar in the marinade will caramelize and create this incredible crust. That’s the good stuff right there.
Remove cooked beef to a plate and repeat with remaining batches, adding more oil as needed.
Step 6: Fry the Eggs
In the same skillet (or a clean one if you prefer), add a bit more oil over medium heat. Crack your eggs and fry them sunny-side up until the whites are set but the yolks are still runny—about 3-4 minutes. You want that yolk to be liquid gold for mixing into your bowl.
Season with a pinch of salt and pepper.
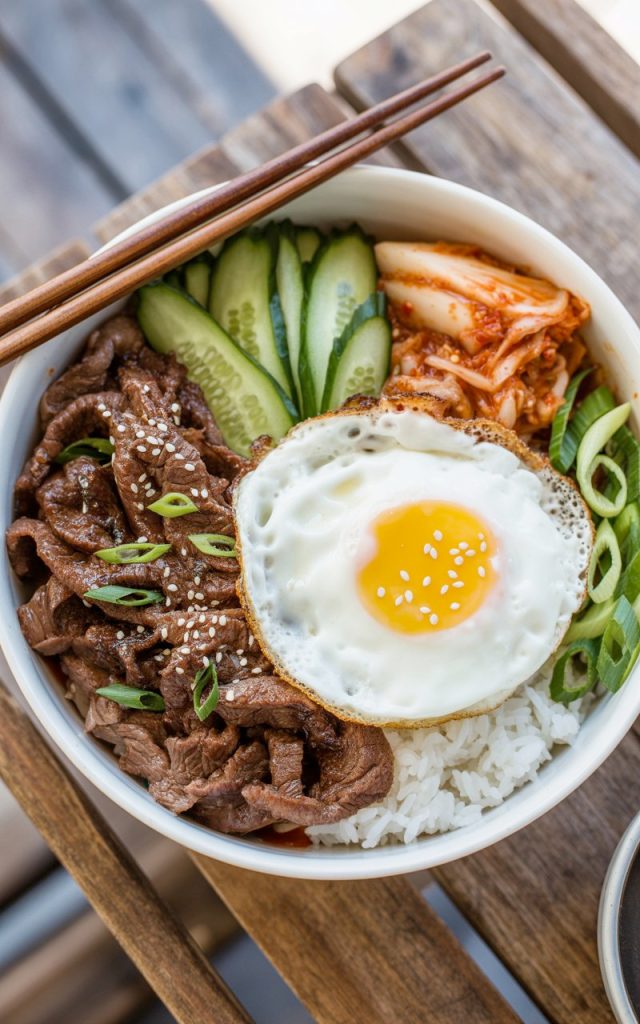
Step 7: Assemble Your Bowls
Now for the fun part. Start with a generous scoop of rice in each bowl. Top with a portion of the bulgogi beef. Add a fried egg right on top. Arrange cucumber slices, kimchi, and any other toppings around the bowl.
Sprinkle with sesame seeds and extra green onions. Drizzle with a little extra sesame oil if you’re feeling fancy.
Step 8: Mix and Enjoy
Here’s how to eat it: break that egg yolk and mix everything together. The runny yolk becomes part of the sauce and coats the rice and beef. It’s messy, it’s delicious, and it’s exactly how it’s meant to be eaten.
Serving Suggestions
These bulgogi bowls are pretty complete on their own, but here’s how I like to round things out:
With banchan (Korean side dishes) – If you want to go full Korean meal, serve with small dishes of kimchi, pickled radish, seasoned spinach (sigeumchi namul), or bean sprouts. You can find these at Korean markets or make simple versions at home.
Extra kimchi – I know I already mentioned kimchi, but seriously, it’s so good with bulgogi. The tangy, spicy fermented flavors cut through the rich, sweet beef perfectly.
Korean-style pickled cucumbers – Quick-pickle some cucumber slices in rice vinegar, sugar, and salt. Takes 10 minutes and adds amazing crunch and acidity.
Miso soup on the side – Keeps things light and adds another layer of umami. Plus, soup and rice bowls just go together.
Korean BBQ sauce for dipping – If you want extra sauce (and who doesn’t?), some gochujang mixed with a little honey and sesame oil makes an incredible dipping sauce.
Lettuce wraps – Put out some butter lettuce leaves and let people wrap their beef in lettuce with rice and kimchi. It’s like Korean tacos and it’s awesome.
Storage and Reheating Tips
Storing Leftovers
Store the beef, rice, and toppings separately in airtight containers. The beef will keep for 3-4 days in the fridge. The rice is good for about the same. Keep fresh toppings like cucumber and avocado separate to prevent sogginess.
The marinated raw beef can be stored in the fridge for up to 24 hours before cooking, or frozen for up to 3 months.
Freezing Instructions
The cooked bulgogi beef freezes really well. Let it cool completely, then portion into freezer bags or containers. Remove as much air as possible. It’ll keep for up to 3 months.
You can also freeze the marinated raw beef. Just portion it into bags, flatten them out, and stack them in the freezer. Defrost overnight in the fridge when you’re ready to cook.
Reheating
Stovetop method (best): Heat a skillet over medium-high heat with a splash of oil or water. Add the beef and stir-fry for 2-3 minutes until heated through and slightly crispy again.
Microwave method (fastest): Heat on 50% power in 30-second intervals, stirring between each. Add a tiny splash of water to prevent drying out.
Rice reheating: Sprinkle with a tablespoon of water, cover, and microwave for 1-2 minutes. Or steam it in a pot on the stove for best results.
Pro tip: Fresh toppings like eggs, cucumber, and avocado should always be prepared fresh, not reheated.
Final Thoughts
These Simple Beef Bulgogi Bowls have become my favorite way to scratch that takeout itch without actually ordering takeout. They’re flavorful, satisfying, and honestly taste better than most Korean restaurants I’ve tried.
Give them a shot, and I promise you’ll be making them on repeat. Your kitchen will smell amazing, and your taste buds will thank you.
– Kip
Simple Beef Bulgogi Bowls Recipe (Korean-Inspired & Ready in 40 Minutes!)
Description
These Simple Beef Bulgogi Bowls feature tender, marinated beef strips in a sweet and savory Korean sauce, served over fluffy rice with fresh vegetables and a perfectly fried egg. It's comfort food with an international twist that comes together surprisingly fast!
Ingredients
For the Bulgogi Marinade:
For the Bowls:
Instructions
-
Partially freeze beef for 20-30 minutes, then slice thinly against the grain.
-
Whisk together all marinade ingredients in a large bowl.
-
Add beef to marinade, toss to coat, and refrigerate for 20-30 minutes (up to overnight for more flavor).
-
Prepare rice and slice vegetables while beef marinates.
-
Heat large skillet over high heat with oil. Cook beef in batches for 2-3 minutes per side until browned and caramelized. Don't overcrowd the pan.
-
Fry eggs sunny-side up in the same or separate skillet until whites are set but yolks are runny.
-
Assemble bowls with rice as the base, top with bulgogi beef, fried egg, cucumber slices, kimchi, and other desired toppings.
-
Garnish with sesame seeds and green onions. Break the egg yolk and mix everything together before eating.
