

Sushi is one of those foods I genuinely love but rarely make at home. The rolling, the precision, the way a perfectly made sushi roll seems to require skills I have not fully developed yet — it always felt like something better left to the professionals. Then I discovered the sushi bake and realized I had been making things much harder than they needed to be.
A sushi bake takes everything that makes sushi so craveable — the seasoned rice, the creamy spicy salmon, the nori, the avocado — and turns it into a casserole that practically makes itself.
No rolling, no mats, no technique required. Just layer, bake, top with avocado, and scoop onto nori sheets for a bite that tastes exactly like the inside of a spicy salmon roll.
The first time I made this for my family, there was a long silence followed by everyone reaching for more at the same time. That is always the best kind of review.
This is also one of those recipes that is genuinely built for a crowd. Double the recipe, bring it to a potluck, set it on the table at a dinner party — it disappears fast and people always ask for the recipe. Consider yourself warned. 🙂
Why You’ll Love This Recipe
- All the sushi flavor, none of the rolling. Every element of a great spicy salmon roll is here — just assembled differently. It is sushi for people who love sushi but have zero patience for the rolling process.
- It feeds a crowd effortlessly. One baking dish serves six to eight people generously. This is the kind of recipe that makes you look like you planned an incredible dinner party when really you just followed some straightforward steps.
- The salmon mixture is incredibly addictive. Creamy, spicy, rich, and deeply savory — the combination of cream cheese, sriracha mayo, and flaked salmon is the kind of thing you will catch yourself eating straight from the bowl before it even goes into the dish.
- Completely customizable. Adjust the spice level, swap the protein, add different toppings — this recipe is a framework that you can make your own every single time.
- Surprisingly approachable. Do not let the word sushi intimidate you here. If you can cook rice and mix ingredients in a bowl, you can make this. It is genuinely one of the most forgiving recipes in this collection.
Ingredients with Key Notes
For the Sushi Rice Base:
- 2 cups uncooked sushi rice — sushi rice is short-grain Japanese rice and it is essential here. Long-grain rice does not have the same sticky texture that holds the base layer together. Find it at any Asian grocery store or in the international aisle of most supermarkets.
- 2.5 cups water
- 3 tablespoons rice vinegar
- 1 tablespoon sugar
- 1 teaspoon salt — the vinegar, sugar, and salt mixture is what transforms plain cooked rice into proper seasoned sushi rice. Do not skip this step.
For the Spicy Salmon Mixture:
- 1.5 lbs fresh salmon fillet, cooked and flaked — you can bake, steam, or poach the salmon for this recipe. Alternatively, canned salmon works well in a pinch and cuts down the prep time significantly. Make sure to remove any bones.
- 4 oz cream cheese, softened — let it come to room temperature before mixing so it blends smoothly into the salmon without lumps.
- 1/2 cup Japanese Kewpie mayonnaise — Kewpie is richer and slightly tangier than regular mayo and makes a noticeable difference in the final flavor. If you cannot find it, regular mayonnaise works.
- 3 tablespoons sriracha — this is your primary heat source. Adjust up or down based on your spice preference. The cream cheese does a good job of mellowing the heat so do not be shy.
- 2 tablespoons soy sauce — use tamari for a gluten-free version.
- 1 teaspoon sesame oil
- 3 green onions, thinly sliced — reserve some for topping
- 2 tablespoons furikake seasoning — furikake is a Japanese rice seasoning made from sesame seeds, dried seaweed, and other savory ingredients. It is the secret weapon in this recipe. Find it in the Asian aisle. If you truly cannot locate it, a mix of sesame seeds and crumbled nori is a reasonable substitute.
For Topping:
- 2 tablespoons furikake for the top layer
- 1 ripe avocado, sliced
- Extra Kewpie mayo and sriracha for drizzling
- Sliced green onions
- Black sesame seeds
For Serving:
- 1 pack roasted nori sheets (full size or snack size) — the nori is non-negotiable for the full sushi bake experience. It provides the crunch and that unmistakable seaweed flavor that ties every bite together.
Step-by-Step Instructions
Step 1: Cook and Season the Sushi Rice
Rinse the sushi rice under cold water until the water runs mostly clear — this removes excess starch and prevents the rice from becoming gummy. Cook according to package instructions. While the rice is still hot, mix together the rice vinegar, sugar, and salt in a small bowl until the sugar dissolves, then fold the mixture gently into the cooked rice using a wooden spoon or rice paddle. Fan the rice slightly as you mix to help it cool and develop that characteristic sushi rice sheen. Set aside to cool slightly.
Step 2: Cook the Salmon
If using fresh salmon, season the fillets lightly with salt and pepper and bake at 400°F for 12 to 15 minutes until cooked through. Let it cool for a few minutes then flake it into a large bowl using two forks, removing any skin or bones. The salmon pieces should be in medium-sized flakes — not too fine and not too chunky.
Step 3: Make the Spicy Salmon Mixture
Add the softened cream cheese, Kewpie mayo, sriracha, soy sauce, sesame oil, sliced green onions, and furikake to the bowl with the flaked salmon. Mix everything together until fully combined and creamy. Taste it and adjust — more sriracha for heat, more mayo for richness, more soy sauce for depth. This mixture should be bold and deeply flavorful because the rice base is relatively mild.
Step 4: Assemble the Sushi Bake
Preheat your oven to 400°F. Line a 9×13 inch baking dish with parchment paper for easy cleanup. Spread the seasoned sushi rice in an even layer across the bottom of the dish, pressing it down gently with the back of a spatula or damp hands to create a compact, even base. Sprinkle a generous layer of furikake over the rice. Spoon the spicy salmon mixture over the furikake layer and spread it evenly all the way to the edges. The salmon layer should be thick and generous.
Step 5: Bake
Place the baking dish in the preheated oven and bake for 20 to 25 minutes until the top of the salmon mixture is lightly golden and the edges are bubbling. For a slightly more caramelized top, switch to broil for the final 2 to 3 minutes. Watch it closely under the broiler — it goes from perfect to overdone quickly.
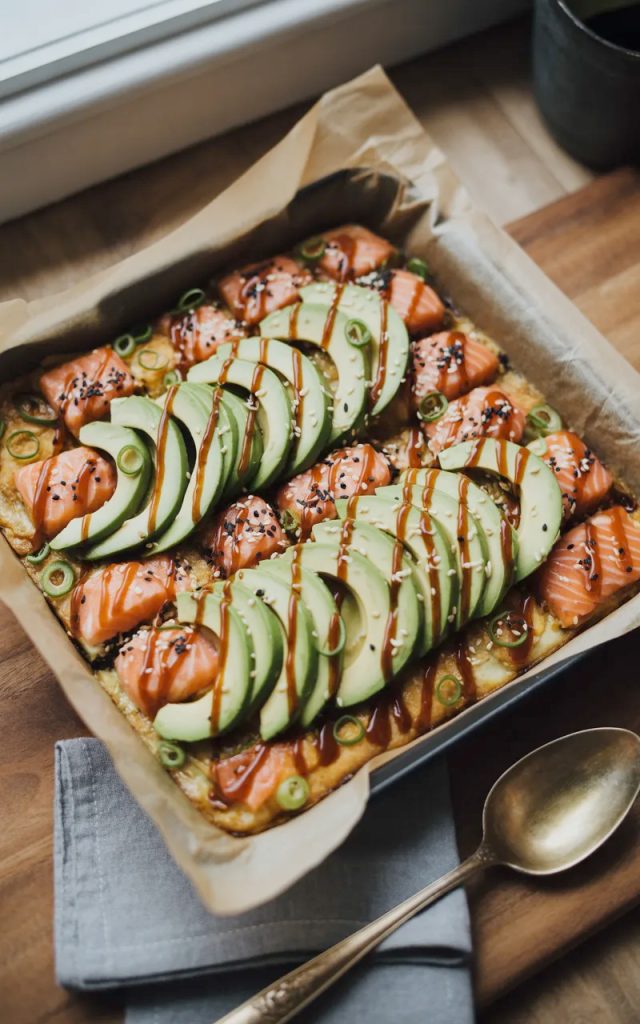
Step 6: Add Toppings and Serve
Remove the baking dish from the oven and let it cool for 5 minutes. Drizzle Kewpie mayo and sriracha in zigzag lines across the top. Arrange the avocado slices over the surface. Scatter sliced green onions and black sesame seeds over everything. Bring the whole dish to the table and serve by scooping generous portions onto individual nori sheets. The combination of warm creamy salmon mixture, sticky rice, and crispy nori in one bite is the whole point of this recipe — and it absolutely delivers.
Serving Suggestions
The sushi bake is wonderfully versatile beyond the classic nori wrap presentation:
- Nori wrap style — the classic and most satisfying way to eat it. Take a nori sheet, scoop a generous portion of sushi bake onto it, fold or wrap loosely, and eat immediately. The nori stays crispy for only a few minutes so eat fast and enjoy every bite.
- Bowl style — skip the nori and serve the sushi bake over individual bowls of extra seasoned rice for a hearty sushi bowl situation. Top with all the same garnishes.
- Party platter style — cut the nori into smaller squares and set out a spread with the baking dish in the center. Let guests scoop their own portions onto nori squares for a fun, interactive appetizer situation. This format is genuinely perfect for gatherings.
- With cucumber slices — thin cucumber rounds make a great low-carb alternative to nori for scooping. They add a refreshing crunch that plays beautifully against the rich salmon mixture.
- Add spicy tuna — mix canned or fresh tuna with sriracha mayo and layer it alongside the salmon for a mixed seafood version that takes the whole dish to another level.
- Adjust the heat — for a milder version suitable for younger eaters, reduce the sriracha to 1 tablespoon and serve extra sriracha on the side for the adults at the table.
Storage Tips
Refrigerator: Store leftover sushi bake in an airtight container in the refrigerator for up to 2 days. The rice layer tends to harden slightly as it chills, which is normal. Store the avocado separately or add it fresh when serving leftovers.
Reheating: Reheat in the oven at 350°F for 10 to 12 minutes until warmed through. Cover loosely with foil to prevent the top from drying out. The microwave works in a pinch — heat in 60-second intervals with a damp paper towel over the top to add a little steam and prevent the rice from becoming too hard.
Nori: Always keep the nori separate and at room temperature in its original packaging until ready to serve. Nori absorbs moisture very quickly and goes soft if stored with the sushi bake.
Avocado: Add fresh avocado only at serving time. Stored avocado browns quickly and the texture suffers significantly after a few hours. A squeeze of lime juice over cut avocado slows browning if you need to prep it slightly ahead.
Freezer: The cooked salmon mixture can be frozen separately for up to 1 month. The rice does not freeze as well for this application — make it fresh when ready to serve. Thaw the salmon mixture overnight in the fridge and reheat gently before assembling and baking.
Let’s Wrap This Up
This spicy salmon sushi bake is one of those recipes that genuinely surprises people — both how easy it is to make and how incredibly good it tastes. It takes everything that makes sushi so special and makes it completely accessible for a home kitchen on a regular weeknight or a dinner party that deserves something memorable.
Food has always been about connection for me. Sharing a dish like this one — something interactive, something communal, something that requires everyone to gather around the table and build their own bite — is exactly what cooking is all about. This recipe creates that moment every single time.
Make this one soon and come back and tell me what happened at your table. Drop a comment below, save it to your Pinterest board, and share it with someone who loves sushi but has never tried making it at home. Happy cooking — Kip.
Spicy Salmon Sushi Bake That Feeds a Crowd and Takes Less Than 45 Minutes
Description
This spicy salmon sushi bake is what happens when your sushi craving meets a casserole dish and everything works out better than expected. A seasoned sushi rice base is topped with a rich, creamy, spicy salmon mixture made from flaked salmon, cream cheese, sriracha mayo, and furikake, then baked until golden and bubbling. Fresh avocado slices go on top right before serving, and the whole thing gets scooped onto crispy nori sheets for the most satisfying bite you will have all week. It feeds a crowd, comes together in under 45 minutes, and tastes exactly like the inside of your favorite sushi roll — except you made it at home for a fraction of the cost.
Ingredients
For the Sushi Rice Base:
For the Spicy Salmon Mixture:
For Topping:
For Serving:
Instructions
-
Rinse and cook sushi rice. Season with rice vinegar, sugar, and salt while hot. Set aside.
-
Bake salmon at 400°F for 12 to 15 minutes. Flake and cool slightly.
-
Mix flaked salmon with cream cheese, Kewpie mayo, sriracha, soy sauce, sesame oil, green onions, and furikake until fully combined.
-
Preheat oven to 400°F. Press seasoned rice into a lined 9x13 inch baking dish. Sprinkle furikake over the rice. Spread the salmon mixture evenly on top.
-
Bake for 20 to 25 minutes until golden and bubbling. Broil for the final 2 to 3 minutes for extra color.
-
Cool for 5 minutes. Drizzle with mayo and sriracha. Top with avocado, green onions, and sesame seeds. Serve scooped onto nori sheets.
