There are mornings when you want to make something that looks like it came from a bakery but you also have exactly 30 minutes and zero desire to make actual danish dough from scratch. This is the recipe for those mornings.
These Strawberry Cream Cheese Heart Danishes use store-bought puff pastry as the base, which means you get all the buttery, flaky, golden layers of a proper danish without any of the laminated dough stress that nobody has time for on a Tuesday.
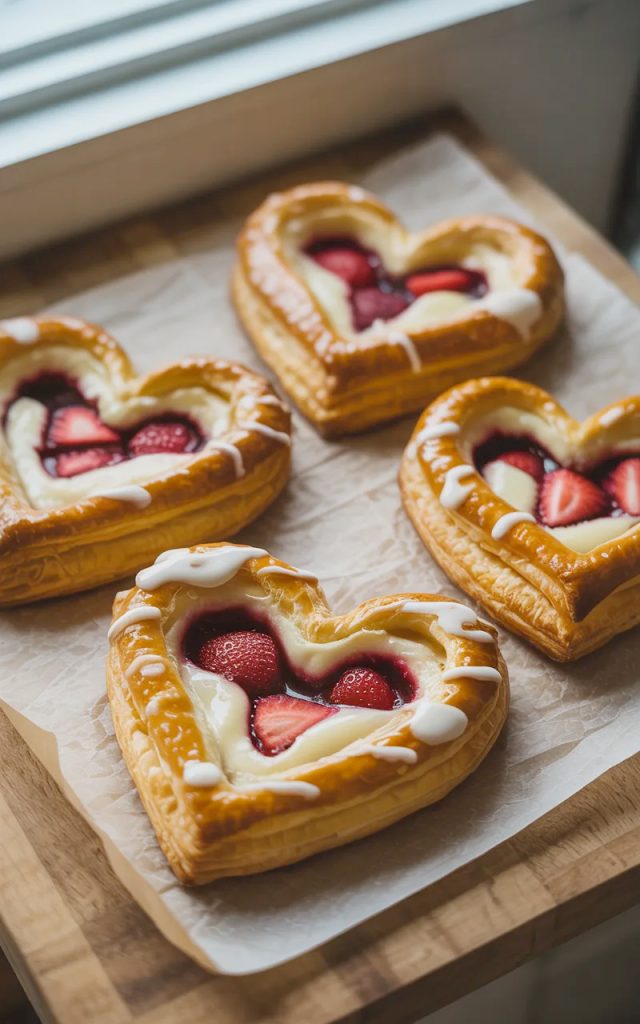
The heart shape is what gets people every time. There is something about a heart shaped pastry sitting on a plate that makes an ordinary breakfast feel like an occasion.
Pull these out on Valentine's Day morning and watch the reaction. Bring them to Easter brunch and watch them disappear before anything else on the table. Make them on a random Saturday just because you felt like it — that is a completely valid reason and one I personally endorse.
The flavor combination here is exactly what you want from a danish. Buttery, shatteringly flaky pastry. Sweet, tangy cream cheese filling that tastes like cheesecake.
Fresh strawberries glazed just enough to shine without being overly sweet. A simple vanilla drizzle over the top to tie everything together. Every bite hits every note and the whole thing comes together in under 30 minutes. Let's get into it.
Why You'll Love This Recipe
Bakery quality in under 30 minutes. Store-bought puff pastry does all the heavy lifting here. You get golden, flaky, layered pastry without making dough from scratch. Nobody at your table needs to know that part.
The heart shape is easier than it looks. All you need is a heart shaped cookie cutter or a sharp knife and a steady hand. The puff pastry is forgiving and the shape holds beautifully through baking.
Perfect for special occasions. Valentine's Day breakfast, Easter brunch, Mother's Day, bridal showers — these danishes fit every occasion that calls for something pretty on the table without requiring a professional pastry chef in the kitchen.
Only a handful of ingredients. Puff pastry, cream cheese, strawberries, sugar, egg, and a few pantry staples. That is the whole list. Nothing obscure, nothing that requires a specialty store.
Completely customizable. The cream cheese filling and heart shape work with virtually any fruit topping. Blueberries, raspberries, peaches, mixed berries — the base recipe stays the same and the topping is entirely up to you.
Kids love helping make them. Cutting the heart shapes, spreading the filling, arranging the strawberries — these are all steps kids can genuinely participate in. They will be proud of what they helped create and even more excited to eat them.
Ingredients
For the Pastry Base
- 2 sheets store-bought puff pastry, thawed according to package directions — Pepperidge Farm is the most widely available and works beautifully, but any all-butter puff pastry is ideal for the best flavor
- A heart shaped cookie cutter approximately 4–5 inches wide, or a sharp knife to cut freehand
For the Cream Cheese Filling
- 8 oz full-fat cream cheese, softened to room temperature — room temperature is essential here, cold cream cheese will not spread smoothly and you risk tearing the pastry trying to spread it
- 1/4 cup granulated sugar
- 1 teaspoon pure vanilla extract
- 1 tablespoon sour cream — just a touch, it adds a subtle tang that makes the filling taste more like actual cheesecake and less like sweetened cream cheese
- 1 teaspoon fresh lemon zest — optional but highly recommended, it brightens the whole filling
For the Strawberry Topping
- 1.5 cups fresh strawberries, hulled and diced into small pieces — fresh is strongly preferred here, frozen strawberries release too much liquid during baking and make the pastry soggy
- 2 tablespoons granulated sugar
- 1 teaspoon fresh lemon juice
- 1/2 teaspoon cornstarch — this keeps the strawberry topping glossy and slightly thickened rather than watery
For the Egg Wash and Glaze
- 1 large egg beaten with 1 tablespoon water — this is what gives the pastry that deep golden color and glossy finish
- 1/2 cup powdered sugar
- 2–3 tablespoons whole milk or heavy cream
- 1/4 teaspoon vanilla extract
Key Notes: Thawing puff pastry correctly is the single most important step in this recipe. You want it cold enough to hold its shape when you cut and handle it but pliable enough not to crack. The best approach is to thaw it in the fridge overnight or on the counter for about 30–40 minutes. If it gets too warm and soft, slide it back into the fridge for 10 minutes before continuing. Warm puff pastry becomes a greasy, sticky mess that does not puff properly in the oven. Cold puff pastry cuts cleanly, holds its shape, and bakes up into those beautiful distinct layers that make a danish worth eating.
Step-by-Step Instructions
Step 1 — Prep the Puff Pastry Hearts
- Preheat your oven to 400 degrees F (200 degrees C). Line two large baking sheets with parchment paper and set aside.
- Lightly flour a clean work surface. Unfold one sheet of puff pastry and gently smooth out any fold lines with your fingertips.
- Using your heart shaped cookie cutter, cut out as many hearts as possible from the first sheet — you should get about 3–4 per sheet depending on the size of your cutter. Gather any scraps, press them together gently, and cut one or two more hearts from the second sheet.
- Place the cut heart shapes onto the prepared baking sheets, spacing them about 2 inches apart.
- Using a sharp knife or smaller heart cutter, score a smaller heart shape inside each pastry heart about half an inch from the outer edge. Press firmly enough to leave a clear visible line but do not cut all the way through. This scored border is what puffs up dramatically in the oven to create the raised edge that holds your filling inside.
- Slide the baking sheets into the fridge for 10 minutes while you prepare the filling. Chilling the shaped pastry before baking helps it hold its form and puff more evenly.
Step 2 — Make the Cream Cheese Filling
- Beat the softened cream cheese and sugar together in a bowl on medium speed for about 1 minute until smooth and fluffy.
- Add the vanilla extract, sour cream, and lemon zest if using. Beat for another 30 seconds until fully combined.
- The filling should be smooth, thick, and spreadable — not runny. If it feels too soft, refrigerate it for 10 minutes to firm it up slightly before spreading.
- Transfer the filling to a small bowl and set aside.
Step 3 — Make the Strawberry Topping
- Combine the diced strawberries, sugar, lemon juice, and cornstarch in a small bowl. Toss gently to coat the strawberries evenly.
- Let the mixture sit for 5 minutes while the sugar draws out the juices and the cornstarch begins to thicken everything slightly. The strawberries should look glossy and lightly syrupy after resting.
- Set aside. Do not cook this mixture — the raw glazed strawberries go on top of the cream cheese filling before baking and cook gently in the oven, which keeps them fresh tasting rather than jammy.
Step 4 — Assemble the Danishes
- Remove the chilled pastry hearts from the fridge.
- Using a pastry brush or the back of a spoon, spread a generous tablespoon of cream cheese filling into the center of each heart, keeping it within the scored inner border. The raised edge that forms during baking will naturally contain the filling, but you want to keep it away from the outer border so it does not interfere with the puffing.
- Spoon a generous portion of the strawberry topping over the cream cheese filling on each heart, distributing the pieces evenly.
- Do not overfill. A heaped tablespoon of cream cheese and a generous spoonful of strawberries is the right amount. Too much filling and the pastry cannot support it properly.
Step 5 — Egg Wash and Bake
- Using a pastry brush, carefully brush the egg wash over the exposed outer border of each pastry heart, avoiding the filling. The egg wash should go on the pastry only — if it drips onto the cut edges of the pastry it can seal the layers together and prevent proper puffing.
- Slide the baking sheets into the preheated oven.
- Bake for 18–22 minutes until the pastry border is deeply golden, puffed, and layered. The filling should be set and the strawberries should look glossy and lightly caramelized at the edges.
- Remove from the oven and let the danishes cool on the baking sheet for at least 10 minutes before glazing. Glazing hot pastry causes the glaze to run straight off and pool on the parchment.
Step 6 — Glaze and Finish
- Whisk together the powdered sugar, milk, and vanilla until smooth and drizzleable. Start with 2 tablespoons of milk and add more a few drops at a time until you reach a consistency that flows off a spoon in a thin steady stream.
- Using a spoon or a small piping bag, drizzle the glaze lightly over the cooled danishes in a back and forth motion. You want a light, elegant drizzle — not a heavy coating.
- Let the glaze set for about 5 minutes before serving. It firms up quickly and gives the danishes that polished bakery finish.
Serving Suggestions
These danishes are a complete experience on their own but here are a few ways to make them shine even more:
- Serve them warm from the oven alongside a strong cup of coffee or a creamy latte. The contrast of the hot flaky pastry and the cold brew is genuinely one of life's great simple pleasures.
- For a Valentine's Day breakfast in bed situation, plate two danishes on a white ceramic plate with a small handful of fresh strawberries on the side and a light dusting of powdered sugar over the whole plate right before serving.
- For Easter brunch, arrange them on a tiered pastry stand alongside other bite sized treats. The heart shape reads beautifully at a distance and draws people in before they even know what they are looking at.
- Pair them with a simple fresh fruit salad and a cold glass of fresh squeezed orange juice for a complete brunch spread that feels intentional and elegant without requiring much effort.
- If you want to make a larger impression, make a double batch and arrange them on a long wooden board with fresh strawberries, a small pot of extra cream cheese filling for dipping, and a dusting of powdered sugar over everything. That board will photograph beautifully and taste even better.
- Serve them at room temperature if you are not eating them immediately after baking. They hold up well and the flavors are actually more balanced once they have cooled completely.
Storage Tips
Room temperature: These danishes are best eaten the day they are baked. If you have leftovers, store them uncovered at room temperature for up to 6 hours. Covering them traps steam and makes the pastry lose its crispness.
Refrigerator: Store leftover danishes in an airtight container in the fridge for up to 2 days. The pastry will soften in the fridge but you can bring it back by reheating. To reheat, place the danishes on a baking sheet in a 350 degree F oven for 8–10 minutes. Do not microwave them — microwaving turns puff pastry into a soggy, rubbery disappointment.
Freezer: You can freeze the unbaked assembled danishes before the egg wash stage. Place them on a parchment lined baking sheet, freeze until solid, then transfer to a zip lock freezer bag for up to 1 month. Bake from frozen at 400 degrees F, adding 5–7 minutes to the bake time. Do not freeze already baked danishes — the pastry texture suffers significantly.
Make ahead strategy: The cream cheese filling can be made up to 2 days in advance and stored covered in the fridge. The strawberry topping is best made fresh the day of since the berries continue to release liquid as they sit. Cut and shape the pastry the morning of and assemble right before baking for the best results.
Let's Wrap This Up
These Strawberry Cream Cheese Heart Danishes are the kind of recipe that earns a completely unfair amount of praise for how straightforward they actually are. Thirty minutes, a handful of ingredients, one bowl for the filling, and you have something that genuinely looks and tastes like it came from a proper bakery.
Make them for someone you love on Valentine's Day morning. Bring them to Easter brunch and claim full credit. Or make them on a quiet weekend morning just for yourself — because sometimes the best reason to make something beautiful is simply that you felt like it.
From my kitchen to yours — go make something worth waking up for.
With gratitude, Kip