

I have made a lot of chicken recipes in my time. A lot. And I will be honest with you — after a while, chicken can start to feel like a chore. Another pan, another protein, another weeknight meal that gets the job done without really exciting anyone.
This garlic butter chicken magic is not that. Not even close.
The name sounds dramatic, I know. But the first time I made this and watched that garlic butter sauce come together in the pan — all golden and glossy, smelling like something incredible — I understood why someone called it magic.
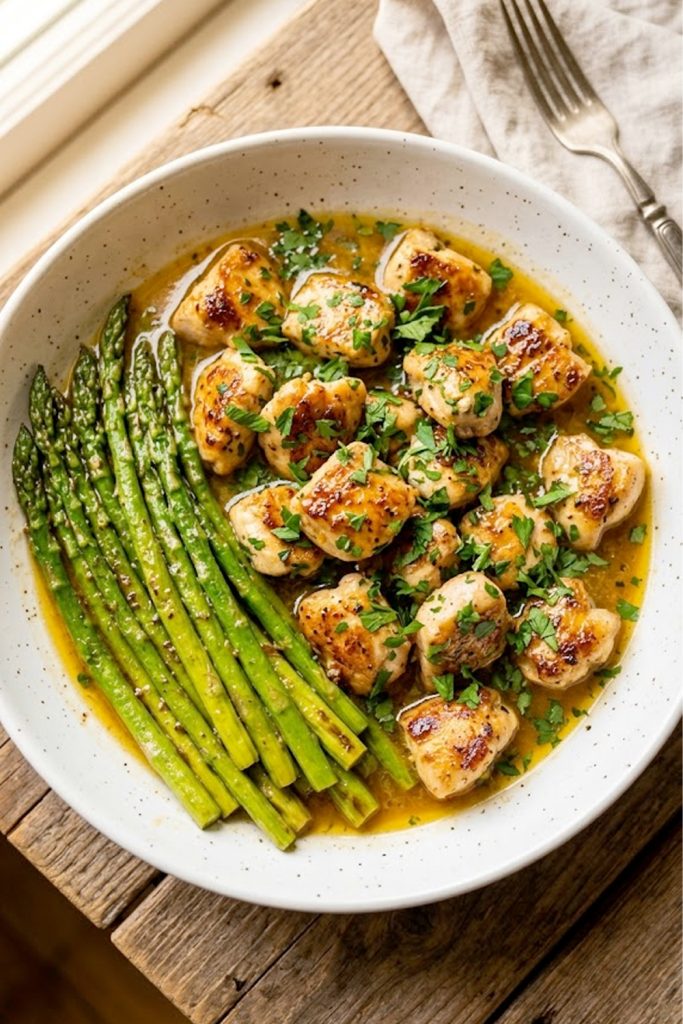
The chicken comes out with crispy, caramelized edges and the most tender center. The sauce is rich and garlicky and coats every single bite. The asparagus sits alongside it, slightly charred and perfect. And the whole thing is on the table in 25 minutes. IMO, that qualifies as magic. Let’s get into it.
Why you’ll love this recipe
- 25 minutes from start to finish — This is one of the fastest genuinely impressive dinners you can make. When you need something good on the table fast, this is the recipe you reach for.
- That garlic butter sauce — Rich, golden, deeply garlicky, and so good you will want to spoon it over everything on your plate. It is the reason this recipe has the word magic in the name.
- Crispy edged chicken bites — Cutting the chicken into bite-sized pieces gives you maximum surface area for searing, which means more of those golden, caramelized edges in every single bite.
- One pan dinner — The chicken, the sauce, and the asparagus all come together in one skillet. Minimal cleanup, maximum flavor.
- Keto and low carb friendly — Under 5g net carbs per serving, high in protein, and filling enough to keep you satisfied well into the evening.
- Endlessly versatile — Serve it over cauliflower rice, zucchini noodles, mashed cauliflower, or just eat it straight from the pan with a fork. All of the above are valid and delicious options.
Ingredients with key notes
For the chicken:
- 1.5 lbs boneless skinless chicken breasts, cut into bite-sized chunks — Cutting the chicken into roughly 1-inch chunks is what gives you those beautiful caramelized edges. Make sure the pieces are roughly the same size so they cook at the same rate. Pat them completely dry before seasoning — this is the single most important step for getting a good sear.
- 1 tsp garlic powder
- 1 tsp smoked paprika — Adds a subtle warmth and gives the chicken a gorgeous deep color as it sears.
- 1/2 tsp onion powder
- 1/2 tsp dried Italian seasoning
- Salt and black pepper to taste
- 2 tbsp olive oil — For searing. Use a oil with a high smoke point since you are cooking over medium-high heat.
For the garlic butter sauce:
- 5 tbsp unsalted butter — Real butter, not margarine. This is a garlic butter recipe — the quality of the butter matters more than usual. Unsalted gives you full control over the seasoning.
- 6 garlic cloves, minced — Fresh garlic only. This sauce is built around garlic flavor and fresh minced garlic delivers in a way that garlic powder simply cannot replicate here. Six cloves sounds like a lot. It is the right amount.
- 1/4 tsp red pepper flakes — Optional but highly recommended. Just enough heat to add a subtle kick without overpowering the garlic butter flavor.
- 2 tbsp fresh parsley, finely chopped — Stirred into the sauce at the end and used as a garnish. Fresh parsley adds brightness and color that the dish genuinely needs to balance the richness of the butter.
- 1 tbsp lemon juice — Optional but excellent. A small squeeze of lemon at the end cuts through the richness of the butter and lifts the whole dish. Try it once with lemon and you will never make it without again.
- Salt to taste
For the asparagus:
- 1 bunch fresh asparagus, woody ends trimmed — Choose medium thickness spears rather than very thin ones — they hold up better in the pan and won’t go limp and sad on you. Snap or cut off the woody bottom ends before cooking.
- 1 tbsp olive oil
- Salt and black pepper
- Parmesan shavings for garnish — Optional, but a light grating of parmesan over the asparagus right before serving adds a beautiful finishing touch.
Step-by-step instructions
Step 1: Season the chicken
Pat the chicken chunks completely dry with paper towels. This step cannot be skipped if you want properly seared chicken — moisture is the enemy of a good golden crust. Once dry, season all over with garlic powder, smoked paprika, onion powder, Italian seasoning, salt, and black pepper. Toss to coat evenly and set aside for a few minutes while you get the pan ready.
Step 2: Sear the chicken
Heat olive oil in a large skillet over medium-high heat until shimmering and just beginning to smoke. Add the chicken pieces in a single layer — do not crowd the pan. If your skillet is not large enough to fit them all without touching, cook in two batches. Crowding the pan causes the chicken to steam rather than sear, and you will lose those golden edges entirely.
Cook without moving for 3-4 minutes until a deep golden crust forms on the bottom. Flip and cook for another 2-3 minutes on the other side until golden and cooked through. Transfer to a plate and set aside. Do not clean the pan — those browned bits left behind are pure flavor.
Step 3: Cook the asparagus
In the same skillet, add the trimmed asparagus spears and drizzle with olive oil. Season with salt and pepper. Cook over medium-high heat for 4-5 minutes, turning occasionally, until the asparagus is bright green, slightly charred in spots, and just tender when pierced with a fork. You want a little char on them — it adds flavor and keeps them from tasting bland. Transfer to a serving dish or push to the side of the pan.
Step 4: Make the garlic butter sauce
Reduce the heat to medium. Add the butter to the same skillet and let it melt completely. Once melted and beginning to foam slightly, add the minced garlic and red pepper flakes. Cook for 60-90 seconds, stirring constantly, until the garlic is fragrant and just beginning to turn golden at the edges. Watch it carefully here — the line between perfectly golden garlic and burnt garlic is a narrow one, and burnt garlic will ruin the whole sauce. The moment you smell it — that rich, nutty, incredible garlic smell — you are right where you want to be.
Scrape up any browned bits from the bottom of the pan as you stir. Those bits dissolve into the butter and make the sauce extraordinary. Add the lemon juice if using, stir to combine, and taste the sauce. Adjust seasoning with salt as needed.
Step 5: Toss the chicken in the sauce
Return the seared chicken pieces to the skillet and toss them in the garlic butter sauce until every piece is well coated and glistening. Let the chicken sit in the sauce over low heat for 1-2 minutes to warm back through and absorb all that flavor. Stir in the fresh chopped parsley and give everything one final toss.
Step 6: Plate and serve
Arrange the garlic butter chicken in a wide serving bowl or plate, spooning any extra sauce from the pan generously over the top. Place the asparagus alongside. Garnish with extra fresh parsley and parmesan shavings over the asparagus if using. Serve immediately while everything is hot and the butter sauce is still glossy. This dish does not like to wait around.
Serving suggestions
- Over mashed cauliflower — Spoon the chicken and all of that garlic butter sauce over a bed of creamy mashed cauliflower. The cauliflower soaks up the sauce and it is an absolutely outstanding combination.
- Over cauliflower rice — A lighter option that still gives you something to soak up the sauce. Add a squeeze of lemon over the cauliflower rice before plating for extra brightness.
- With zucchini noodles — Toss the zucchini noodles briefly in the garlic butter sauce before plating the chicken on top. It feels indulgent and it comes in at minimal carbs.
- With a simple green salad — If you want to keep things really light, a crisp salad with a lemon vinaigrette on the side is all this dish needs. The chicken and sauce carry the meal on their own.
- Straight from the pan — Look, some nights you do not want dishes or plating or sides. You just want to eat the garlic butter chicken straight from the skillet with a fork. That is a completely valid dinner choice and I fully support it.
Storage tips
Refrigerator: Let the chicken cool completely before transferring to an airtight container. Store in the fridge for up to 4 days. Make sure to include any remaining garlic butter sauce in the container — it keeps the chicken moist and the flavors continue to develop overnight. This honestly tastes even better the next day.
Freezer: The chicken freezes well. Transfer cooled portions to freezer-safe containers or zip-lock bags, making sure to include the sauce. Freeze for up to 2 months. The asparagus does not freeze well and is best made fresh each time. Thaw the chicken overnight in the refrigerator before reheating.
Reheating: Reheat on the stovetop in a skillet over medium-low heat, adding a small knob of butter to bring the sauce back to life as it warms. Stir gently and heat until warmed through — this takes about 3-4 minutes. Individual portions can be microwaved in 60-second intervals, but the stovetop method gives a much better result and keeps the chicken from drying out.
A quick word before you go
Twenty-five minutes. One pan. A dinner that makes people stop mid-bite to ask you what you put in it.
That is the whole promise of garlic butter chicken magic, and it delivers every single time. There is nothing complicated happening here — just good technique, quality butter, real garlic, and chicken that gets the respect of a proper sear. Sometimes the simplest combinations produce the most extraordinary results.
This is one of those combinations.
Make it tonight. Spoon every last drop of that garlic butter sauce over your plate. And if you find yourself standing at the stove eating it directly from the pan before it even makes it to the table — welcome to the club. We meet every Tuesday.
With gratitude, Kip.
Garlic butter chicken magic — the low carb keto dinner that lives up to its name
Description
This garlic butter chicken magic is exactly what it sounds like — a little bit of weeknight wizardry that comes together in under 25 minutes and tastes like something you would pay good money for at a restaurant. Golden, crispy-edged chicken bites swimming in a deeply flavored garlic butter sauce, served alongside vibrant roasted asparagus that soaks up every last drop of that sauce. Low carb, keto friendly, and the kind of dinner that earns you compliments every single time you make it.
Ingredients
Chicken:
Garlic butter sauce:
Asparagus:
Instructions
-
Pat chicken dry, season with garlic powder, paprika, onion powder, Italian seasoning, salt and pepper.
-
Sear chicken in olive oil over medium-high heat, 3-4 minutes per side until deeply golden. Work in batches if needed. Transfer to a plate.
-
In the same pan, cook asparagus in olive oil over medium-high heat for 4-5 minutes until bright green and slightly charred. Set aside.
-
Reduce heat to medium. Add butter and let melt. Add minced garlic and red pepper flakes, cook 60-90 seconds until fragrant and just golden. Add lemon juice if using.
-
Return chicken to the pan, toss in the garlic butter sauce until fully coated. Warm through 1-2 minutes. Stir in fresh parsley.
-
Plate the chicken with sauce spooned over, asparagus alongside. Garnish with extra parsley and parmesan if using. Serve immediately.
