

There are side dishes that people eat because they feel like they should, and then there are side dishes that people actually get excited about. This creamy pea salad with bacon is firmly in the second category. Every time I put this on the table, it’s one of the first bowls to empty out — and people are always a little surprised by how much they love it.
What makes it work is the combination of textures and flavors happening all at once. Sweet tender peas, crispy salty bacon, creamy hard-boiled eggs, and fresh chives all brought together by a rich tangy dressing that ties everything into one cohesive, seriously delicious bite. It sounds simple because it is simple. But simple done right is hard to beat.
The best part? This comes together in about 15 minutes. No cooking beyond boiling the eggs and frying the bacon. No complicated techniques. Just good ingredients treated well, which honestly is what cooking is all about.
Why you’ll love this recipe
- It comes together in just 15 minutes with minimal cooking required
- The combination of sweet peas, crispy bacon, and creamy eggs gives you incredible flavor and texture in every bite
- The tangy creamy dressing is simple to make and works perfectly with every ingredient in the bowl
- It gets better as it sits — make it ahead and the flavors deepen beautifully in the fridge
- It works as a side dish at cookouts, potlucks, holiday dinners, and weeknight meals alike
- It’s naturally gluten free and easy to adapt for different dietary needs
Ingredients with key notes
For the pea salad:
- 4 cups frozen green peas, thawed — frozen peas are actually ideal here because they’re picked and frozen at peak sweetness, which means they taste great year round. Thaw them completely and pat them dry with paper towels before using — excess moisture will thin out your dressing. Fresh peas work beautifully in spring if you have access to them.
- 8 strips of bacon, cooked and crumbled — cook your bacon until genuinely crispy. That crunch is a big part of what makes this salad so satisfying and provides a textural contrast against the soft peas and creamy eggs. Turkey bacon works as a lighter substitute but regular thick-cut bacon gives you the best flavor here.
- 4 large hard-boiled eggs, peeled and chopped — the eggs add richness, protein, and a creamy element that makes the salad feel more substantial. Make sure they’re fully cooled before chopping so they hold their shape rather than crumbling into the dressing.
- 1/2 cup red onion, finely diced — adds sharpness and a pop of color. If raw red onion is too strong for your taste, soak the diced pieces in cold water for 10 minutes before using to mellow out the bite without losing the flavor.
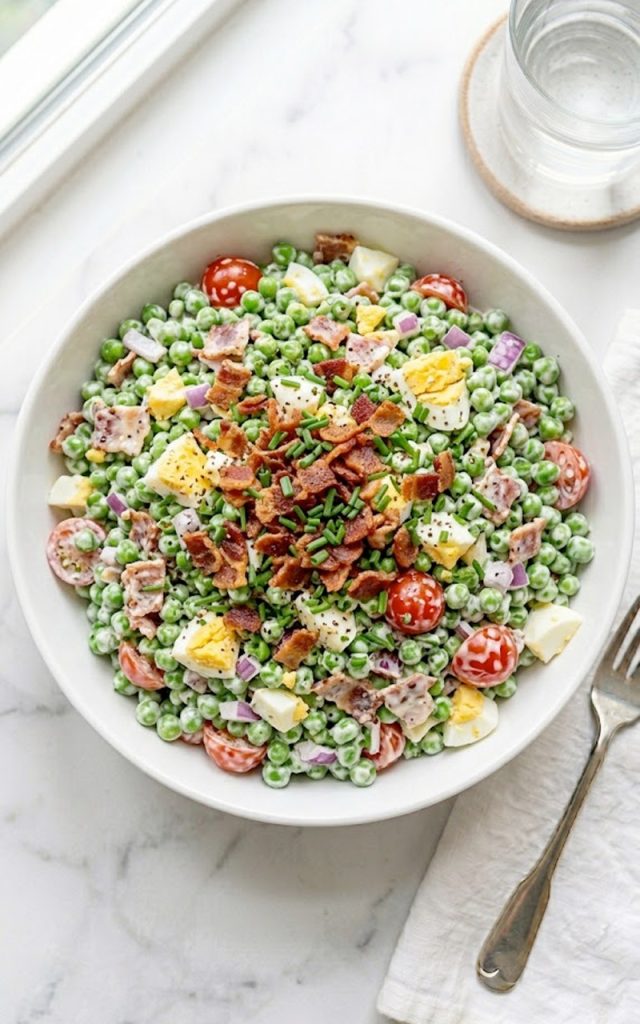
- 1 cup cherry tomatoes, halved — the pin shows beautiful whole and halved cherry tomatoes nestled into the salad which add juiciness, color, and a gentle acidity that balances the richness of the dressing beautifully.
- 3 tablespoons fresh chives, finely chopped — adds a mild fresh oniony note that lifts the whole dish. Fresh chives are worth using here — dried chives simply do not have the same brightness. Flat-leaf parsley or fresh dill work as substitutes if chives aren’t available.
For the dressing:
- 1/2 cup mayonnaise — the creamy backbone of the dressing. Use a good quality full-fat mayo for the best result. Duke’s or Hellmann’s are both excellent choices.
- 1/4 cup sour cream — adds a gentle tang and a slightly lighter creaminess that prevents the dressing from feeling too heavy. Greek yogurt works as a higher protein substitute.
- 1 tablespoon apple cider vinegar — brightens the dressing and cuts through the richness of the mayo perfectly. White wine vinegar works as a substitute.
- 1 teaspoon sugar — just enough to enhance the natural sweetness of the peas and balance the acidity of the vinegar. Don’t skip it — it makes a noticeable difference.
- 1/2 teaspoon garlic powder
- Salt and black pepper to taste — be generous. This salad needs proper seasoning to really sing.
Step-by-step instructions
Step 1: Thaw and dry the peas
Place the frozen peas in a colander and run cold water over them until fully thawed. Spread them out on a clean kitchen towel or several layers of paper towels and pat them as dry as possible. This step matters more than you might think — wet peas will water down your dressing and leave the salad soupy rather than creamy. Give them at least 5 minutes to drain properly.
Step 2: Cook the bacon
Fry the bacon strips in a skillet over medium heat until genuinely crispy — not just cooked through, but properly crunchy. Transfer to a paper towel-lined plate to drain the excess grease and cool completely. Once cooled, crumble into small pieces. If you’re making a large batch, cooking bacon in the oven at 400 degrees on a lined baking sheet for 15 to 18 minutes is a great hands-off method that frees you up to prep everything else.
Step 3: Make the dressing
In a large mixing bowl, whisk together the mayonnaise, sour cream, apple cider vinegar, sugar, and garlic powder. Season generously with salt and black pepper and give it a good taste. The dressing should be creamy, tangy, and slightly sweet with a well-rounded flavor. Adjust the vinegar if you want more brightness or add a pinch more sugar if it feels too sharp.
Step 4: Combine the salad
Add the dried peas, chopped hard-boiled eggs, diced red onion, and halved cherry tomatoes to the bowl with the dressing. Fold everything together gently until evenly coated. Be careful not to overmix — you want the eggs and tomatoes to stay intact rather than breaking down into the dressing.
Step 5: Add the bacon and chill
Fold in most of the crumbled bacon, reserving a generous handful for topping. Add most of the fresh chives, again saving some for garnish. Cover the bowl and refrigerate for at least 30 minutes before serving — this resting time lets the flavors meld together and the dressing thicken slightly around the peas.
Step 6: Garnish and serve
Just before serving, give the salad a gentle stir and taste for seasoning — it may need a pinch more salt after chilling. Transfer to your serving bowl and top with the reserved crumbled bacon, fresh chives, and a generous crack of black pepper. Serve cold and enjoy immediately.
Serving suggestions
This pea salad is versatile enough to complement just about any main course. Here are some of my favorite ways to serve it:
- Pair it with grilled burgers or hot dogs for a classic cookout combination that never gets old
- Serve it alongside fried chicken or baked chicken thighs for a comforting Southern-inspired spread
- Bring it to a holiday dinner as an alternative to heavier sides — it holds its own next to roasted meats beautifully
- Serve it at a potluck in a chilled bowl — it travels well and looks stunning when topped with fresh garnishes right before serving
- Pair it with a simple green salad and crusty bread for a light but satisfying lunch that comes together in minutes
Storage tips
- Refrigerator: Store leftover pea salad in an airtight container in the fridge for up to 3 days. The bacon will soften slightly as it sits in the dressing, so if you want to maintain that crunch, store the bacon separately and add it fresh right before serving each time.
- Freezer: This salad does not freeze well at all. The creamy dressing breaks down completely when frozen and thawed, and the peas lose their texture. Keep it refrigerated and enjoy within 3 days.
- Make ahead tip: This salad is genuinely better when made a few hours ahead or even the night before. The flavors develop beautifully as it sits. Just keep the bacon and fresh chives separate and add them right before serving to preserve the texture and color.
Closing
And that is your creamy pea salad with bacon — simple, satisfying, and genuinely one of those dishes that earns a permanent spot in your recipe rotation. It takes 15 minutes, uses ingredients you can find anywhere, and delivers a flavor combination that is hard to argue with.
Make it for your next cookout, bring it to a holiday dinner, or just throw it together on a weeknight when you want something easy that still feels a little special. However you serve it, do not be surprised when people ask you for the recipe. It happens every single time.
With gratitude, Kip
Creamy Pea Salad with Bacon — The Simple, Satisfying Side Dish You’ll Make Again and Again
Description
A classic creamy pea salad made with sweet green peas, crumbled crispy bacon, chopped hard-boiled eggs, and fresh chives, all tossed in a rich and tangy mayonnaise and sour cream dressing seasoned with a touch of sugar and apple cider vinegar. Ready in 15 minutes and absolutely perfect for any occasion.
Ingredients
Instructions
-
Thaw frozen peas under cold running water. Spread on paper towels and pat completely dry.
-
Cook bacon until crispy. Drain on paper towels, cool completely, and crumble into pieces.
-
Whisk together mayonnaise, sour cream, apple cider vinegar, sugar, and garlic powder. Season with salt and pepper.
-
Add peas, chopped eggs, red onion, and cherry tomatoes to the dressing. Fold gently until evenly coated.
-
Fold in most of the bacon and chives, reserving some of each for topping.
-
Cover and refrigerate for at least 30 minutes. Before serving top with reserved bacon, fresh chives, and cracked black pepper.
