

Let me paint you a picture. It’s girls night. Everyone is coming over. You want the food situation to feel special without spending three hours in the kitchen stress cooking while your friends are already having fun without you. Sound familiar?
This is exactly where a charcuterie board comes in and saves the entire evening. No oven, no pots, no complicated recipes, no timing anything. You pull everything out, arrange it on a board, and suddenly the table looks like something out of a magazine.
Your friends walk in, see it, and immediately reach for their phones to take a picture before anyone even touches it. That reaction never gets old.
What I love most about building a board like this is how personal you can make it. You pick the cheeses your group loves, the meats that always disappear first, the fruit that is in season, the crackers that pair best with everything.
There are no real rules here — just good food, good company, and a board that makes the whole night feel like a proper occasion without you having to break a sweat putting it together.
Why you’ll love this recipe
- Zero cooking required. Not a single burner gets turned on. Everything on this board is ready to go straight from the store to the board to the table. This is the ultimate low effort, high reward food situation.
- It looks completely stunning. A well arranged charcuterie board is genuinely one of the most visually impressive things you can put on a table, and it takes a fraction of the effort of any actual cooked dish. The colors, the textures, the variety — it looks like you hired a caterer.
- It feeds a crowd without the stress. A good sized board can easily feed six to eight people as an appetizer or four to five people as a main spread for the evening. Scale it up by simply adding more of everything.
- Everyone finds something they love. Cheese lovers, meat lovers, fruit lovers, cracker snackers — a well built board has something for every person at the table. Nobody goes home hungry and nobody feels left out.
- It is completely customizable. Swap out any element based on what your group loves, what is in season, or what fits your budget. This is a framework, not a rigid recipe. Make it your own.
- It is ready in under 30 minutes. Once you have everything assembled, building the board itself takes about twenty to twenty five minutes. Which leaves you plenty of time to actually enjoy the evening with your people.
Ingredients with key notes
Cheeses:
- 1 wheel of brie — Brie is the anchor cheese for a board like this. It is creamy, crowd pleasing, and looks beautiful when sliced open and fanned out on the board. Leave it at room temperature for at least thirty minutes before serving so it softens properly.
- 4 oz sharp cheddar, sliced into rectangles — Cheddar adds a bold, familiar flavor that most people love and it provides a nice color contrast against the lighter cheeses. Pre-sliced into small rectangles makes it easy to pick up and pairs well with almost every cracker on the board.
- 4 oz string cheese or mozzarella sticks — A fun, casual addition that works especially well if any kids are joining the night. It breaks up the more sophisticated cheeses and adds a playful element to the board.
- 8 oz cream cheese, softened — The base for the herbed dip that sits in the center of the board. Mix it with a little sour cream, dried herbs, garlic powder, and salt for a simple dip that becomes the most visited spot on the entire board.
Meats:
- 4 oz salami, for roses — Salami roses are the visual showstopper of any charcuterie board and they are surprisingly easy to make. Fold each salami slice over the rim of a small wine glass, layer them around, then press them together and flip onto the board. Full instructions in the steps below.
- 4 oz sliced salami rounds — Beyond the roses, have extra sliced salami laid out flat or in casual folds for people who just want to grab a piece quickly without dismantling the art installation.
- 3 oz pepperoni or sliced cured beef — Adds another meat variety and a slightly different flavor profile. Roll them into small tubes or fan them out for easy grabbing.
Crackers:
- Assorted crackers, at least 3 varieties — Variety is everything with crackers. Include something buttery and plain, something seeded or whole grain, and something thin and crispy. Aim for at least three different types to give people options and add visual variety to the board. About two to three boxes total depending on your board size.
Fresh fruit:
- 1 cup fresh strawberries, halved — Strawberries add a bright pop of red color and a sweet freshness that cuts through the richness of the cheeses and meats. Use ripe, sweet ones.
- 1 cup green grapes — Green grapes add color contrast, natural sweetness, and an easy grab-and-eat element that people reach for constantly throughout the evening.
Extras and accents:
- 1/2 cup dill pickle slices — The briny, tangy punch of pickles is a perfect contrast to the rich cheeses and salty meats. Serve them in a small ramekin or bowl directly on the board.
- 1/2 cup chocolate covered pretzels or plain pretzels — Adds a sweet and salty crunchy element that fills in the board beautifully and gives people something to snack on between the more substantial items.
- Fresh or dried herbs for the dip — Dried dill, parsley, or Italian seasoning all work great sprinkled on top of the cream cheese dip for flavor and visual appeal.
For the herbed cream cheese dip:
- 8 oz cream cheese, softened
- 2 tablespoons sour cream
- 1/2 teaspoon garlic powder
- 1/2 teaspoon dried dill
- 1/2 teaspoon dried parsley
- Salt and pepper to taste
Step-by-step instructions
Step 1: Choose your board and prep your space
Start with a large wooden board, a slate board, or even a large baking sheet lined with parchment paper if that is what you have. The board in this post is a handled wooden tray which works beautifully because it is easy to carry to the table and has natural edges that help contain everything. Lay out all your ingredients on the counter first so you can see what you are working with before anything goes on the board.
Step 2: Make the herbed cream cheese dip
Beat the softened cream cheese with sour cream, garlic powder, dried dill, dried parsley, salt, and pepper until smooth and well combined. Transfer it into a small white ramekin or bowl. Sprinkle extra dried herbs on top for a finished look. Place the bowl roughly in the center or upper center of your board — this becomes an anchor point that everything else builds around.
Step 3: Place the cheeses
Arrange the cheeses next. Place the brie wheel near one corner, slice a few wedges from it and fan them out slightly so people can see the creamy interior and know it is ready to eat. Fan the cheddar rectangles in another section of the board. Tuck the string cheese into another area. Space the cheeses out across the board rather than clustering them together — this forces you to fill the space between them with everything else and creates a more balanced, abundant looking board.
Step 4: Make the salami roses and add the meats
To make salami roses, fold six to eight salami slices individually over the rim of a small wine glass, overlapping them as you go around the glass to create a rose shape. Gently press the center down, then carefully flip the glass upside down onto the board and slide the rose off. Repeat for a second rose. Place the roses in different sections of the board. Add the extra sliced salami in casual folds or flat rounds in another area. Tuck the pepperoni or cured beef slices near the edges.
Step 5: Add the crackers
Fan crackers out along the edges of the board and in the spaces between the cheeses and meats. Use at least two to three varieties and keep each variety grouped together rather than mixing them — this looks more intentional and makes it easier for people to grab what they want. Stack them slightly rather than laying them perfectly flat for a more abundant, generous look.
Step 6: Fill in with fruit, pickles, and extras
Place the halved strawberries in one corner or along an edge where their red color creates a visual contrast. Tuck the green grape clusters in another corner. Add the pickle slices in their small bowl directly on the board. Scatter the pretzels into any remaining gaps. At this point stand back and look at the board — find any sparse areas and fill them in with extra crackers, fruit, or a small handful of pretzels. The goal is a board that looks full, abundant, and almost overflowing.
Step 7: Final touches
Add any small toothpicks or cheese knives directly on the board for serving. If you want to add any additional garnish, a few fresh herb sprigs tucked into the corners add a professional finishing touch. Serve immediately or cover loosely and refrigerate until your guests arrive.
Serving suggestions
A charcuterie board is the most versatile food situation you can create for a girls night. Here are some great ways to set the whole evening up around it:
- As the main event for a casual girls night in — Skip the full dinner and let the board be the meal. Build it generously, add some extra crackers and fruit on the side, and let everyone graze throughout the evening. This works especially well paired with wine.
- As a starter before a simple dinner — If you are making a light pasta or a salad for dinner, this board works perfectly as a starter to keep people happy and snacking while you finish the main.
- Paired with a wine selection — A charcuterie board and a curated wine selection is honestly one of the most foolproof girls night combinations in existence. Set out two or three bottle options — a crisp white, a light red, and something bubbly — and let people pour what they like alongside whatever they grab from the board.
- With a signature cocktail — If wine is not the vibe, a big batch signature cocktail served alongside this board makes the whole setup feel really intentional and special. A sparkling berry mocktail works beautifully if anyone is not drinking.
- For a movie night spread — Lay the board on the coffee table before the movie starts and let everyone graze. It is infinitely better than popcorn and chips, and it makes the whole movie night feel elevated without any extra effort.
Storage tips
Before serving: If you need to build the board in advance, assemble everything except the crackers and cover the board tightly with plastic wrap. Refrigerate for up to 4 hours. Add the crackers right before serving so they stay crisp and do not absorb moisture from the other ingredients.
Leftovers: Leftover charcuterie does not store well as a whole board. Instead, transfer each component separately into airtight containers. Cheeses last up to 5 days in the fridge wrapped tightly. Meats last 3 to 4 days in an airtight container. Fresh fruit is best consumed within a day or two.
The cream cheese dip: Store any leftover dip in an airtight container in the refrigerator for up to 4 days. It actually tastes even better the next day once the flavors have had time to develop. Use it as a spread on toast, a dip for vegetables, or as a base for a quick sandwich.
Do not freeze: None of the components on this board freeze well. The cheeses change texture, the meats lose their quality, and the fresh fruit becomes unusable after freezing.
Before you go
Girls night does not need to be complicated to feel special. Sometimes the best evenings are the ones where the food is easy, the drinks are cold, and nobody had to spend the whole afternoon in the kitchen to make it happen.
This charcuterie board is proof of that. Twenty five minutes of assembly, zero cooking, and a result that makes the whole evening feel like a real occasion. That is the kind of recipe that earns a permanent spot in your entertaining rotation.
Build it once and you will never stress about girls night food again. And when your friends ask how you pulled it off so effortlessly — that is entirely your business. 🙂
With gratitude, Kip.
Girls night charcuterie board ideas (easy, stunning & no cooking required)
Description
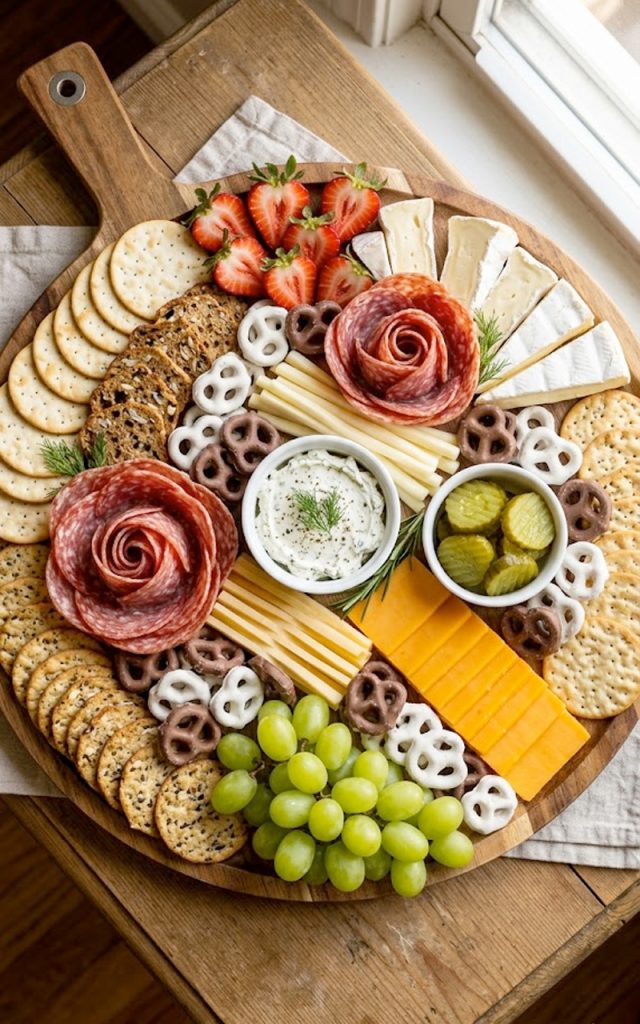
A gorgeous girls night charcuterie board loaded with an irresistible mix of cheeses, salami roses, fresh strawberries and grapes, assorted crackers, pickles, pretzels, and a creamy herbed dip. No cooking required, completely customizable, and so visually stunning that people will think you spent hours putting it together. Spoiler — you didn't.
Ingredients
Cheeses:
Meats:
Crackers:
Fresh fruit:
Extras:
Herbed cream cheese dip:
Instructions
-
Beat cream cheese, sour cream, garlic powder, dried dill, parsley, salt, and pepper together until smooth. Transfer to a small ramekin and sprinkle extra herbs on top.
-
Place the cream cheese dip bowl in the center of your board as the anchor point.
-
Arrange cheeses across the board — fan out brie wedges, layer cheddar rectangles, and tuck in string cheese.
-
Make salami roses by folding slices over a wine glass rim, pressing together, and flipping onto the board. Add remaining meats in folds or flat rounds.
-
Fan crackers along the edges and in spaces between other components, grouping each variety together.
-
Add strawberries, grapes, pickle bowl, and pretzels into remaining spaces.
-
Fill any gaps with extra crackers or fruit. Add cheese knives and toothpicks. Serve immediately.
Note
- Build the board up to 4 hours ahead without the crackers and cover with plastic wrap.
- Add crackers right before serving.
- Leave brie at room temperature for 30 minutes before building for the best texture.
