

I did not grow up in Hawaii, but the first time I tasted Hawaiian guava cake I understood immediately why people who did grow up there talk about it the way they do — with that specific kind of nostalgia that is reserved for food that genuinely shaped them.
It is the kind of cake that is soft and light and fruity in a way that feels almost delicate, and then the cream cheese layer hits and you realize this thing means serious business.
What makes this cake so distinctive is that it does not taste like anything else you have had before. Guava has this floral, tropical sweetness that is completely its own — not quite strawberry, not quite pear, not quite citrus, but somewhere beautifully in between all three.
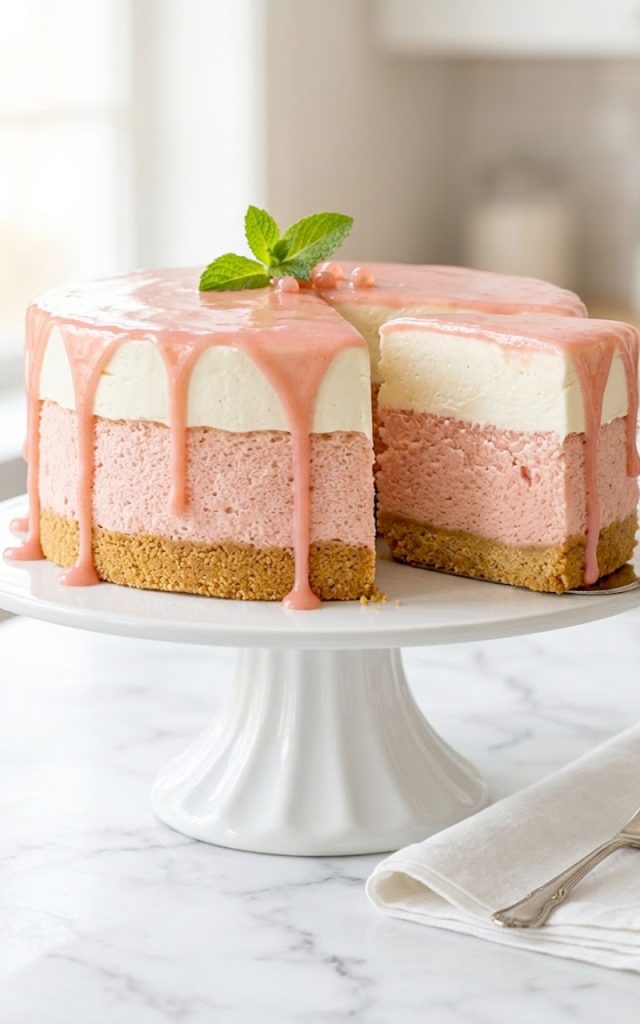
When you bake it into a chiffon cake and then layer it with whipped cream cheese frosting and a glossy guava glaze on top, you get something that looks like it came straight out of a Honolulu bakery case and tastes even better than it looks.
Fair warning — this cake requires a little more patience than your average weeknight bake. But every single step is straightforward, and the result is so worth it. Let’s make something special.
Why you’ll love this recipe
- The flavor is completely unique — floral, fruity, and tropical in a way that no other cake can replicate
- The three distinct layers make for a stunning cross-section that gets a reaction every single time you slice into it
- The chiffon cake base is incredibly light and tender, which balances the richness of the cream cheese layer perfectly
- The glossy guava glaze on top is dead simple to make and gives the cake that professional bakery finish
- It is a make-ahead friendly dessert that actually improves after a night in the fridge
- Whether you are serving it at a birthday, a potluck, or just a regular Sunday — this cake always feels like a celebration
Ingredients with key notes
For the graham cracker base:
- 1 1/2 cups graham cracker crumbs
- 1/4 cup granulated sugar
- 6 tablespoons unsalted butter, melted
For the guava chiffon cake:
- 2 cups all-purpose flour
- 1 1/2 cups granulated sugar, divided
- 1 tablespoon baking powder
- 1/2 teaspoon salt
- 1/2 cup vegetable oil
- 6 large eggs, separated
- 3/4 cup guava juice or guava nectar
- 1 teaspoon vanilla extract
- 1/4 teaspoon cream of tartar
- A few drops of red or pink food coloring (optional, for that signature pink hue)
For the cream cheese frosting layer:
- 16 oz cream cheese, softened to room temperature
- 1 cup powdered sugar, sifted
- 1 teaspoon vanilla extract
- 2 cups heavy whipping cream, cold
For the guava glaze:
- 1 1/2 cups guava juice or guava nectar
- 3 tablespoons cornstarch
- 3 tablespoons granulated sugar
- 1 tablespoon lemon juice
Key notes:
- Guava juice or nectar: This is the backbone of both the cake and the glaze. Look for it in the international foods aisle, Latin grocery stores, or online. Goya and Jumex both make widely available guava nectars that work beautifully here. The flavor of your guava juice directly determines the flavor of your cake, so do not go for the most diluted option you can find.
- Separating eggs: For a proper chiffon cake, you need to separate the eggs carefully. Even a small amount of yolk in your egg whites will prevent them from whipping up properly. Use three separate bowls — one for yolks, one for whites as you separate, and one to transfer the clean whites into. This prevents one broken yolk from ruining the entire batch.
- Cream of tartar: This stabilizes the egg whites and helps them hold their volume. Do not skip it. It is what gives the chiffon cake its signature light and airy structure.
- Cream cheese: It must be fully softened to room temperature before you start. Cold cream cheese will leave lumps in your frosting no matter how long you beat it. Pull it out of the fridge at least an hour before baking.
- Heavy whipping cream: Keep it cold right up until you need it. Cold cream whips up faster and holds its structure better than cream that has been sitting out. Some people even chill their mixing bowl and beaters in the freezer for 10 minutes before whipping.
- Food coloring: Completely optional but it gives the cake that iconic pale pink color you see in traditional Hawaiian guava cake. Start with just 2-3 drops and add more until you reach the shade you want.
- Graham cracker base: This is a departure from some traditional versions but it adds a lovely buttery, slightly crunchy foundation that works beautifully with the soft cake on top. If you prefer a more classic approach, you can skip the base and simply bake the chiffon cake on its own.
Step-by-step instructions
Step 1: Make the graham cracker base
Preheat your oven to 350 degrees F. Grease a 9-inch springform pan and line the bottom with parchment paper. Combine the graham cracker crumbs, sugar, and melted butter in a bowl and mix until the mixture resembles wet sand. Press it firmly and evenly into the bottom of the prepared pan. Bake for 8 minutes until just set. Remove and let cool while you prepare the cake batter.
Step 2: Make the chiffon cake batter
In a large mixing bowl, whisk together the flour, 1 cup of the sugar, baking powder, and salt. Make a well in the center and add the vegetable oil, egg yolks, guava juice, and vanilla extract. Whisk until smooth and well combined. Add a few drops of pink food coloring if using and stir to incorporate. Set aside.
Step 3: Whip the egg whites
In a completely clean, grease-free bowl, beat the egg whites and cream of tartar with a hand mixer or stand mixer on medium speed until foamy. Gradually add the remaining 1/2 cup of sugar and increase the speed to high. Beat until stiff, glossy peaks form — the whites should hold their shape firmly when you lift the beaters. This is the step that gives your chiffon cake its lift and lightness.
Step 4: Fold the egg whites into the batter
Add about one third of the whipped egg whites to the guava batter and fold gently with a rubber spatula to lighten the batter. Add the remaining whites in two more additions, folding carefully each time. Use slow, deliberate strokes — fold from the bottom of the bowl up and over, rotating the bowl as you go. You want to keep as much air in those whites as possible. Stop as soon as no large white streaks remain.
Step 5: Bake the cake
Pour the chiffon batter gently over the cooled graham cracker base in the springform pan. Smooth the top with a spatula. Bake at 350 degrees F for 30-35 minutes until the top is set, lightly golden, and a toothpick inserted in the center comes out clean. The cake will rise significantly in the oven — this is normal. Do not open the oven door during the first 25 minutes. Let the cake cool completely in the pan on a wire rack before adding any toppings — at least 1 hour.
Step 6: Make the cream cheese frosting layer
Beat the softened cream cheese with a hand mixer on medium speed until completely smooth and fluffy, about 2-3 minutes. Add the sifted powdered sugar and vanilla extract and beat until combined. In a separate bowl, whip the cold heavy cream on high speed until stiff peaks form. Gently fold the whipped cream into the cream cheese mixture in two additions until fully incorporated and smooth. The result should be light, airy, and spreadable — not runny.
Step 7: Apply the cream cheese layer
Once the cake is completely cool, spread the cream cheese frosting evenly over the top of the cake in a thick, smooth layer. Use an offset spatula to get it as level as possible. Transfer the cake to the fridge for at least 30 minutes to firm up the frosting before adding the glaze.
Step 8: Make the guava glaze
Whisk together the guava juice, cornstarch, sugar, and lemon juice in a small saucepan until the cornstarch is fully dissolved. Place over medium heat and cook, stirring constantly, until the mixture thickens and turns glossy — about 4-5 minutes. Remove from heat and let the glaze cool to room temperature. It should be pourable but not runny. If it thickens too much, whisk in a tablespoon of warm water to loosen it.
Step 9: Glaze the cake and chill
Pour the cooled guava glaze slowly and evenly over the cream cheese layer, starting from the center and letting it spread naturally to the edges. Use a spatula to guide it gently if needed. Let some of it drip over the sides for that beautiful bakery look. Return the cake to the fridge and chill for at least 2 hours, or overnight, until the glaze is fully set and the layers are firm.
Step 10: Garnish and serve
Remove the cake from the springform pan carefully. Garnish with a dollop of whipped cream, a slice of fresh citrus, and a sprig of fresh mint if you like. Slice with a sharp knife, wiping the blade clean between cuts for those picture-perfect slices. Stand back and accept the compliments.
Serving suggestions
- Serve chilled straight from the fridge — this cake is at its absolute best when cold
- A small scoop of coconut ice cream on the side takes the tropical experience completely over the top
- Garnish each slice with a fresh mint sprig and a small piece of guava candy for an elegant presentation
- Pair with a cold glass of passion fruit iced tea or a tropical fruit punch for a full Hawaiian-themed dessert spread
- Serve alongside fresh sliced mango and pineapple for a simple but stunning tropical fruit platter
- For a more indulgent finish, add a swirl of fresh whipped cream and a drizzle of extra guava glaze right on each individual slice before serving
Storage tips
Refrigerator: Store the cake covered in the fridge for up to 5 days. The flavor and texture actually improve significantly after the first night as the layers settle and meld together. Keep it in the springform pan with a cover or transfer to an airtight cake container.
Freezer: You can freeze this cake either whole or in individual slices. Wrap tightly in plastic wrap, then in foil, and freeze for up to 2 months. Thaw overnight in the refrigerator — never at room temperature, as the cream cheese layer needs to thaw slowly and evenly.
Make-ahead tip: This cake is ideal for making ahead. Bake the chiffon layer and refrigerate it a day before. Apply the cream cheese frosting and glaze the following day. By the time you serve it, everything will be perfectly set and the flavors will have had time to develop fully.
Slicing tip: Always slice with a sharp knife that has been run under hot water and wiped dry between each cut. This gives you clean, precise slices that show off those beautiful distinct layers.
Closing
Hawaiian guava cake is one of those recipes that reminds you why baking is worth the effort. It takes a little more time and care than a simple weeknight dessert, but what comes out of that fridge when it is fully set and sliced is genuinely something special. Floral, fruity, creamy, and light all at once — this is the kind of cake that creates memories.
Make it for someone you love, bring it to your next gathering, or honestly just make it for yourself on a weekend when you feel like treating yourself to something extraordinary. You deserve it. And when you do make it, drop a comment below and let Kip know how it turned out.
With gratitude, Kip.
Hawaiian guava cake — the stunning tropical dessert that tastes like a vacation in every slice
Description
Hawaiian guava cake is one of those desserts that stops people in their tracks the moment it hits the table. A light, tender pink guava-infused chiffon cake sits on a buttery graham cracker base, topped with a thick layer of whipped cream cheese frosting and finished with a gorgeous glossy guava glaze that drips down the sides. It is floral, fruity, creamy, and completely unforgettable. This is the cake you bring to a gathering when you want everyone asking for the recipe before they have even finished their slice.
Ingredients
For the graham cracker base:
For the guava chiffon cake:
For the cream cheese frosting:
For the guava glaze:
Instructions
-
Preheat oven to 350 degrees F. Mix graham cracker crumbs, sugar, and melted butter. Press into a lined 9-inch springform pan. Bake for 8 minutes. Cool completely.
-
Whisk flour, 1 cup sugar, baking powder, and salt. Add oil, egg yolks, guava juice, and vanilla. Mix until smooth. Add food coloring if using.
-
Beat egg whites and cream of tartar until foamy. Gradually add remaining 1/2 cup sugar and beat to stiff glossy peaks.
-
Fold egg whites into the batter in three additions. Pour over the cooled graham cracker base.
-
Bake for 30-35 minutes until set and a toothpick comes out clean. Cool completely in the pan.
-
Beat cream cheese until smooth. Add powdered sugar and vanilla. Fold in separately whipped heavy cream. Spread over cooled cake. Chill for 30 minutes.
-
Whisk guava juice, cornstarch, sugar, and lemon juice in a saucepan over medium heat until thickened and glossy. Cool to room temperature.
-
Pour glaze over cream cheese layer. Chill for at least 2 hours until fully set.
-
Remove from pan, garnish, slice, and serve cold.
