

There are certain things I always keep stocked in my kitchen — good olive oil, a block of parmesan, hot sauce, and this pickled cucumber, onion and pepper salad. Always this salad. It sits right at the front of my fridge like it pays rent, and honestly, it earns its spot every single time.
I stumbled onto this recipe during a summer when I had way too many cucumbers from a little garden experiment that got slightly out of hand. I needed something that would use them up fast, keep well, and actually taste good after a few days in the fridge. This salad checked every single box — and then some.
What I didn’t expect was how addictive it would become. The brine does something almost magical to these vegetables. The cucumbers stay crisp, the onions mellow out beautifully, and those colorful peppers soak up all that tangy goodness and just pop with flavor. It gets better every single day it sits. FYI — if you’ve never made refrigerator pickles before, this is the perfect place to start.
Why you’ll love this recipe
- Zero cooking required. No stove, no oven, no heat whatsoever. You slice, you mix, you jar, you wait. That’s the whole process.
- It gets better with time. Most recipes peak right after cooking. This one actually improves every day it sits in the fridge. Day three is genuinely unreal.
- It goes with absolutely everything. Grilled chicken, fish tacos, burgers, sandwiches, rice bowls — this salad makes everything taste more alive.
- It’s incredibly healthy. Low in calories, packed with vitamins, naturally vegan and gluten free. You can eat a generous portion and feel completely good about it.
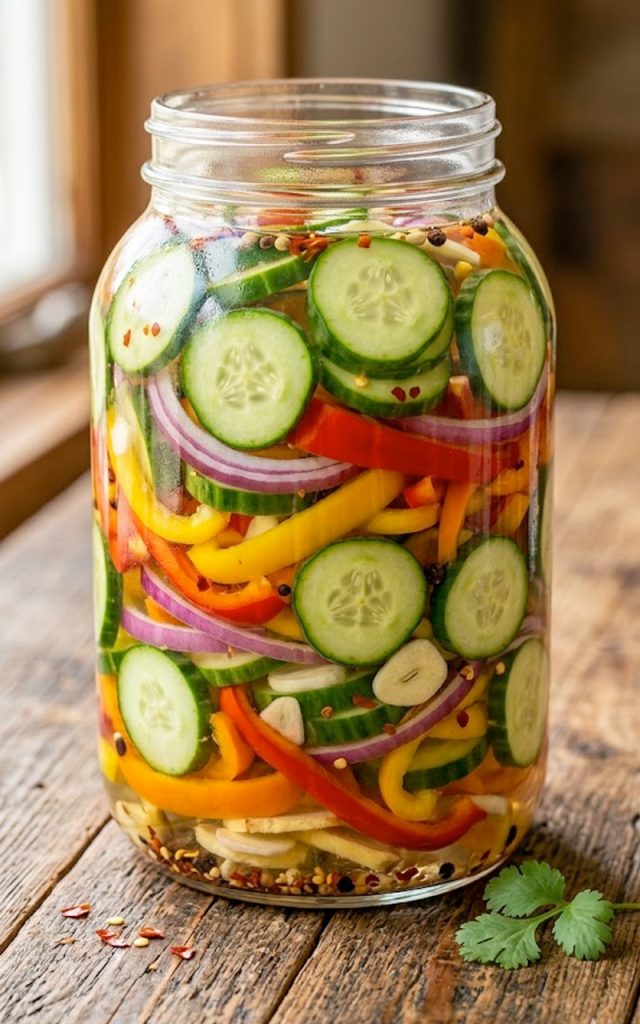
- The color alone is stunning. Red, yellow, orange, and green peppers with purple onion and bright green cucumber — this jar is genuinely beautiful sitting on your counter or table.
- It’s budget friendly. The whole jar costs somewhere between five and eight dollars to make, and it feeds a crowd all week long.
Ingredients with key notes
The vegetables
- 2 large cucumbers, thinly sliced — English cucumbers work best here because they have fewer seeds and thinner skin. Regular cucumbers work too — just peel them first if the skin feels tough. Slice them about 1/4 inch thick for the best texture. Too thin and they go soft, too thick and the brine doesn’t penetrate well.
- 1 medium red onion, thinly sliced into rings — Red onion is the move here. It adds color, a little sharpness, and it mellows beautifully in the brine overnight. White onion works as a substitute but won’t give you that gorgeous purple hue.
- 1 cup mixed bell peppers, sliced — Use as many colors as you can find — red, yellow, orange, green. Each one brings a slightly different sweetness and the mix makes this salad visually stunning. Slice them into thin strips so they absorb the brine evenly.
- 1 small green chili or red chili, thinly sliced — Optional, but highly recommended if you want a subtle heat running through the whole jar. Remove the seeds if you want the flavor without the fire.
- Fresh herbs — A small handful of fresh dill or flat-leaf parsley adds a nice brightness. Completely optional but worth it if you have them on hand.
The brine
- 1 cup white vinegar — This is your base. White vinegar gives you a clean, sharp tang. Apple cider vinegar works beautifully too and adds a slightly sweeter, more complex flavor. Rice vinegar is a milder option if you prefer less sharpness.
- 1 cup water
- 2 tbsp granulated sugar — This balances the acidity of the vinegar. You can reduce it slightly if you prefer a more tart brine, or increase it for a sweeter pickle.
- 1 tsp salt — Use kosher salt or sea salt for the cleanest flavor. Avoid iodized table salt — it can make the brine slightly cloudy and affect the taste.
- 1/2 tsp black pepper
- 1/2 tsp red pepper flakes — Optional, but they add a beautiful warmth and look great in the jar.
Optional add-ins
- 1/2 tsp mustard seeds — Adds a classic pickle flavor that takes this to another level.
- 2 garlic cloves, thinly sliced — If you love garlic (and honestly, who doesn’t), throw a couple of sliced cloves in the jar. They pickle beautifully and infuse the whole brine with a mellow garlic flavor.
- 1/2 tsp dried oregano — Works particularly well if you plan to serve this alongside Mediterranean-style dishes.
Step-by-step instructions
Step 1: Slice all the vegetables
Wash and dry all your vegetables thoroughly. Slice the cucumbers into rounds about 1/4 inch thick — use a mandoline if you have one for perfectly even slices, but a sharp knife works just fine. Slice the red onion into thin rings and the bell peppers into thin strips. If you’re using chili, slice it as thinly as possible. Set everything aside in a large bowl.
Step 2: Make the brine
Combine the white vinegar, water, sugar, salt, black pepper, and red pepper flakes in a small bowl or measuring jug. Whisk everything together until the sugar and salt dissolve completely. Taste it — it should be tangy, slightly sweet, and a little salty. Adjust the sugar or salt to your preference at this point. You want to get the brine right before it goes into the jar.
Step 3: Combine the vegetables
Add the sliced cucumbers, onion rings, and bell pepper strips into a large clean jar or an airtight container. Layer them in rather than just dumping everything at once — this gives you a more even distribution of vegetables and looks great through the glass. If you’re adding garlic, mustard seeds, or fresh herbs, tuck them in between the layers as you go.
Step 4: Pour the brine
Pour the brine over the vegetables slowly, making sure everything gets submerged. Press the vegetables down gently with a spoon if needed to make sure they’re fully covered by the brine. If you run short on brine, mix a quick extra batch using the same ratios and top it off. Put the lid on tightly.
Step 5: Refrigerate and let it rest
Here’s the only hard part — waiting. Refrigerate the jar for at least 1 hour before serving. Honestly though, overnight is where the magic really happens. The longer it sits, the deeper the flavor gets. Give the jar a gentle shake or stir before serving to redistribute everything.
Serving suggestions
This pickled salad is one of those rare sides that genuinely works with almost anything. Here are some of my favorite ways to use it:
- Alongside grilled meats — Grilled chicken, steak, or pork chops benefit enormously from the bright acidity of this salad cutting through the richness.
- On top of tacos or burgers — Spoon it directly onto your tacos or burgers instead of regular pickles. It adds crunch, color, and so much more flavor than a plain pickle slice.
- With rice and protein bowls — Add a generous spoonful over a simple rice bowl with grilled chicken or tofu and you’ve instantly elevated a basic meal.
- As part of a charcuterie or snack board — The colorful jar looks stunning on a board alongside cheeses, crackers, and cured meats.
- Straight from the jar — I’m just going to be honest with you here. Sometimes I stand at the fridge and eat it with a fork directly from the jar. Zero regrets.
Storage tips
In the fridge: Store the salad in a sealed jar or airtight container in the refrigerator for up to 1 week. The flavor actually peaks around day 2 or 3, so don’t be afraid to make a big batch at the start of the week.
Keep it submerged: Make sure the vegetables stay submerged in the brine at all times. If anything starts poking above the liquid, press it back down or add a little extra brine to cover it.
Do not freeze: Freezing will destroy the texture of the cucumbers and peppers completely. This one is fridge only.
Use a clean utensil every time: Always use a clean fork or spoon when serving from the jar. Introducing bacteria from a used utensil will shorten the shelf life significantly.
Glass is best: Store this in a glass jar if possible. Plastic containers can absorb the vinegar smell over time and may affect the flavor slightly.
A jar worth making every single week
I know I called this a salad, but honestly it functions more like a condiment that happens to be a side dish. It makes boring meals interesting, it adds a punch of color to any plate, and it takes less than 15 minutes of actual work to put together.
The hardest part of this whole recipe is waiting for it to chill. And even that is worth it, IMO. Make a big jar on Sunday and thank yourself every single day that week when you open the fridge and it’s just sitting there, ready to make whatever you’re eating better.
Give it a try and let me know what you end up pairing it with — I’m always curious to hear how people use it. And if you went rogue and threw in some extra garlic or mustard seeds, I respect the creativity. That’s exactly the kind of cook I want you to be.
With gratitude, Kip.
Pickled Cucumber, Onion and Pepper Salad You’ll Want to Keep in Your Fridge All Week
Description
A vibrant, no-cook pickled salad packed with crisp cucumber slices, sweet onion rings, and colorful bell peppers all soaked in a simple tangy brine. This is the kind of side dish that makes everything else on the table taste better.
Ingredients
The vegetables:
The brine:
Optional add-ins:
Instructions
-
Slice all vegetables — cucumbers into 1/4 inch rounds, onion into rings, peppers into thin strips.
-
Whisk together vinegar, water, sugar, salt, black pepper, and red pepper flakes until sugar and salt dissolve completely.
-
Layer the vegetables into a clean jar or airtight container, tucking in any optional add-ins between the layers.
-
Pour the brine over the vegetables, pressing them down to ensure everything is fully submerged.
-
Seal the jar and refrigerate for at least 1 hour. Overnight is strongly recommended for the best flavor.
-
Give the jar a gentle shake before serving and enjoy.
Note
- English cucumbers are preferred for their thinner skin and fewer seeds.
- Apple cider vinegar is a great substitute for white vinegar and adds a slightly sweeter flavor.
- Avoid iodized table salt — it can cloud the brine and affect taste.
- The salad keeps for up to 1 week in the fridge and tastes best on day 2 or 3.
- Always use a clean utensil when serving to extend shelf life.
