

There is always that one dish at every potluck or family gathering that quietly disappears before anything else on the table. Nobody makes a big announcement about it. It just gets eaten, completely and without apology, while the fancier dishes sit half full. This spring pea salad is that dish. Every single time.
I first had a version of this at a church potluck years ago and spent the rest of the afternoon trying to figure out who made it so I could get the recipe. It turned out to be one of those deceptively simple combinations that somehow adds up to way more than the ingredients suggest.
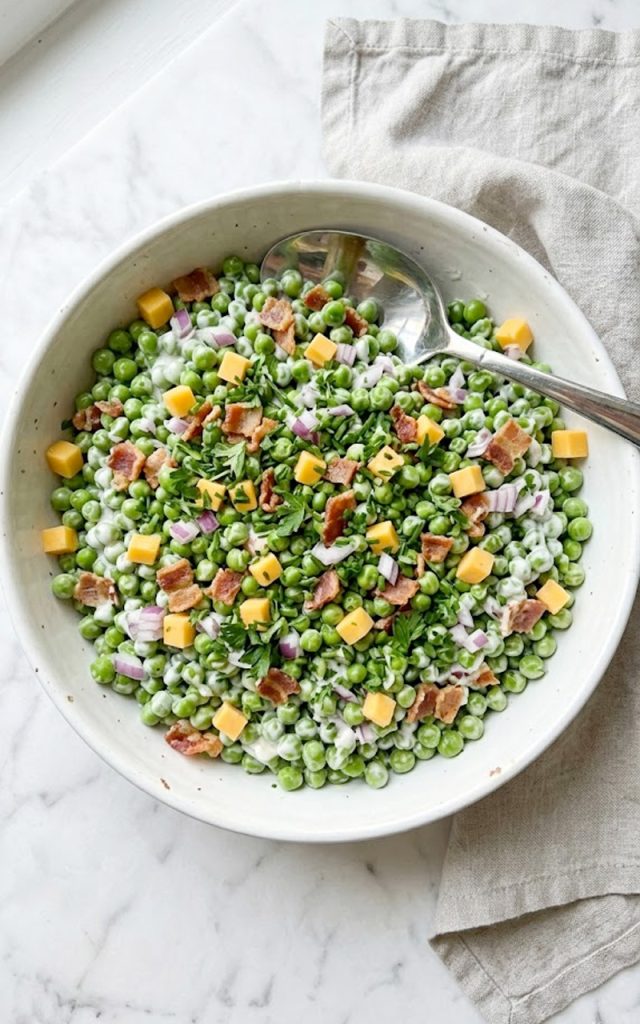
Sweet green peas, crispy bacon, sharp cheddar, red onion, fresh herbs, and a creamy tangy dressing that coats everything perfectly. Ten minutes to put together and somehow tasting like something that took much longer.
The best part about this salad is that it actually gets better as it sits. Make it in the morning, let it chill in the fridge, and by the time lunch or dinner rolls around the flavors have melded into something genuinely special. This is the kind of recipe that earns a permanent spot in your warm weather rotation and stays there because it never lets you down.
Why you’ll love this recipe
- It takes 10 minutes to put together. There is almost no prep involved. You thaw the peas, cook the bacon, dice a few things, whisk a dressing, and toss everything together. That is genuinely it. This is one of those recipes where the result is wildly disproportionate to the effort.
- It is the definition of a crowd pleaser. Sweet peas, bacon, and cheese are a combination that pretty much everybody loves. This salad has never once been turned down at any gathering I have brought it to. Not once.
- It gets better as it chills. Unlike salads that wilt and suffer in the fridge, this one improves with time. The dressing soaks into the peas, the flavors meld together, and the whole thing becomes more cohesive and delicious after an hour in the fridge. Making it ahead is not just convenient, it is actually the right move.
- The creamy tangy dressing is perfectly balanced. It is rich enough to coat everything well but the apple cider vinegar keeps it from feeling heavy. The touch of honey rounds out the sharpness and pulls the whole dressing together in a way that makes you want to keep eating.
- It works for everything. Backyard barbecues, Easter brunches, weekday lunches, potlucks, holiday side dishes. This salad fits every occasion and never feels out of place.
- It is naturally gluten free. No substitutions needed. Every ingredient in this recipe is naturally gluten free, which makes it a reliable option when you are cooking for a group with mixed dietary needs.
Ingredients with key notes
For the pea salad:
- 4 cups frozen sweet peas, thawed (do not use canned)
- 6 strips bacon, cooked until crispy and crumbled
- 1 and 1/2 cups sharp cheddar cheese, diced into small cubes
- 1/2 medium red onion, finely diced
- 3 tablespoons fresh parsley, finely chopped
- 2 tablespoons fresh chives, finely sliced
For the creamy dressing:
- 1/2 cup mayonnaise
- 1/4 cup sour cream
- 1 tablespoon apple cider vinegar
- 1 teaspoon honey
- 1/2 teaspoon garlic powder
- 1/2 teaspoon onion powder
- 1/2 teaspoon dried dill
- Salt and black pepper to taste
Key notes:
- Frozen peas, not canned: This is the most important ingredient decision in the recipe. Frozen peas are sweet, tender, and bright green. Canned peas are mushy, dull in color, and have a tinny flavor that will drag the whole salad down. Always use frozen peas, thawed properly. To thaw, place them in a colander and run cold water over them for a couple of minutes, then pat completely dry. Excess water dilutes the dressing and makes the salad watery.
- Pat the peas dry: After thawing, take the time to really pat the peas dry with paper towels or spread them on a clean kitchen towel for a few minutes. This step makes a meaningful difference in the final texture and prevents the dressing from getting watery.
- Sharp cheddar diced, not shredded: Diced cheddar gives you little pockets of cheese flavor throughout the salad that shredded cheese cannot replicate. The cubes hold their shape, add satisfying texture, and look better in the bowl. Go sharp rather than mild for a more pronounced cheese flavor that stands up to the other ingredients.
- Crispy bacon: The bacon needs to be genuinely crispy here, not just cooked through. Soft or chewy bacon will go completely limp once it hits the dressing and lose all its textural contrast. Cook it until it is deeply browned and snaps when you break it. If you are making this ahead, keep the bacon separate and add it right before serving to maintain the crunch.
- Red onion: Finely diced red onion adds a sharp, punchy bite that balances the sweetness of the peas and the richness of the dressing beautifully. If raw onion is too strong for your taste, soak the diced onion in cold water for 10 minutes before adding it. This takes the edge off significantly without losing the flavor entirely.
- Apple cider vinegar in the dressing: This is what stops the dressing from feeling heavy. The acidity cuts through the mayonnaise and sour cream, adds a subtle tang, and brightens all the other flavors. White wine vinegar works as a substitute but apple cider vinegar has a slightly rounder, fruitier quality that works better here.
- Dried dill in the dressing: Dill and peas are one of those classic flavor combinations that exists for a very good reason. The dill adds a subtle herby freshness to the dressing that ties all the flavors together. Fresh dill works beautifully here too if you have it. Use about a tablespoon of fresh dill in place of the half teaspoon of dried.
Step-by-step instructions
Step 1: Thaw and dry the peas
Place the frozen peas in a colander and run cold water over them for 2 to 3 minutes until fully thawed. Shake well to remove excess water, then spread them on a clean kitchen towel or paper towels and pat them dry as thoroughly as possible. This step is more important than it sounds. Wet peas make a watery salad and a watery salad is a sad salad.
Step 2: Cook the bacon
Cook the bacon strips in a skillet over medium heat until deeply golden and crispy, turning occasionally. This usually takes about 8 to 10 minutes depending on the thickness of your bacon. Transfer to a paper towel lined plate to drain and cool. Once cool, crumble or roughly chop into bite-sized pieces. If you are making this salad ahead of time, store the bacon separately and add it right before serving to keep it crispy.
Step 3: Prep the remaining ingredients
While the bacon cooks and cools, dice the sharp cheddar into small uniform cubes, finely dice the red onion, chop the fresh parsley, and slice the chives. Having everything prepped and ready before you make the dressing means the salad comes together in seconds.
Step 4: Make the creamy dressing
In a small bowl, whisk together the mayonnaise, sour cream, apple cider vinegar, honey, garlic powder, onion powder, and dried dill until smooth and fully combined. Season with salt and black pepper to taste. Give it a taste and adjust. More vinegar if you want more tang, more honey if you want it slightly sweeter, more salt if it needs lifting.
Step 5: Combine the salad
Add the thawed and dried peas to a large mixing bowl. Add the diced cheddar, finely diced red onion, fresh parsley, and chives. Pour the creamy dressing over everything and toss gently until all the ingredients are evenly coated. You want every pea to have a good coating of dressing without completely drowning the salad. Start with three quarters of the dressing and add more as needed.
Step 6: Add the bacon and chill
If you are serving immediately, add the crumbled bacon now and toss once more. If you are making this ahead, cover the bowl and refrigerate without the bacon, then add the bacon right before serving. Either way, the salad benefits from at least 30 minutes in the fridge before serving. The flavors come together and the dressing settles into a more cohesive coating. An hour is even better.
Serving suggestions
This cold pea salad is one of the most versatile side dishes you can have in your recipe arsenal.
- Alongside grilled meats at a barbecue: This salad is a natural partner for grilled burgers, hot dogs, grilled chicken, or ribs. The cool, creamy, tangy salad is a perfect counterpoint to smoky, charred meat fresh off the grill.
- At an Easter or spring brunch table: The bright green color and fresh flavor make this salad a beautiful addition to any spring celebration spread. It sits happily alongside deviled eggs, ham, and other classic brunch dishes without competing with any of them.
- As part of a deli-style lunch spread: Serve it alongside some deli meats, good bread, and a few other cold salads for an easy, crowd-pleasing lunch setup that feels intentional and well thought out.
- Stuffed into a sandwich or wrap: Spoon a generous amount of pea salad into a toasted hoagie roll or a large flour tortilla with some sliced turkey or chicken for a lunch that is way more interesting than your average sandwich.
- As a standalone light lunch: Served in a bowl with a few extra crackers on the side, this salad is filling enough to stand alone as a light lunch. The protein from the bacon and cheese makes it more satisfying than it looks.
- At a potluck or picnic: This salad travels beautifully. It holds up well in a cold cooler, does not wilt or degrade quickly, and feeds a crowd without breaking the bank. It is the kind of dish that earns you a reputation as someone who always brings something good.
Storage tips
Refrigerator: Store the pea salad in an airtight container in the fridge for up to 3 days. The flavors actually improve on day two as everything melds together more fully. Give it a gentle toss before serving and taste for seasoning as the dressing can absorb into the peas and the salad may need a little extra salt or a splash of vinegar to brighten it back up.
Bacon tip: For the crispiest results over multiple days, store the crumbled bacon separately in a small airtight container or zip lock bag at room temperature and add it fresh each time you serve the salad. Bacon stored in the dressed salad goes soft within a few hours and loses all its textural appeal.
Make-ahead tip: This salad is an ideal make-ahead dish. You can make the entire salad up to a day in advance, keep the bacon separate, and refrigerate overnight. The next day the flavors are perfectly developed and all you have to do is add the bacon and serve. It is genuinely one of the best potluck strategies there is.
Freezer: This salad does not freeze well. Peas hold up to freezing on their own but once they are dressed and combined with mayonnaise and sour cream, the texture and consistency break down completely when frozen and thawed. Keep it fresh and refrigerated only.
Best practice: If you notice the dressing has thinned out slightly after sitting in the fridge, which can happen as the peas release a little moisture, stir in an extra tablespoon of mayonnaise to bring the consistency back to where you want it.
Let’s wrap this up
Some recipes earn their place in your life not because they are complicated or impressive in a technical sense but because they are reliably, consistently, quietly excellent. This spring pea salad is exactly that kind of recipe. It shows up, it delivers, and it never once disappoints.
Ten minutes of prep, a short rest in the fridge, and you have a cold salad that people genuinely get excited about. That is the sweet spot I am always chasing in the kitchen and this one hits it every time without breaking a sweat.
Make it this weekend, bring it somewhere, and watch how fast it disappears. Then come back here and make it again the following week because once is never enough with this one 🙂
With gratitude, Kip.
Best spring pea salad – the simple cold deli-style salad everyone asks for the recipe
Description
This spring pea salad is a classic cold deli-style salad built on a foundation of sweet tender green peas, crumbled crispy bacon, diced sharp cheddar cheese, finely diced red onion, and fresh herbs, all brought together with a creamy tangy dressing made from mayonnaise, sour cream, apple cider vinegar, and a touch of honey. It is simple, satisfying, and one of those recipes that consistently gets more compliments than dishes that took ten times longer to make.
Ingredients
Pea salad:
Creamy dressing:
Instructions
-
Thaw peas under cold running water. Pat completely dry with paper towels.
-
Cook bacon until deeply crispy. Drain and crumble. Set aside.
-
Dice cheddar, finely dice red onion, chop parsley, and slice chives.
-
Whisk all dressing ingredients together until smooth. Season to taste.
-
Combine peas, cheddar, red onion, parsley, and chives in a large bowl. Pour dressing over and toss to coat evenly.
-
Add crumbled bacon and toss once more. Refrigerate at least 30 minutes before serving for best flavor.
Note
- Pat peas completely dry before dressing.
- Store bacon separately if making ahead to keep it crispy.
- Salad keeps well in the fridge for up to 3 days.
